Windows Server 2012 – Configure DHCP for Failover

DHCP failover overview

In Windows Server® 2008 R2, there are two high availability options available for DHCP Server deployment. Each of these options is associated with some challenges.

  1. DHCP in a Windows failover cluster. This option places the DHCP server in a cluster with an additional server configured with the DHCP service that assumes the load if the primary DHCP server fails. The clustering deployment option uses a single shared storage. This makes the storage a single point of failure, and requires additional investment in redundancy for storage. In addition, clustering involves relatively complex setup and maintenance.
  2. Split scope DHCP. Split scope DHCP uses two independent DHCP servers that share responsibility for a scope. Typically 70% of the addresses in the scope are assigned to the primary server and the remaining 30% are assigned to the backup server. If clients cannot reach the primary server then they can get an IP configuration from the secondary server. Split scope deployment does not provide IP address continuity and is unusable in scenarios where the scope is already running at high utilization of address space, which is very common with Internet Protocol version 4 (IPv4).

DHCP failover in Windows Server 2012 enables administrators to deploy a highly resilient DHCP service to support a large enterprise without the challenges of the options discussed earlier. The main goals of the feature are the following:

  • Provide DHCP service availability at all times on the enterprise network.
  • If a DHCP server is no longer reachable, the DHCP client is able to extend the lease on its current IP address by contacting another DHCP server on the enterprise network.

The DHCP server failover feature provides the ability to have two DHCP servers provide IP addresses and option configuration to the same subnet or scope, providing for continuous availability of DHCP service to clients. The two DHCP servers replicate lease information between them, allowing one server to assume responsibility for servicing of clients for the entire subnet when the other server is unavailable. It is also possible to configure failover in a load-balancing configuration with client requests distributed between the two servers in a failover relationship.

DHCP failover in Windows Server 2012 provides support for a maximum of two DHCP servers, and the failover relationship is limited to IPv4 scopes and subnets. Network nodes using Internet Protocol version 6 (IPv6) typically determine their own IPv6 address using stateless IP auto configuration. In this mode, the DHCP server delivers only the DHCP option configuration, and the server does not maintain any lease state information. A high availability deployment for stateless DHCPv6 is possible by simply setting up two servers with identical option configuration. Even in a stateful DHCPv6 deployment, the scopes do not run under high address utilization, which makes split scope a viable solution for high availability.

DHCP failover architecture

Administrators can deploy DHCP servers running Windows Server 2012 as failover partners in either hot standby mode or load sharing mode.

Hot standby mode

In hot standby mode, two servers operate in a failover relationship where an active server is responsible for leasing IP addresses and configuration information to all clients in a scope or subnet. The secondary server assumes this responsibility if the primary server becomes unavailable. A server is primary or secondary in the context of a subnet. For instance, a server that has the role of a primary for a given subnet could be a secondary server for another subnet.

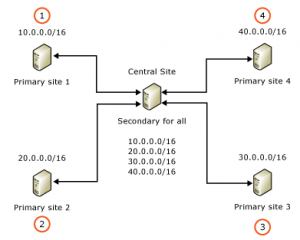
Hot standby mode of operation is best suited to deployments where a central office or data center server acts as a standby backup server to a server at a remote site, which is local to the DHCP clients (ex: hub and spoke deployment). In such deployments, it is undesirable to have a remote standby server service any clients unless the local DHCP server becomes unavailable. The figure below is an example of a hub and spoke deployment.

Load sharing mode

In a load sharing mode deployment, which is the default mode of operation, the two servers simultaneously serve IP addresses and options to clients on a given subnet. The client requests are load balanced and shared between the two servers.

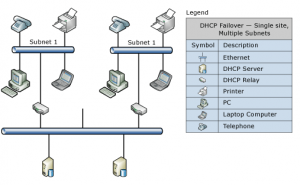
The load sharing mode of operation is best suited to deployments where both servers in a failover relationship are located at the same physical site. Both servers respond to DHCP client requests based on the load distribution ratio configured by the administrator. See the following example.

Load sharing in a single site with multiple subnets

In the following example, two DHCP servers simultaneously provide IP addressing to clients on multiple subnets.


for more information and setting up an DHCP failover, see: http://technet.microsoft.com/en-us/library/hh831385.aspx
 

IBM Storage replace Disk

If you replace a disk in an IBM Storage, such as a DS4700 and the disk is not rebuilding and is instead a new disk. You can set the disk as a replacement disk with the following command:

replace drive [85,12] replacementDrive=85,12;


To put the hot spare which was in use back to a hot spare, use the following command:

set drive [0,1] hotSpare=TRUE


This can be done in the Main storage manager view. Highlight the system, right mouse click and choose “Execute Script …”. Put in the commands and select “Tools” –> “Verify and Execute”.

Your initial lun will rebuild and your hot spare will fall back to the hot spare.


Get Server Uptime Using WMI

Retrieve Server Uptime

Uses the WMI to pull system uptime with WMI timeouts, it will useful when remote WMI not responding.

I have used it for a few hundred servers and it works fine. The initial test-connection uses only 1 ping, so that it can go through a large list of servers very easily.

If you found any bug then report to [email protected]

# Writer = Ritesh Parab; fb.com\parab.ritesh   
# File Name = Get-uptime 1.2 
# WMI Query time function added {Thanks to Technet forum} 

cls                                              
$erroractionpreference = "SilentlyContinue" 
# Helper Function - convert WMI date to TimeDate object 
function WMIDateStringToDate($Bootup) { 
 [System.Management.ManagementDateTimeconverter]::ToDateTime($Bootup) 
} 

# Main script 
$Computer = Get-Content "c:\Servers.txt" 

foreach ($system in $Computer) { 
$rtn = Test-Connection -ComputerName $system -Count 1 -BufferSize 16 -Quiet 
         IF($rtn -match 'True') { 
        $NameSpace = "Root\CIMV2" 
        $wmi = [WMISearcher]"" 
         $wmi.options.timeout = '0:0:15' #set timeout to 10 seconds 
         $query = 'Select * from Win32_OperatingSystem' 
         $wmi.scope.path = "\\$system\$NameSpace" 
         $wmi.query = $query 
          Try{ 
          $wmiresult = $wmi.Get() 
          #    $wmiresult 
            foreach ($wmioutput in $wmiresult){ 
               $Bootup = $wmioutput.LastBootUpTime 
               $LastBootUpTime = WMIDateStringToDate($Bootup) 
               $now = Get-Date 
               $Uptime = $now - $lastBootUpTime 
               $d = $Uptime.Days 
               $h = $Uptime.Hours 
               $m = $uptime.Minutes 
               $ms= $uptime.Milliseconds 
               $a = "$System Up for: {0} days, {1} hours, {2}.{3} minutes" -f $d,$h,$m,$ms 
               Write-Host "$a" -ForegroundColor Green 
                 } 
              } 
        Catch { 
                  Write-host "WMI not available on : $System" -ForegroundColor Red 
                Write-Output "WMI failed on $system because : $_" | Out-File "d:\failed.txt" -Force -Append  
          } 
        } 
        else{ 
            write-host "$system Offline" -ForegroundColor DarkRed 
            Write-Output "$system Offline" | Out-File 'd:\wintech\Get-Uptime\failed.txt' -Force -Append  
        } 
    }

http://gallery.technet.microsoft.com/scriptcenter/Get-Server-Uptime-Using-WMI-15aaa8ac

Determine when each user in the domain last logged on.

Run the following powershell script to determine the last logon date from the AD users.

Output will be written to c:\users.txt

# PSLastLogon.ps1
# PowerShell script to determine when each user in the domain last
# logged on.
#
# ----------------------------------------------------------------------
# Copyright (c) 2011 Richard L. Mueller
# Hilltop Lab web site - http://www.rlmueller.net
# Version 1.0 - March 16, 2011
#
# This program queries every Domain Controller in the domain to find the
# largest (latest) value of the lastLogon attribute for each user. The
# last logon dates for each user are converted into local time. The
# times are adjusted for daylight savings time, as presently configured.
#
# You have a royalty-free right to use, modify, reproduce, and
# distribute this script file in any way you find useful, provided that
# you agree that the copyright owner above has no warranty, obligations,
# or liability for such use.

Trap {"Error: $_"; Break;}
$file = "c:\users.txt"
$D = [System.DirectoryServices.ActiveDirectory.Domain]::GetCurrentDomain()
$Domain = [ADSI]"LDAP://$D"
$Searcher = New-Object System.DirectoryServices.DirectorySearcher
$Searcher.PageSize = 200
$Searcher.SearchScope = "subtree"

$Searcher.Filter = "(&(objectCategory=person)(objectClass=user))"
$Searcher.PropertiesToLoad.Add("distinguishedName") > $Null
$Searcher.PropertiesToLoad.Add("lastLogon") > $Null

# Create hash table of users and their last logon dates.
$arrUsers = @{}

# Enumerate all Domain Controllers.
ForEach ($DC In $D.DomainControllers)
{
    $Server = $DC.Name
    $Searcher.SearchRoot = "LDAP://$Server/" + $Domain.distinguishedName
    $Results = $Searcher.FindAll()
    ForEach ($Result In $Results)
    {
        $DN = $Result.Properties.Item("distinguishedName")
        $LL = $Result.Properties.Item("lastLogon")
        If ($LL.Count -eq 0)
        {
            $Last = [DateTime]0
        }
        Else
        {
            $Last = [DateTime]$LL.Item(0)
        }
        If ($Last -eq 0)
        {
            $LastLogon = $Last.AddYears(1600)
        }
        Else
        {
            $LastLogon = $Last.AddYears(1600).ToLocalTime()
        }
        If ($arrUsers.ContainsKey("$DN"))
        {
            If ($LastLogon -gt $arrUsers["$DN"])
            {
                $arrUsers["$DN"] = $LastLogon
            }
        }
        Else
        {
            $arrUsers.Add("$DN", $LastLogon)
        }
    }
}

# Output latest last logon date for each user.
$Users = $arrUsers.Keys
ForEach ($DN In $Users)
{
    $Date = $arrUsers["$DN"]
    "$DN;$Date" | Out-File $file -Append
}

Original script (without export to file) from: http://www.rlmueller.net/PowerShell/PSLastLogon.txt

Configuring DNS for a KMS host

If you have multiple KMS servers in your domain, or want to add an other KMS server from outside the domain, just ad an SRV entry in your DNS.

Name Setting
Name _vlmcs._tcp
Type SRV
Priority 0
Weight 0
Port 1688
Hostname FQDN of KMS Host

With the priority you can add a preferred server. If you choose a higher number for the kms record, this record comes after the record with “0”.


Source: http://technet.microsoft.com/en-us/library/ff793405.aspx