Windows 7: Windows cannot connect to the printer 0x0000007e

The problem occures because HP uses a 32 bit path to a file in the printer queue. The x64 client cannot resolve this location and the printer installation fails.

printer


Log on to the print server. Make sure that the 64bit driver is installed on the server. Delete the BIDI key in the register:

[HKEY_LOCAL_MACHINE\SOFTWARE\Microsoft\Windows NT\CurrentVersion\Print\Printers\PRINTERNAME\CopyFiles\BIDI

The printer can be installed now without errors.


references:

http://social.technet.microsoft.com/Forums/windowsserver/en-US/6c68f4d3-fa4c-4986-9567-bbe89551652f/windows-7-windows-cannot-connect-to-the-printer-0x0000007e

http://cloudsurvivalguide.com/error-0x0000007e-adding-printer-hp-universal-print-driver/

Report DHCP Scope Settings using Powershell

Source: http://www.rivnet.ro/2013/06/report-dhcp-scope-settings-using-powershell.html


A script to export information from all authorized DHCP servers in the Active directory. It will export the following information to a csv file:

DHCPServer name, Scope Name, Subnet defined, Start and End Ranges, Lease Times, Description, DNS Server, Gateway


import-module DHCPServer
#Get all Authorized DCs from AD configuration
$DHCPs = Get-DhcpServerInDC
$filename = "d:\backup\dhcp\DHCPScopes_DNS_$(get-date -Uformat "%Y%m%d-%H%M%S").csv"

$Report = @()
$k = $null
write-host -foregroundcolor Green "`n`n`n`n`n`n`n`n`n"
foreach ($dhcp in $DHCPs) {
    $k++
    Write-Progress -activity "Getting DHCP scopes:" -status "Percent Done: " `
    -PercentComplete (($k / $DHCPs.Count)  * 100) -CurrentOperation "Now processing $($dhcp.DNSName)"
    $scopes = $null
    $scopes = (Get-DhcpServerv4Scope -ComputerName $dhcp.DNSName -ErrorAction:SilentlyContinue)
    If ($scopes -ne $null) {
        #getting global DNS settings, in case scopes are configured to inherit these settings
        $GlobalDNSList = $null
        $GlobalDNSList = (Get-DhcpServerv4OptionValue -OptionId 6 -ComputerName $dhcp.DNSName -ErrorAction:SilentlyContinue).Value
        $scopes | % {
            $row = "" | select Hostname,ScopeID,SubnetMask,Name,State,StartRange,EndRange,LeaseDuration,Description,DNS1,DNS2,DNS3,GDNS1,GDNS2,GDNS3,Router
            $row.Hostname = $dhcp.DNSName
            $row.ScopeID = $_.ScopeID
            $row.SubnetMask = $_.SubnetMask
            $row.Name = $_.Name
            $row.State = $_.State
            $row.StartRange = $_.StartRange
            $row.EndRange = $_.EndRange
            $row.LeaseDuration = $_.LeaseDuration
            $row.Description = $_.Description
            $ScopeDNSList = $null
            $ScopeDNSList = (Get-DhcpServerv4OptionValue -OptionId 6 -ScopeID $_.ScopeId -ComputerName $dhcp.DNSName -ErrorAction:SilentlyContinue).Value
            #write-host "Q: Use global scopes?: A: $(($ScopeDNSList -eq $null) -and ($GlobalDNSList -ne $null))"
            If (($ScopeDNSList -eq $null) -and ($GlobalDNSList -ne $null)) {
                $row.GDNS1 = $GlobalDNSList[0]
                $row.GDNS2 = $GlobalDNSList[1]
                $row.GDNS3 = $GlobalDNSList[2]
                $row.DNS1 = $GlobalDNSList[0]
                $row.DNS2 = $GlobalDNSList[1]
                $row.DNS3 = $GlobalDNSList[2]
                }
            Else {
                $row.DNS1 = $ScopeDNSList[0]
                $row.DNS2 = $ScopeDNSList[1]
                $row.DNS3 = $ScopeDNSList[2]
                }
            $router = (Get-DhcpServerv4OptionValue -ComputerName $dhcp.DNSName -OptionId 3 -ScopeID $_.ScopeId).Value
            $row.Router = $router[0]
            $Report += $row            }
        }
    Else {
        write-host -foregroundcolor Yellow """$($dhcp.DNSName)"" is either running Windows 2003, or is somehow not responding to querries. Adding to report as blank"
        $row = "" | select Hostname,ScopeID,SubnetMask,Name,State,StartRange,EndRange,LeaseDuration,Description,DNS1,DNS2,DNS3,GDNS1,GDNS2,GDNS3,Router
        $row.Hostname = $dhcp.DNSName
        $Report += $row
        }
    write-host -foregroundcolor Green "Done Processing ""$($dhcp.DNSName)"""
    }

$Report  | Export-csv -NoTypeInformation -UseCulture $filename


Excel AddIn to reset the last worksheet cell

source: http://xsformatcleaner.codeplex.com/

Microsoft Excel saves only the part of each worksheet that is in use, meaning the section that contains data or formatting. Sometimes the last cell of a worksheet may be beyond the range of your actual used data. This issue may cause you to have a larger file size than neccesary, you may print extra pages, you may receive “Out of Memory” error messages, or you may experience other unusual behavior. Clearing the excess rows and columns to reset the last cell can help to resolve these issues.

Note You can locate the last cell of the active worksheet by pressing CTRL+SHIFT+END.

This is a sample of the code located in Microsoft KB 244435
How to reset the last cell in Excel
http://support.microsoft.com/kb/244435


[wpdm_file id=85]

Installing Dell OpenManage Server Administrator on VMWare ESXi 5.5

Installing Dell OpenManage Server Administrator on VMWare ESXi 5.5

Installing Dell OMSA on a ESXi server allows you to see more detailed information regarding the Dell hardware. It also allows you to perform operations such as specifying hot spares and rebuilding RAID arrays. After you install OMSA on the ESXi server you can install the OMSA web-based GUI on another Windows PC or Server in order to access OMSA.

The steps below will get OMSA up and running on VMWare ESXi 5.5. Be sure to download the version of the OMSA Offline Installation Bundle that corresponds to your version of ESXi.


Download the OMSA Offline Bundle from the Dell Website.

Enable SSH on the ESXi Server

  • Open and log-in to VMWare vShpere Client.
  • Select the server node in the tree view on the left.
  • Click the Configuration tab along the top.
  • Click the Properties link to the right of Services.
vSphere Client Security Profile Page
  • Select SSH in the list and click Options.
  • Select “Start and stop with host”
  • Under Service Commands click Start.
  • Click OK.
vSphere SSH Options
vSphere SSH Options

Transfer the OMSA Offline Bundle to the Server

Since SSH is enabled the easiest way to transfer the file “OM-SrvAdmin-Dell-Web-7.3.0-588_A00.VIB-ESX55i.zip” to the server is with a SFTP client. I typically use WinSCP on Windows, Transmit on a Mac, or the command line SCP client on Linux systems. I’ll show you how to use WinSCP below:

  • Open WinSCP.
  • Click New to create a new connection.
  • Enter the host name of the ESXi server, user name and password. (User name is root by default).
WinSCP Login Screen
WinSCP Login Screen
  • Click Login.
  • If this is your first time connecting to this host you’ll see a warning screen about the server’s host key. You can click Yes to continue.
  • Once connected you’ll see an explorer type view with your local files on the left and the server’s file system on the right.
  • You want to navigate to the /tmp/ folder.
ESXi /tmp/ Directory
  • Double click tmp to enter the directory.
  • In the left pane browse to where you downloaded “OM-SrvAdmin-Dell-Web-7.3.0-588_A00.VIB-ESX55i.zip”
  • Once located, drag the file to the right pane. When the Copy dialog comes up click Copy.
OMSA In tmp Directory

Install the Offline Bundle

Its now time to install the bundle. To do this  you’ll need a SSH client. I use Putty on Windows and the command line SSH client on Mac and Linux. I’ll show you how to use Putty below.

  • Open Putty.
  • Enter the ESXi server host name and click Open.
Putty Configuration
Putty Configuration
  • Again if this is your first time connecting to this host you’ll see a Putty Security Alert dialog box. Click Yes to continue.
  • Enter the user name (root).
  • Enter the password.
  • At the command line type “esxcli software vib install -d /tmp/OM-SrvAdmin-Dell-Web-7.3.0-588_A00.VIB-ESX55i.zip
  • Make sure to match the file name of the file you actually downloaded since version numbers will change frequently. You can use tab-auto-complete to type in the first few letters such as OM- and then press tab to complete the file name.
  • Press enter.
  • Reboot the server to complete the installation. If you don’t have any running hosts you’ll be able to restart without being in maintenance mode. If you do have running hosts you’ll need to shut them down and then put the ESXi server into maintenance mode.

Installing OpenManage Server Administrator Managed Node

  • Download the installer for Dell OpenManage Server Administrator Managed Node (Windows),v7.3 to a Windows PC.
  • Run and install the application.
  • The installer will complain about it not being installed on Dell software but you can proceed with the server installation only.
  • Dell OMSA is web-based, relying on a Java back-end so when you double click the icon on your desktop it will open your default browser.
  • Enter the ESXi host, user name and password. Check the box to Ingore certificate warnings.
OMSA Login
OMSA Login
  • This should allow you to use OpenManage similarly to how you would on a bare-metal install of Windows Server on a Dell system.

How to install Dell Openmanage Server Administratior on ESXi using VMware Update Manager

http://oxfordsbsguy.com/2013/08/09/how-to-install-dell-openmanage-server-administrator-on-esxi-5-1-using-vmware-update-manager/

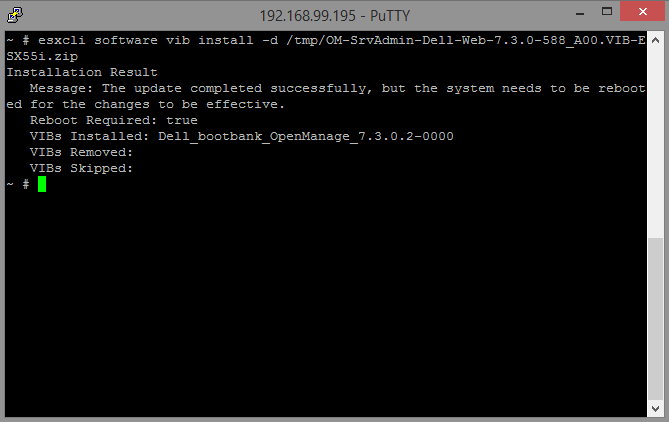
1.  Download the OpenManage Server Administrator vSphere Installation Bundle (VIB) for ESXi 5.1, v7.3 from Dell’s website. It can be found on the Product Support page in the System Management section. Or you can download it from here.

OpenManage Server Administrator vSphere Installation Bundle (VIB) for ESXi 5.1, the current version is v7.32. Login in to vCenter, click Home, Update Manager and then select the Patch Repository tab.

VMware Update Manager - Patch Repository3. Click Import Patches.

VMware Update Manager - Import Patches4. Browse to the downloaded zip file and click Next. If you get a Security Warning dialogue box pop up, click Ignore.

Security Warning6. Click Finish to confirm the import.

VMware Update Manager - Import Patches7. If you browse the Patch Repository you will now see the OpenManage 7.3 for ESXi 510 patch.

VMware Patch Repository showing Dell OpenManage 7.3 for ESXi 510 patch

8. Click the Baseline and Groups tab. Then click on the left-hand Create option to create a new baseline.

VMware create Baseline

9. Give the baseline a name, Dell Host Extension, and select the Host Extension radio button, and click Next.

VMware New Baseline Name and Description10. Browse to the OpenManage 7.3 for ESXi510 extension, select it and click the Down Arrow to add it, click Next.

VMware New Baseline - Select Extensions

11. Review the selection and click Finish.

VMware New Baseline Complete

12. Click on Home, Hosts and Clusters, select the host you want to Install OpenManage Server Administrator on and select the Update Manager tab, then click Attach.

VMware Update Manager tab13. Select the Dell Host Extension baseline, then click Attach.

VMware - Attach Baseline or Group14. Select Patches and Extensions check box and click Scan.

VMware Confirm Scan15. To Apply the Extension, put the host into Maintenance Mode. Click the Stage button and then click the Remediate button.

To Access Server Administrator on ESXi 5.1 do the following or, just copy and paste the following address into a browser, changing the ESXiservername:

https://ESXiservername:1311/OMSALogin?manageDWS=false

1. From a Windows Server with Dell OpenManage Server Administrator installed, Open the local Server Administrator instance.

2. Click Logout in the top right hand corner of the web interface.

3. Click Log in.

Dell Server Administrator - Log in4. At the bottom of the login dialogue box, click Manage Remote Node.

Dell OpenManage Login

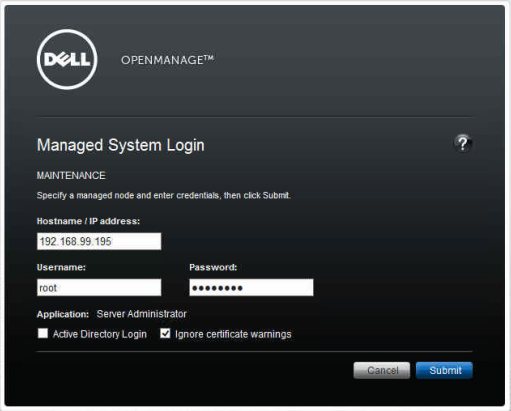
4. Enter the Esxi hostname or IP address, username and password, and check the box to Ignore certificate warnings. Click Submit.

Dell OpenManage - Managed System LoginYou will now be presented with the Dell OpenManage Server Administrator interface for your ESXi server.

Dell OpenManage Server Administrator ESXi interface