Mailbox and other printer-specific settings are saved with an Excel file

source

SYMPTOMS

When you send a Microsoft Excel workbook to another user account in an e-mail message or store the file on a network share, with the print settings set to print to your mailbox or to a local printer with specialized settings, these settings may still be in effect for the other users. If they print the workbook, it may either print to your mailbox, not theirs, or it may try to print by using certain settings for your local printer.

RESOLUTION


To resolve this issue, use one of the following methods.

Method 1: Remove the printer file settings for a workbook

Excel 2003 and Excel 2002

  1. Change the default printer to a different printer.
  2. In Excel, open the workbook that is experiencing the problem.
  3. On the File menu, click Print.
  4. In the Print dialog box, click Cancel.
  5. On the File menu, click Save.

Method 2: Add a registry key

Excel 2003

Warning If you use Registry Editor incorrectly, you may cause serious problems that may require you to reinstall your operating system. Microsoft cannot guarantee that you can solve problems that result from using Registry Editor incorrectly. Use Registry Editor at your own risk.
A software update has not been created for this issue in Microsoft Office Excel 2003. However, you can add the QFE_Sitka registry key to work around the issue. When you set the value of the QFE_Sitka registry key to 1, the printer settings are not saved in the file.

Follow these steps, and then quit Registry Editor:

  1. Click Start, click Run, type regedit, and then click OK.
  2. Locate and then click the following key in the registry:
    HKEY_CURRENT_USER\Software\Microsoft\Office\11.0\Excel\Options
  3. On the Edit menu, point to New, and then click DWORD value.
  4. Type QFE_Sitka, and then press ENTER.
  5. On the Edit menu, click Modify.
  6. Type 1, and then click OK.

Excel 2002 Service Pack 2 (SP2) or later service packs

A supported hotfix is available from Microsoft. However, this hotfix is intended to correct only the problem that is described in this article. Apply this hotfix only to systems that are experiencing this specific problem. If the hotfix is available for download, there is a “Hotfix download available” section at the top of this Knowledge Base article. If this section does not appear, submit a request to Microsoft Customer Service and Support to obtain the hotfix. Note If additional issues occur or if any troubleshooting is required, you might have to create a separate service request. The usual support costs will apply to additional support questions and issues that do not qualify for this specific hotfix. For a complete list of Microsoft Customer Service and Support telephone numbers or to create a separate service request, visit the following Microsoft Web site:

http://support.microsoft.com/contactus/?ws=support (http://support.microsoft.com/contactus/?ws=support)  

Note The “Hotfix download available” form displays the languages for which the hotfix is available. If you do not see your language, it is because a hotfix is not available for that language. The global version of this hotfix has the file attributes (or later) that are listed in the following table. The dates and times for these files are listed in coordinated universal time (UTC). When you view the file information, it is converted to local time. To find the difference between UTC and local time, use the Time Zone tab in the Date and Time tool in Control Panel.

Date (UTC)        Time (UTC)   Version            File Name
--------------------------------------------------------------
2003-Oct-06     21:43     4747816     EXCELop.msp
2003-Oct-06     22:51     16571988     EXCELff.msp

After the hotfix is installed, the global version of this fix will have the file attributes (or later) that are listed in the following table:

Date (UTC)       Time (UTC)   Version            Size               File Name
----------------------------------------------------------------------------
2003-Oct-03     01:08     10.0.5730.0     9181752     EXCEL.EXE

How to Obtain the Hotfix

This issue is fixed in the Excel 2002 Hotfix Package that is dated October 6, 2003. For additional information, click the following article number to view the article in the Microsoft Knowledge Base:

829340 (http://support.microsoft.com/kb/829340/ ) Excel 2002 Post-Service Pack 2 Hotfix Package: October 6, 2003

After you install the Excel 2002 hotfix, you must add the QFE_Sitka registry key to activate the hotfix. When you set the value of the QFE_Sitka registry key to 1, printer settings are not saved in the file.

Warning If you use Registry Editor incorrectly, you may cause serious problems that may require you to reinstall your operating system. Microsoft cannot guarantee that you can solve problems that result from using Registry Editor incorrectly. Use Registry Editor at your own risk.
Follow these steps, and then quit Registry Editor:

  1. Click Start, click Run, type regedit, and then click OK.
  2. Locate and then click the following key in the registry:
    HKEY_CURRENT_USER\Software\Microsoft\Office\10.0\Excel\Options
  3. On the Edit menu, point to New, and then click DWORD value.
  4. Type QFE_Sitka, and then press ENTER.
  5. On the Edit menu, click Modify.
  6. Type 1, and then click OK.

Microsoft Cluster Service (MSCS) support on ESX

http://kb.vmware.com/selfservice/documentLink.do?externalID=1004617

ESX Server 3 Release MSCS Supported? Documentation
3.0 Yes Setup for Microsoft Cluster Service (PDF)
3.0.1 Yes Setup for Microsoft Cluster Service (PDF)
3.0.2 Yes Setup for Microsoft Cluster Service (PDF)
3.0.2 Update 1 Yes VMware Infrastructure 3 Release Notes

see also Setup for Microsoft Cluster Service (PDF)

3.5 No VMware Infrastructure 3 Release Notes
3.5 Update 1, 2, 3, 4 Yes VMware Infrastructure 3 Release Notes

see also  Setup for Microsoft Cluster Service (PDF)

vSphere 4.0 Yes What’s New in VMware vSphere 4.0

see also  Setup for Failover Clustering and Microsoft Cluster Service(PDF)

Extend boot volume on Windows Server 2000/2003

source

Before you begin, make sure that you do not have an active snapshot on the VM, extending a virtual disk with a snapshot will cause corrpution

Extend the boot volume of Windows Server 2003 Virtual Machine
To start, I have a Windows Server 2003 Virtual Machine that has a 5.3G disk allocated to it, I need to expand this disk to 10G.

1

Step 1: Power off the virtual machine that holds the boot volume that you want to extend.

Step 2: Make a backup copy of your virutal disk, this is optional but if you mess up don’t call me unless you’re willing to pay.

Step 3: From the service console, increase the size of the .dsk or .vmdk virtual disk file. This can also be accomplished through the Virtual Infrastructure Client if you are using VirtualCenter 2.x+.

[root@esx-test local]# ls -lah test.vmdk

-rw------- 1 root root 5.4G Jul 18 13:57 test.vmdk

Extend the virtual disk with vmkfstools. The input to the -X switch is the size that you want the disk file to be not the size you want to extend the disk file by.

[root@esx-test local]# vmkfstools -X 10G test.vmdk

View the new size of test.vmdk

[root@esx-test local]# ls -lah test.vmdk

-rw-------    1 root     root          10G Jul 18 13:57 test.vmdk

Step 4: For this step you will need an additional Virtual Machine running Windows Server 2003. Power off the second Virtual Machine, and add the disk from the first Virtual Machine to it through the mui. Power up the second Virtual Machine and verify that the imported disk has unallocated space on it.

 2

From the run menu type “diskpart.exe” to enter the command line utility to resize disk partitions in Windows Server 2003.

 3

The command list volume will show you all the available volumes. Select your volume as shown below. select volume 1 corresponds to the “D” volume that I want to exntend. Finally extend the volume with the extend command.

4

If all goes well, the partition will be immediately exnteded under the Disk Management snap in.

5

Step 5: Shut down the second Virtual Machine and remove the disk from the second Virtual Machine. Power on the first Virtual Machine and check out your new space.

 6

TCP Keep-Alive Messages

When a windows client is connected to a server, disconnects are experienced.

This is because the client does not communicate (default 2 hours) whith the server and then other devices (like a firewall with a 1 hour inactive disconnect setting) disconnects the session.

You can change the keep alive settings as follows:

  1. Open the register
  2. Go to HKEY_LOCAL_MACHINE\SYSTEM\CurrentControlSet\Services\Tcpip\Parameters
  3. Add/Change the Keepalive time

    KeepAliveTime

    Value Type: REG_DWORD – Time in milliseconds
    Valid Range: 1 – 0xFFFFFFFF
    Default: 7,200,000 (two hours)
    Description: The parameter controls how frequently TCP tries to verify that an idle connection is still intact by sending a keepalive packet. If the remote computer is still reachable and functioning, the remote computer acknowledges the keepalive transmission. By default, keepalive packets are not sent. A program can turn on this feature on a connection.

Microsoft knowledgebase 314053

Configuring Symantec AntiVirus for deployment as part of a drive image

Symantec Document ID: 2005092215503348

Question/Issue:
You need to create a drive image with Symantec AntiVirus already installed.

Solution:
Every installation of Symantec AntiVirus creates a globally unique identifier (GUID) for that installation when the Rtvscan service first starts. If you use a computer with Symantec AntiVirus to create a drive image, and if that image is used to create clones of that computer on the same network, then each computer will have the same GUID. This causes problems in Symantec System Center, such as the following:

  • Clients do not appear.
  • Clients randomly appear and disappear.

You can prevent this problem by creating a drive image that does not have a Symantec AntiVirus GUID.

To create an image without a Symantec AntiVirus GUID

  1. Install the operating system, and install all patches as you would normally.
    Do not install Symantec AntiVirus yet.
  2. Install any other software besides Symantec AntiVirus that will be on the image.
  3. Install Symantec AntiVirus last, after any other installations.
  4. Before you save the image, start the Registry Editor.
  5. Go to the following key:

    HKEY_LOCAL_MACHINE\SOFTWARE\Intel\LANDesk\VirusProtect6\CurrentVersion

  6. In the right pane, right-click GUID, and then click Delete.
  7. Exit the Registry Editor.
    The hard drive now contains the final image. Do not restart the computer.
  8. Create the image with your preferred disk imaging software.

When the computer starts again, Rtvscan checks for the GUID value, and when it determines that it does not exist, it generates a new one.

If you have computers that were already deployed with identical GUID values, you can delete the GUID value on each computer, as described above. This can be done with a batch file, a login script, or a group policy object.

Wrong preferred DNS server (BIND) with VPN client

When you are connected with VPN to your work network, some dns names are resolving to the wrong number. This is because you are using the wrong preferred dns.

When typing nslookup, you see that the used DNS server is the dns server from your networkcard and not the VPN dns server.

Look with ipconfig /all” for the name of your vpn network interface, then go to the following key in the register:

HKLM\SYSTEM\CURRENTCONTROLSET\SERVICES\TCPIP\LINKAGE\BIND

Make sure the name of your network interface is on top of the bind sequence. This should set your preferred DNS to your VPN DNS server.

List all vm’s and total assigned diskspace

Looking for new scripts i’ve stumbled opon the following script to list all vm’s to an excel sheet and display the total assigned diskspace:

# Define Variables 
$outputFile = 'C:\VMDiskCapacity.csv' 
$VCServer = "vcenter.mydomain.com" 
$username = "vcenter_admin" 
$pass = "password" 

################## 
# Add VI-toolkit # 
################## 
Add-PSsnapin VMware.VimAutomation.Core 
Initialize-VIToolkitEnvironment.ps1 

# Connect server 
$VC = Connect-VIServer -Server "$VCServer" -User "$username" -Password "$pass" 

$myCol = @()    # Prepare output collection 
$VMs = Get-VM | sort Name    # Get all VMs (sorted) 
$counter = 0    # Initialize counter for progress bar 
ForEach ($VM in $VMs)    # Loop through VMs 
   { 
   $counter++    # Increase counter for progress bar 
   Write-Progress -Activity "Gathering disk information" -Status "Processing VM $VM" -PercentComplete (100*($counter/$VMs.count))    # Display progress bar 
    
   $myObj = "" | 
   select VM, TotalDiskSizeGB # Create output object 
   $myObj.VM = $VM.Name    # Virtual Machine Name 
    
   $TotalDiskSizeKB = 0 
   ForEach ($DISK in $VM.HardDisks)    # Loop through VM's harddisks 
      { 
      $TotalDiskSizeKB += $DISK.CapacityKB    
      } 
    
   $myObj.TotalDiskSizeGB = [math]::Round(($TotalDiskSizeKB * 1KB / 1GB),0) #Disk Size in GB 
   $myCol += $myObj    # Add output to collection 
   } 
$myCol | Export-Csv $outputFile -NoTypeInformation  # Export output to csv 

VMware ESX Datastore Reports – PowerShell

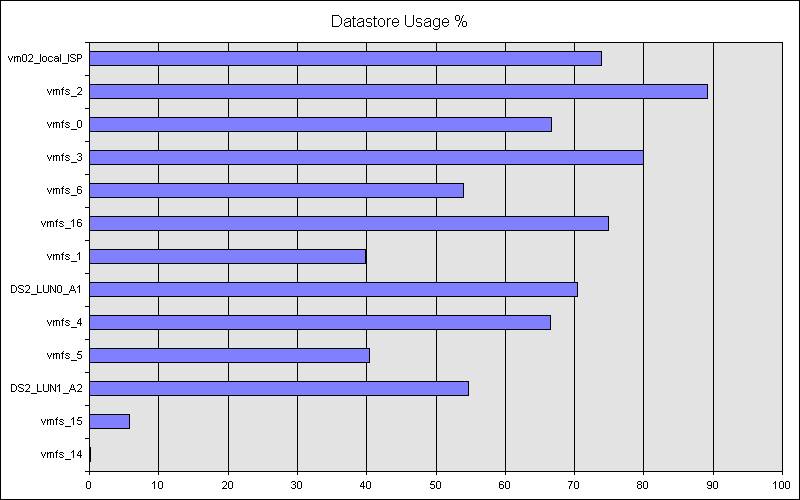
Using Microsft PowerShell and the VI Toolkit for Windos you can do some nice stuff. When looking for a way to make reports for a customer of my i’ve stumbled upon a few scripts.

All you have to do is to install Microsoft Powershell, VI toolkit for windows and have Office on your machine. When running the powershell script [wpdm_file id=”4″] i get the following output:

Datastore Chart

Contents of datastore.ps1:

if ((Test-Path  REGISTRY::HKEY_CLASSES_ROOT\OWC11.ChartSpace.11) -eq $False)
{
       Write-Host "This script requires Office Web Components to run correctly, please install these from the following website: http://www.microsoft.com/downloads/details.aspx?FamilyId=7287252C-402E-4F72-97A5-E0FD290D4B76&displaylang=en"
       exit
}
connect-VIServer yourserver

$Caption = "Datastore Usage %"

$categories = @()
$values = @()
$chart = new-object -com OWC11.ChartSpace.11
$chart.Clear()
$c = $chart.charts.Add(0)
$c.Type = 4
$c.HasTitle = "True"
$series = ([array] $chart.charts)[0].SeriesCollection.Add(0)

Get-datastore |Sort-Object FreeSpaceMB -Descending | foreach-object {

        $capacitymb = $_.CapacityMB
        $FreeSpaceMB = $_.FreeSpaceMB
        $UsedSpace = $capacitymb - $freespacemb

        $perc = $UsedSpace / $capacitymb * 100

        $categories += $_.Name
        $values += $perc * 1
}

$series.Caption = $Caption
$series.SetData(1, -1, $categories)
$series.SetData(2, -1, $values)
$filename = (resolve-path .).Path + "\Chart.jpg"
$chart.ExportPicture($filename, "jpg", 800, 500)
invoke-item $filename

Viewing Ghost Hardware after P2V

After converting a physical machine to a virtual machine, you need to remove the “old” hardware. Sometimes this hardware is not shown in the device manager. To do this you will need to follow the Microsoft KB article 241257 or 269155.

Abstract:
Device Manager displays only non-Plug and Play devices, drivers, and printers when you click the Show hidden devices command on the View menu to enable it. Devices that are installed but are not currently connected to the computer (such as a Universal Serial Bus (USB) device or “ghosted” devices) are not displayed in Device Manager, even when you use the Show hidden devices command.

To work around this behavior and display phantom devices when you use the Show hidden devices command:

  1. Click Start, point to Programs, point to Accessories, and then click Command Prompt.
  2. At the command prompt, type the following lines, pressing ENTER after each line
    set devmgr_show_nonpresent_devices=1
    cd\%SystemRoot%\System32
    start devmgmt.msc

    where %SystemRoot% is the folder in which Windows 2000 is installed.

  3. Troubleshoot the devices and drivers in Device Manager, as required.NOTE: You must first select show hidden devices on the Device Manager View menu before you can see devices that are no longer present in the system.
  4. When you are done troubleshooting, quit Device Manager, and then close the Command Prompt window. Closing the window clears the variable you set in step 2 and prevents ghosted devices from being displayed when you use the Show hidden devices command.

NOTE: When you quit Device Manager and close the Command Prompt window, the set devmgr_show_nonpresent_devices=1 variable is turned off so you cannot see the phantom devices.