Synching Microsoft NPS (RADIUS) servers

source: http://www.routereflector.com/2016/07/syncing-microsoft-nps-servers/

Use the following powershell script to sync microsoft NPS (radius) servers.

Export-NpsConfiguration -Path C:\TEMP\LocalNPSExportedConfig.xml

$CurrentServerNPS = $env:computername

$NPServers = Get-ADGroupMember "RAS and IAS Servers"
$NPServers | ForEach-Object {

	$NPServerName = $_.Name

	if ($NPServerName -ne $CurrentServerNPS) {
		$NPServerName
		copy-item Export-NpsConfiguration -Path  \\$NPServerName\C$\TEMP\LocalNPSExportedConfig.xml
		Invoke-Command -ComputerName $NPServerName -ScriptBlock {Export-NPSConfiguration -Path C:\TEMP\BackupNPSExportedConfig.xml
		Invoke-Command -ComputerName $NPServerName -ScriptBlock {Import-NPSConfiguration -Path C:\TEMP\LocalNPSExportedConfig.xml
	}
}


Failed To Open or Edit GPO

source: https://mohdzmaili.wordpress.com/2017/02/15/failed-to-open-or-edit-gpo/comment-page-1/#comment-30


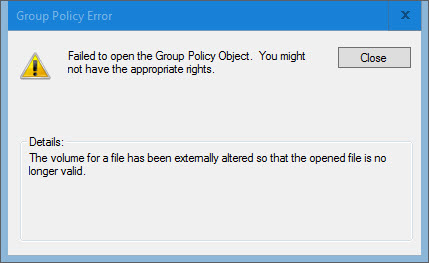
Group Policy Object cannot be opened or edited with the error: Failed to open Group Policy Object. You might not have the appropriate rights.

Details: The volume for a file has been externally altered so that the opened file is no longer valid.

gpo1

gpo2

Solution:

  • Get GPO GUID: from Group Policy Management Console (GPMC) –> choose GPO –> from right pane go to Details tab –> go to Unique ID field.
  • Open the path: C:\Windows\SYSVOL\sysvol\<Domain>\Policies\<GPO GUID>\User
  • Delete “registry.pol” file.

Note: if you have migrated SYSVOL replication type from FRS to DFSR, open the path:  C:\Windows\SYSVOL_DFSR\sysvol\<Domain>\Policies\<GPO GUID>\User

Resetting Administrator Password in Windows 2012

Instructions

To reset the password on your Windows 2012 server, simply complete the following steps:

  • Boot from the Micrsoft Windows Server 2012 DVD
  • From the Windows Setup menu, click “Next”.
  • Select “Repair your computer”
  • Under Choose and option, click on “Troubleshoot”.
  • Under Advanced options, click “Command Prompt”.
  • At the command prompt, run the following commands:
    d:
    cd windows\system32
    ren Utilman.exe Utilman.exe.old
    copy cmd.exe Utilman.exe
  • Close the command prompt and then click “Continue”.
  • The server should now boot and present the logon screen. Here click Windows Key + U.
  • At the prompt you can now change the password, by typing the following command:
    net user administrator Password123
    This will set the password for the Administrator user to be Password123 (case sensitive).

    If a new (adminstrator) user is needed, type the following commands:
    net user “OtherUser” Password123 /add
    net localgroup administrators “OtherUser” /add

Closing the command prompt, you should now be able to log back onto the server using the password you have provided in the last step.


Cleanup Steps

Once you have verified you can log on to the server you will have repeat the steps above and boot using the Windows Server 2008 DVD/ISO and run the command prompt again.

  • Restart your server and once again, boot from the Micrsoft Windows Server 2012 DVD
  • From the Windows Setup menu, click “Next”.
  • Select “Repair your computer”
  • Under Choose and option, click on “Troubleshoot”.
  • Under Advanced options, click “Command Prompt”.
  • At the command prompt, run the following commands:
    d:
    cd windows\system32
    ren utilman.exe utilman.exe.new
    copy utilman.exe.old utilman.exe
  • Close the command prompt and then click “Continue”.

You should be back up and running as if nothing ever happened.


source: http://www.kieranlane.com/2013/09/18/resetting-administrator-password-windows-2012/

Copy SQL server database role

source: http://stackoverflow.com/questions/6300740/how-to-script-sql-server-database-role


With the following script a script is generated which can be used to copy a SQL database role

declare @RoleName varchar(50) = 'RoleName'

declare @Script varchar(max) = 'CREATE ROLE ' + @RoleName + char(13)
select @script = @script + 'GRANT ' + prm.permission_name + ' ON ' + OBJECT_NAME(major_id) + ' TO ' + rol.name + char(13) COLLATE Latin1_General_CI_AS 
from sys.database_permissions prm
    join sys.database_principals rol on
        prm.grantee_principal_id = rol.principal_id
where rol.name = @RoleName

print @script


Active Directory – How to display Bitlocker Recovery Key

source: http://www.alexandreviot.net/2015/06/10/active-directory-how-to-display-bitlocker-recovery-key/


Active Directory – How to display Bitlocker Recovery Key

When Bitlocker is enabled on workstation/ laptop in your entreprise, you must have a solution to get the recovery key of the hard drive. In some cases, Bitlocker can prompt to the user the Recovery key if it detects a specific behavior like partition changes.

The easiest solution is to use Active Directory Users And Computers console. This can only be possible if you set in the GPO to store Recovery Key into Active Directory.

With Active Directory Users And Computers, we can:

  • Display Bitlocker Recovery key for one computer.
  • Search in all Active Directory for a Password ID.
  • Delegate Rights to display confidential information.

Feature installation

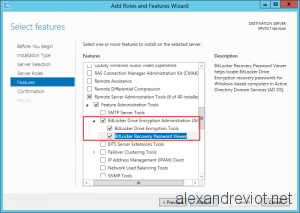
Before searching your computer in Active Directory, you need to install a plugin to display Bitlocker Recovery Key information. It is integrated in features since Windows Server 2008.

To install Bitlocker Recovery Key feature:

  • Go to Server Manager.
  • On Features Page select Remote Server Administration Tools.
  • Check Bitlocker Drive Encryption Administration Utility.
    • Check Bitlocker Drive Encryption Tools.
    • Bitlocker Recovery Password Viewer.

Bitlocker Recovery Key Feature

Bitlocker Recovery Key Feature

Computer Object

After the installation, just close and open Active Directory Users And Computers again.

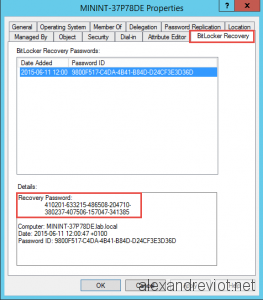
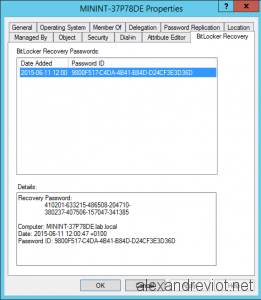
A new tab is now available on computer object:  Bitlocker Recovery with some information:

  • Recovery Key : this key must be given to the user if needed.
  • Computer name and date
  • Password ID:  User must give you this information. (First 8 digit)

Bitlocker Recovery Key Tab

Bitlocker Recovery Key Tab

Bitlocker Recovery Key Lookup Tool

Sometime, you don’t have the computer name because the remote user doesn’t know it. You only have first 8 digit code. Don’t panic, there is a solution for that too. ?

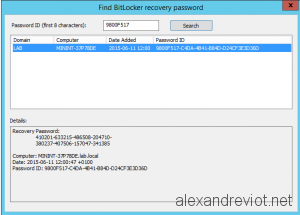
We can search for 8 digit code in all computer objects:

  • Right click on your domain name.
  • Select Find Bitlocker Recovery Password.

Find Bitlocker Recovery Password

Find Bitlocker Recovery Password

  • Enter the first 8 digit and click Search. You will find the computer and the recovery key.

Bitlocker Find Recovery Key

Bitlocker Find Recovery Key

Delegation Rights

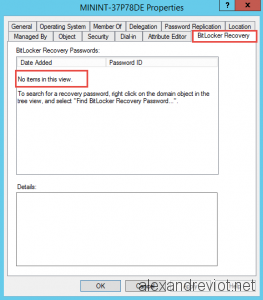
If a helpdesk team exists in your enterprise, you maybe want to give them the right to display this information. However, Recovery key is a confidential information and standard users can not view it.

Bitlocker Recovery Key Standard User

Bitlocker Recovery Key Standard User

We need to delegate some rights on the targeted OU to specific group.

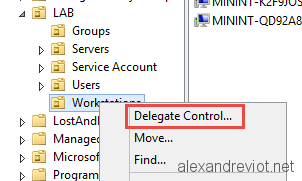
  • Right click on the targeted OU and select Delegate Control.

OU Delegate Control

OU Delegate Control

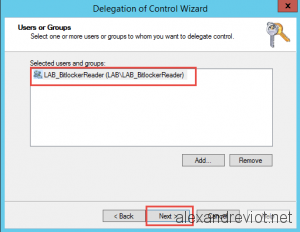
  • Add groups which need to view Recovery Key.

Delegate Group

Delegate Group

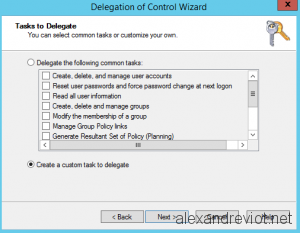
  • Select Create a custom task to delegate.

Custom task to delegate

Custom task to delegate

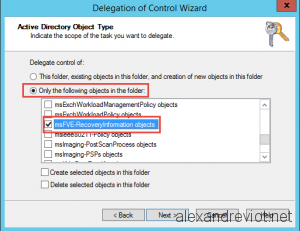
  • Choose Only the following object in the folder and check MSFVE-RecoveryInformation objects.

MSFVE-RecoveryInformation

MSFVE-RecoveryInformation

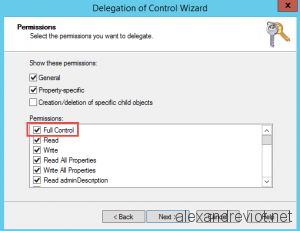
  • Give Full Control on this object.

Full Control Right

Full Control Right

  • Helpdesk user can now view Recovery information.

Recovery Key Granted user

Recovery Key Granted user

More

You can get more information about Bitlocker here.

Quickly list all mailboxes to which a particular user has access

From Vasil Michev

source: http://www.michev.info/Blog/Post/77/Quickly-list-all-mailboxes-to-which-a-particular-user-has-access


  • List all mailboxes to which a particular user has Full Access permissions:

PS C:\> Get-Mailbox | Get-MailboxPermission -User vasil

Identity             User                 AccessRights

——–             —-                 ————

HuKu                 Vasil Michev         {FullAccess}

retail               Vasil Michev         {FullAccess}

sharednew            Vasil Michev         {FullAccess}

testplan2            Vasil Michev         {FullAccess}

WC                   Vasil Michev         {FullAccess}

  • List all shared/user/room/whatever mailboxes to which particular user has Full Access permissions:

PS C:\> Get-Mailbox -RecipientTypeDetails UserMailbox,SharedMailbox -ResultSize Unlimited | Get-MailboxPermission -User vasil

Identity             User                 AccessRights

——–             —-                 ————

HuKu                 Vasil Michev         {FullAccess}

retail               Vasil Michev         {FullAccess}

sharednew            Vasil Michev         {FullAccess}

testplan2            Vasil Michev         {FullAccess}

  • List all mailboxes to which members of a particular security group have access:

PS C:\> Get-Mailbox | Get-MailboxPermission -User secgrp

Identity             User                 AccessRights

——–             —-                 ————

Bathroom             secgrp               {FullAccess}

  • List all mailboxes to which a user has Send As permissions:

PS C:\> Get-Mailbox | Get-RecipientPermission -Trustee vasil

Identity                            Trustee                             AccessControlType                   AccessRights

——–                            ——-                             —————–                   ————

sharednew                           Vasil Michev                        Allow                               {SendAs}

  • List all user mailboxes to which members of a particular security group have access:

PS C:\> Get-Mailbox -RecipientTypeDetails UserMailbox -ResultSize Unlimited | Get-RecipientPermission -Trustee secgrp

Identity                            Trustee                             AccessControlType                   AccessRights

——–                            ——-                             —————–                   ————

HuKu                                secgrp                              Allow                               {SendAs}

  •  List all mailboxes to which a particular security principal has Send on behalf of permissions:

PS C:\> Get-Mailbox | ? {$_.GrantSendOnBehalfTo -match “vasil”}

Name                      Alias                ServerName       ProhibitSendQuota

—-                      —–                ———-       —————–

Bathroom                  bathroom             amspr03mb084     49.5 GB (53,150,220,288 bytes)

WC                        WC                   dbxpr03mb096     9.5 GB (10,200,547,328 bytes)
Find Mailbox and Online Archive size

Script to connect to Office 365 and collect the last logged on date/time, mailbox size and item count for each mailbox and archive mailbox for every user within your organization.

The following script was specifically written for a client recently which I thought would be good to share with the wider community. This will connect to Office 365 and collect the last logged on date/time, mailbox size and item count for each mailbox and archive mailbox for every user within your organization.


Those users without an archive mailbox will be returned as ‘No Archive’


For more information about this script please see the source at: https://gallery.technet.microsoft.com/scriptcenter/Find-Mailbox-and-Archive-2859b540

$Office365Credentials = Get-Credential
$session = New-PSSession -ConfigurationName Microsoft.Exchange -ConnectionUri "https://ps.outlook.com/powershell/" -Credential $Office365Credentials -Authentication Basic -AllowRedirection
Import-PSSession $session
 
Write-Host "Gathering Stats, Please Wait.."
 
$Mailboxes = Get-Mailbox -ResultSize Unlimited | Select UserPrincipalName, identity, ArchiveStatus
 
$MailboxSizes = @()
 
foreach ($Mailbox in $Mailboxes) {
 
                $ObjProperties = New-Object PSObject
               
                $MailboxStats = Get-MailboxStatistics $Mailbox.UserPrincipalname | Select LastLogonTime, TotalItemSize, ItemCount
               
                Add-Member -InputObject $ObjProperties -MemberType NoteProperty -Name "UserPrincipalName" -Value $Mailbox.UserPrincipalName
                Add-Member -InputObject $ObjProperties -MemberType NoteProperty -Name "Last Logged In" -Value $MailboxStats.LastLogonTime
                Add-Member -InputObject $ObjProperties -MemberType NoteProperty -Name "Mailbox Size" -Value $MailboxStats.TotalItemSize
                Add-Member -InputObject $ObjProperties -MemberType NoteProperty -Name "Mailbox Item Count" -Value $MailboxStats.ItemCount
               
                if ($Mailbox.ArchiveStatus -eq "Active") {
               
                                $ArchiveStats = Get-MailboxStatistics $Mailbox.UserPrincipalname -Archive | Select TotalItemSize, ItemCount
                               
                                Add-Member -InputObject $ObjProperties -MemberType NoteProperty -Name "Archive Size" -Value $ArchiveStats.TotalItemSize
                                Add-Member -InputObject $ObjProperties -MemberType NoteProperty -Name "Archive Item Count" -Value $ArchiveStats.ItemCount
 
                }
                else {
               
                                Add-Member -InputObject $ObjProperties -MemberType NoteProperty -Name "Archive Size" -Value "No Archive"
                                Add-Member -InputObject $ObjProperties -MemberType NoteProperty -Name "Archive Item Count" -Value "No Archive"
                               
                }
               
                $MailboxSizes += $ObjProperties
 
}             
               
$MailboxSizes | Out-GridView -Title "Mailbox and Archive Sizes"
 
Get-PSSession | Remove-PSSession


Customizing the RDS title “Work Resources” using PowerShell on Windows Server 2012

See http://social.technet.microsoft.com/wiki/contents/articles/13451.customizing-the-rds-title-work-resources-using-powershell-on-windows-server-2012.aspx


If you are running multiple Connection Brokers in High Availability mode, you must run this against the active broker. You can use this command:

Set-RDWorkspace -Name “XYZ Applications” -ConnectionBroker (Get-RDConnectionBrokerHighAvailability).ActiveManagementServer


Otherwise you can use:

set-RDWorkspace -Name “XYZ Applications” -ConnectionBroker broker01.company.local

VMware get inventory

source: http://www.wooditwork.com/2010/08/16/exporting-all-that-useful-vm-information-with-powercli/

To export a list of usefull information about your environment use the following oneliner to export it to a CSV.

Get-VM | Select Name, PowerState, NumCPU, MemoryMB, ProvisionedSpaceGB, UsedSpaceGB, @{N=”ESX Host”;E={Get-VMHost -VM $_}}, @{N=”Datastore”;E={Get-Datastore -VM $_}}, @{N=”Guest OS”;E={Get-VMGuest -VM $_}} | Export-CSV d:\temp\report.csv