Why I can’t convert my Windows Server 2012 R2 Core to GUI

Error:

Install-WindowsFeature : The request to add or remove features on the specified server failed.
Installation of one or more roles, role services, or features failed.

The source files could not be downloaded.

Use the “source” option to specify the location of the files that are required to restore the feature. For more information on specifying a source location,see http://go.microsoft.com/fwlink/?LinkId=243077. Error: 0x800f0906

Coretech Blog » Blog Archive » Why I can’t convert my Windows Server 2012 R2 Core to GUI
Here are the commands to update the source files with PowerShell

# Create folders
New-Item -Path C:\WS2012R2 -ItemType Directory
New-Item -Path C:\TEMP -ItemType Directory

# Copy the install.wim to temporary folder
Copy-Item H:\sources\install.wim C:\TEMP

# Remove the read-only attribute from the copied file
Set-ItemProperty -Path C:\TEMP\install.wim -Name IsReadOnly -Value $False

# Get the Windows Image Index
Get-WindowsImage -ImagePath C:\TEMP\install.wim

# Mount the Image
Mount-WindowsImage -Path C:\WS2012R2 -ImagePath C:\TEMP\install.wim -Index 2

# Add the Updates to Windows Image
$Updates = Get-ChildItem C:\Users\kaj\Desktop\Updates
foreach($item in $Updates){
Add-WindowsPackage -PackagePath $item.FullName -Path “C:\WS2012R2”
}

# Commit the changes
Dismount-WindowsImage -Path C:\WS2012R2 -Save -Verbose

source: http://blog.coretech.dk/kaj/why-i-cant-convert-my-windows-server-2012-r2-core-to-gui/

DelinvFile – Delete Invalid Files and Folders

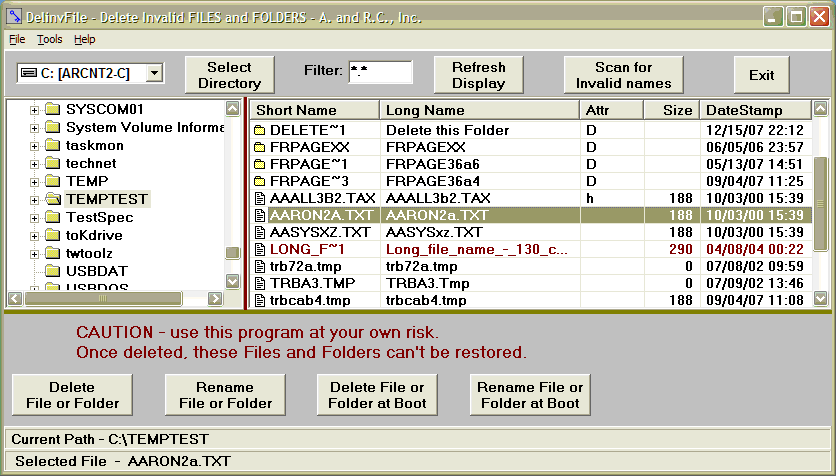
Windows allows the creation of file names and folder names that can not be deleted or renamed via Windows Explorer.  This includes names with invalid characters and names that are too long. The current limit is 260 characters.  In other words, windows can create names that are too long for the standard Windows Explorer to delete. When copying or deleting file the message: “Path too long” appears.


“DelinvFile.exe” is a Windows program that provides a convenient User Interface for selecting the file that you need to delete and provides for a choice of two delete methods. You use the standard controls for Drives, Folders, and Files to navigate to the Folder and Select the file to be deleted.


A trial version is available. See http://www.purgeie.com/delinv/

divfscrn

The Windows Server Update Services console crashes when browsing for updates

The Windows Server Update Services (WSUS) console crashes when browsing for updates and displays the following error message:

error

An unexpected error occurred. 
click reset server node to try to connect to the server again


This can occur if the application cache is corrupted.

To resolve this issue, delete the WSUS application cache from the location below:

C:\Documents and Settings\<user profile>\application data\microsoft\mmc

where user profile is the currently logged in user profile.


source: http://support.microsoft.com/kb/2761925

Default x.509 Certificates Have Longer Key Length

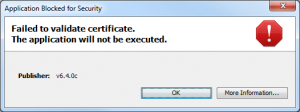
Openening a java application fails with the following error (Failed to validate certificate):


Untitled


Starting from 7u40, the use of x.509 certificates with RSA keys less than 1024 bits in length is restricted. This restriction is applied via the Java Security property, jdk.certpath.disabledAlgorithms. The default value of jdk.certpath.disabledAlgorithms is now as follows:

jdk.certpath.disabledAlgorithms=MD2, RSA keySize < 1024

In order to avoid the compatibility issue, users who use X.509 certificates with RSA keys less than 1024 bits, are recommended to update their certificates with stronger keys. As a workaround, at their own risk, users can adjust the key size to permit smaller key sizes through the security property jdk.certpath.disabledAlgorithms.


Open the java.security file which is located in your client machine’s Java/JRE installed directory (e.g. C:\Program Files (x86)\Java\jre7\lib\security)

Look for this line:

jdk.certpath.disabledAlgorithms=MD2, RSA keySize < 1024

Change 1024 to 256 and save.

Now you can open the java application.


It looks like every java updates reset this parameter to 1024 so you need to change it to 256 each time you have upgraded java.

Easily audit and install patches on your servers in the network by providing a graphical interf

Project Description
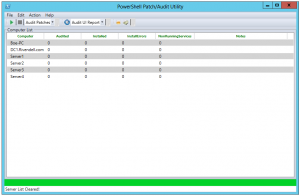
PoshPAIG allows you to easily audit and install patches on your servers in the network by providing a graphical interface

The utility works in any environment, but the optimal environment is a where you have a local WSUS server and your systems have Windows Update settings configured to “Download updates and do not install” either through Group Policy or local policy.

Due to licensing issues, please download PSExec.exe from the link below and place in the root of the UI folder, otherwise the Install portion will fail
http://technet.microsoft.com/en-us/sysinternals/bb897553

Version 2.1.5 has been released!
Please see release notes in the downloads section for new features/bug fixes.
http://poshpaig.codeplex.com/releases/view/100929

Capture

Hey, Scripting Guy articles:
http://blogs.technet.com/b/heyscriptingguy/archive/2011/08/13/use-powershell-to-audit-and-install-windows-patches.aspx
http://blogs.technet.com/b/heyscriptingguy/archive/2011/08/14/lessons-learned-while-writing-the-powershell-poshpaig-module.aspx

A list of new features available are:

  • Updated ListView UI
  • PSJobs replaced with Background runspaces for better performance
  • New reports for installed updates
  • Keyboard Shortcuts
    • F1: Display Help
    • F5: Run the selected command. Ex. Audit Patches,Install Patches
    • F8: Run a select report to generate
    • Ctrl+E: Exits the PoshPAIG applicaton
    • Ctrl+A: Select all systems in the Computer List
    • Ctrl+O: Opens up the Options menu
    • Ctrl+S: Opens window up to add more systems to Computer List
    • Ctrl+D: Removes a selected System or Systems
  • Services Reporting for non-running services set to Automatic
  • New UI changes
  • Better interaction with Windows Update Service
  • New reporting options available
  • Options menu to adjust some settings
  • MultiThreading of operations (Supports running 20 jobs at one time) without UI freeze
  • Add multiple computers with Add Server button using comma to separate each server
  • Select multiple computers in server list and perform operations on only those servers
  • Able to reboot systems with a monitored reboot
  • Ping sweep of all systems in server list
  • View windowsupdate.log on an individual server
  • View installed updates on servers
  • Remotely run wuauclt /detectnow on servers
  • Generate host list of servers
  • Sort columns
  • Notes column to track running operations
  • Error report

The PowerShell Patch Audit/Installation GUI started out as a project for work to build an interface to perform the patching of our systems to those who were not familiar enough with PowerShell to run a set of scripts I build to perform the same auditing and installation of patches. This product is currently in Alpha as there are some bugs that need to be squashed as well as other features I need to add to the tool as well as updating some some current features.

A blog post about this is available at http://learn-powershell.net/2011/06/03/powershell-patch-auditinstall-gui-poshpaig-released/

What this tool gives you is a way to first audit your systems which you can supply one of many ways. You can supply a list of systems, pull a list from Active Directory or manually add the systems yourself into the utility.

One of the best features about this tool is that it uses background jobs to perform all of the actions while the front end GUI is not affected. This means that you can freely move the GUI around as it does not get locked up like a normal WPF gui would in PowerShell if you attempted to run a job of some kind. You will also notice that the data in the GUI updates automatically as each job finishes for a server. For instance, if you are Auditing for patches, you will start seeing the number of patches waiting to be installed start updating next to each respective server. Same for Installing patches, the total number of installed patches, along with patches that gave an error when installing will be displayed in the GUI’s data window. Also, a progress bar is at the bottom of the GUI and status bar to show you how far along the process is.

After an Audit or Installation is performed, there are options to generate a Grid-View report for viewing or a CSV report can easily be generated to the default location of the GUI in no time!

Next version
The next version will have the following items that I am working on:

  • Better displaying of services report to allow restart
  • UI updates for grid view
  • Updated code and reporting
  • Various feature/bug requests


Project page: http://poshpaig.codeplex.com/

Download software: [wpdm_file id=84]

Dell: How to install Server Administrator on Windows 2012 Server Core Edition

Do the following to install Server Administrator on a Server Core. Once installed, you can launch OMSA using a supported remote browser.

1. Enable WOW component. Run the following command from the Server Core command prompt:

 dism /online /enable-feature /featurename:ServerCore-WOW64

2. Install x64 Server Administrator. Run the following command to install

Msiexec /i SysMgmtx64.msi

3. Disable WOW: Run the following command to disable WOW feature.

 dism /online /disable-feature /featurename:ServerCore-WOW64

4. Reboot the system.

Note: Disabling or enabling the WOW component would require system reboot.

5. Server Administrator is installed. You can launch the Server Administrator from a remote device as Server Core does not have the user interface

Monitoring Dell Servers in HP Systems Insight Manager

Monitoring Dell Servers in HP Systems Insight Manager

This post explains the details of managing Dell Servers with HP Systems Insight Manager(HPSIM) and enabling SNMP Traps support. The server MIB files “10892.mib” and “dcstorag.mib” can be used for monitoring the Dell Servers in an environment managed by HPSIM.


Managed Node Pre-Requisites


         Installing the OpenManage Server Administrator

            The Dell Server should be installed with the Server Administrator Software to enable the monitoring. The Server Administrator software comes with the installation DVD and the details for the installation and configuration of the OpenManage Server Administrator is available in support.dell.com manuals.

     Configuring the SNMP Service

            The SNMP Service needs to be configured in the Server to enable the SNMP communication between the Dell Server and HPSIM. To enable the traps to be forwarded to the HP SIM server the SNMP Trap destination needs to be configured properly with the HP SIM Server IP Address. The details for the SNMP configuration configuration is available in the Server Administrator documents in support.dell.com.

The current latest version can be downloaded from support.dell.com :
http://support.dell.com/support/edocs/software/svradmin/7.1/en/index.htm

Loading the Dell MIBs in HPSIM

            The Dell Server MIB files are available with the Server Administrator DVD and also the MIBs can be downloaded from support.dell.com.


  • Uploading he MIBs:

Uploading the MIBs is simply copying the MIBs from the downloaded folder to the \Program Files\HP\Systems Insight Manager\mibs folder

  1.  Copy “10892.mib” to \Program Files\HP\Systems Insight Manager\mibs
  2.  Copy “dcstorag.mib” to \Program Files\HP\Systems Insight Manager\mibs

Note – As HPSIM generates an error when a MIB has a filename that contains only    numbers, rename “10892.mib” to “new10892.mib”, and for consistency also rename to “dcstorag.mib” to “newdcstorag.mib”.

  • Compiling the MIBs:

The MIBs needs to be compiled to generate the intermediate .cfg file which can be used to register the MIBs in HP SIM.

  1. Open a command window (cmd.exe)
  2.  Change the working directory to \Program Files\HP\Systems Insight Manager\mibs.
  3. Enter the command “mcompile new10892.mib”. The MIB should compile and return the message “Mib Compilation completed successfully”.
  4. Enter the command “newdcstorag.mib”. The MIB should compile and return the message “Mib Compilation completed successfully”.
  • Registering the MIBs:


Register the Server MIB files as follows:

  1. Enter the command “mxmib -a new10892.cfg”. The MIB should register and return the message “COMMAND COMPLETED SUCCESSFULLY”.
  2. Enter the command “mxmib -a newdcstorag.cfg”. The MIB should register and return the message “COMMAND COMPLETED SUCCESSFULLY”.

HPSIM – System Type Manager

The System Type Manager is used to define the rules to identify the different systems in HP SIM. The steps used to configure the System Type Manager to recognize a Dell Server are as follows:

Dell Windows Server

  1. Login to HPSIM.
  2. Select Options ‐> Manage System Types.
  3. Click the New… button. The New Rule pane will open below.
  4. Beside System object identifier click the Retrieve from system… button. The Retrieve from system pane will appear below the current pane.
  5. Enter the hostname or IP address of the target Dell system in the Target hostname or IP address text box.
  6. Click Get Response. Note that the response value of “1.3.6.1.4.1.311.1.1.3.1.2” is displayed below.
      • Figure 1
  7. Click the OK button to accept this value and return to the New rule pane.
  8. Beside MIB variable object identifier enter the OID for the Server MIB Attribute “systemManagementSoftwareName” value as “.1.3.6.1.4.1.674.10892.1.100.1”.
      • Figure 2
  9. Beside Object Value click on “Retrieve from System”
  10. Click Get Response. Note that the response value of “Server Administrator” is displayed below. This is the OpenManage Server Administrator software name retrieved from the Dell Server.
      • Figure 3
  11. Click the OK button to accept this value and return to the New rule pane.
  12. Beside Compare rule select Match.
  13. Beside System Type select Server.
  14. Beside Subtype select “Dell”.
  15. Beside Product model enter “Dell Windows Server”.
  16. Leave the Custom management page field blank and click the OK button.

Dell Linux Server

  1. Login to HPSIM.
  2. Select Options ‐> Manage System Types.
  3. Click the New… button. The New Rule pane will open below.
  4. Beside System object identifier click the Retrieve from system… button. The Retrieve from system pane will appear below the current pane.
  5. Enter the hostname or IP address of the target Dell system in the Target hostname or IP address text box.
  6. Click Get Response. Note that the response value of “1.3.6.1.4.1.8072.3.2.10” is displayed below.
      • Figure 4 
  7. Click the OK button to accept this value and return to the New rule pane.
  8. Beside MIB variable object identifier enter the OID for the Server MIB Attribute “systemManagementSoftwareName” value as “.1.3.6.1.4.1.674.10892.1.100.1”.
  9. Beside Object Value click on “Retrieve from System”
  10. Click Get Response. Note that the response value of “Server Administrator” is displayed below. This is the OpenManage Server Administrator software name retrieved from the Dell Server.
  11. Click the OK button to accept this value and return to the New rule pane.
  12. Beside Compare rule select Match.
  13. Beside System Type select Server.
  14. Beside Subtype select “Dell”.
  15. Beside Product model enter “Dell Linux Server”.
  16. Leave the Custom management page field blank and click the OK button.

Discovering Dell Servers

Once the Dell Server system type has been configured in the HP SIM, the Dell Servers can be properly discovered in HP SIM.


  • Global Protocol Settings:

The SNMP settings can be changed as follows:

  • Click Options ‐> Protocol Settings ‐> Global Protocol Settings. The Global Protocol Settings window will appear.
      • Figure 5 
  • Scroll down to the Default SNMP settings section and click on “Global Credentials” and Verify that the required community strings is configured and click on OK button to save the changes.
    • Figure 6


  • Discovering Dell Servers:


    • Click Options ‐> Discovery. The Discovery summary page will be displayed.
      • Figure 7


    • Click on New button, the Discovery options page will be shown.
    • Select the Discovery option “Discover a Single System” and enter the name for the discovery option and enter the IPAddress of the Dell Server.     Note – Also the Group discovery can be used to discover multiple servers.
      • Figure 8


    • Click on Save button to save and accept the changes.

i.        Once the discovery rule is saved, Click on “Run Now” option to execute the discovery Rule. The Discovered Dell Server will be shown as

      • Figure 9


ii.        The “Tools and Links” tab contains the link to launch the OpenManage Sever Administrator Console for Dell Servers.

      • Figure 10


iii.        The Events tab will List the associated events with the corresponding Dell Server.

      • Figure 11


  • Testing Dell Server SNMP Traps:


    • Log on to Dell Server OpenManage Server Administrator console by clicking on the “openmanage” link from “Tools and Links” tab.
    • Navigate to the Temperature page in Main System under Server Module in the left-side navigation tree
      • Figure 12


    • Click on the “System Board Ambient Temperature” in the right-side navigation pane.
    • The Properties page tab will be displayed and select “Set to Values” option and set a value higher than the current Temperature reading to simulate the Warning alert for Temperature.
      • Figure 13
    • Click on Apply option to save the changes and verify that the Temperature status has been changed to Warning.
      • Figure 14


    • Navigate to the Events Tab in the HP SIM and the Temperature Alert should be shown in the Events page.
      • figure 15

The Server Administrator SNMP Traps details are documented in the Message Reference guide and can be downloaded from support.dell.com.

Appendix

MIB Files

#

MIB

MIB Filename

Description

1 Server Administrator Instrumentation MIB 10892.mib The Server Administrator Instrumentation MIB provides

instrumentation data that allows you to monitor the health of a system with

SNMP management applications. It provides:

• Information about the status of temperatures, power supplies, voltages,

currents, fans, and memory at key points in the system

• Rapid access to detailed fault and performance information gathered by

industry standard systems management agents

• Version information for Basic Input/Output System (BIOS), firmware, and operating system

• A detailed account of every cost of ownership (COO) detail about your system

In addition, traps are sent to report a change in status of the health of critical components.

2 Server Administrator Storage Management MIB dcstorag.mib The Server Administrator Storage Management MIB provides storage management data that allows you to monitor the health of storage resources with SNMP management applications.


If interested to know about Monitoring Dell Servers using HP Operations Manager for Windows, please refer to the Dell SPI white paper here


source: http://en.community.dell.com/techcenter/systems-management/w/wiki/3891.monitoring-dell-servers-in-hp-systems-insight-manager.aspx
CLI uninstall Powerchute Business Edition from Windows 2012 Core

Run the following command to deinstall PBE from the Command Line Interface


PowerChute Business Edition Agent:

“C:\Program Files (x86)\InstallShield Installation Information\{BCE9F441-9027-4911-82E0-5FB28057897D}\setup.exe” -runfromtemp -l0x0409 AnyText -removeonly

PowerChute Business Edition Server:

“C:\Program Files (x86)\InstallShield Installation Information\{A6491A4A-AAA0-4892-BFEF-ECD6CECE2FF3}\setup.exe” -runfromtemp -l0x0409 AnyText -removeonly

PowerChute Business Edition Console:

“C:\Program Files (x86)\InstallShield Installation Information\{0F86FD09-BA63-4E45-A70B-604C1106C2F2}\setup.exe” -runfromtemp -l0x0409 AnyText -removeonly


The corresponding directories in “C:\Program Files (x86)\InstallShield Installation Information” could also be removed

Excel – Count colored cells

Copy and paste the following code into you VBA project (alt+f10 in excel)


Public Function cell_colour(Cell_Check As Range) As Long
cell_colour = Cell_Check.Interior.Color
End Function

Public Function count_colour(Count_Range As Range, Colour As Long) As Long
Dim x As Range
count_colour = 0
For Each x In Count_Range
If x.Interior.Color = Colour Then
count_colour = count_colour + 1
End If
Next x
End Function


With the formula “count_colour(B1:B10;cell_colour($A$1))” you can count the colorourd cells in B1 to B10 with the same colour as the cell in A1