Update a HA Netscaler environment

source:http://support.citrix.com/article/CTX127455

To update an HA netscaler, do the following steps.

User-added image

Upgrade the secondary netscaler appliance

    1. Save the config: save config
    2. Switch to shell: shell
    3. Change to the installation directory: cd /var/nsinstall
    4. Create a temporary directory: mkdir x.xnsinstall
    5. Chang to the created directory: cd x.xnsinstall
    6. Upload the files to the temporary directory (e.g. pscp build-11.0-66.11_nc.tgz nsroot@192.168.1.1:/var/nsinstall/11.0nsinstall/build-11.0-66.11_nc.tgz)
    7. Extract the files: tar -zxvf ns-x.0-xx.x-doc.tgz
    8. Install the software: # ./installns
    9. Press y to restart the appliance
    10. Check the state of the appliance: > show ha node
      This should state that it is the secondary node and synchronization is disabled. To disable the synchronization manually run the command: > set node -hasync disable
    11. Check the configuration
      The version can be found with the command:  > show version
    12. Failover the appliance: > force failover

Upgrade the primary netscaler appliance

  1. Follow step 1 to 9 mentioned in the previous section
  2. Check if the appliance is UP and it is the primary node: > show ha node
    If the appliance isn’t the primary application a failover can be initiated: > force failover

Enable Synchronization

  1. Log on the secondary node, check if it is the secondary node: > show node
  2. Enable synchronization: > set node -hasync enable
  3. Check synchronization status: > show ns runningconfig

The update has been completed. Additional backups can be removed as well the downloaded files in the created directory (step 4).

send “show tech all” from a HP switch to a tftp server

Introduction

A ‘show tech all’ file contains a lot of information from the switch. Although it is possible to capture this output using session logging in your telnet or terminal emulator application, it is better to transfer the file via TFTP. Session logs tend to have a lot of control sequences embedded which makes it difficult for us to analyze the file.


If you do not have IP connectivity on the switch and the switch has a console port, it is possible to transfer the ‘show tech all’ file via the console cable, see at the end of this document.

Requirements

* You must have a TFTP server running on a PC (See ‘obtaining a TFTP server’ below)

* Your switch must have IP connectivity to the PC running a TFTP server

* You must have command line access to the switch

Obtaining a TFTP server

You can download a simple and easy to use TFTP server for free from http://www.solarwinds.com/


Alternatively you can download TFTPd32 from http://tftpd32.jounin.net/ which also includes simple SNTP, syslog and DHCP servers.

Obtaining the ‘show tech all’ via TFTP

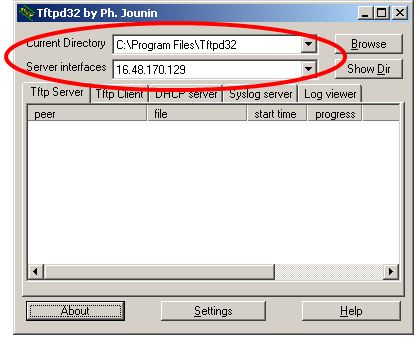
Start your TFTP server:

tftp


Notice the ‘Current Directory’ setting; this is where the file from the switch will end up.


Also notice the ‘Server interfaces’ setting; this is the IP address you will specify on the switch command line when creating the ‘show tech all’ file.


Connect to the command line of the switch and log in if needed. You should NOT be in configuration mode on the switch, but you do need to be in enable (manager) mode. Issue the following command:


Switch# copy command-output ‘show tech all’ tftp 12.23.34.45 xxxx.txt


Where 12.23.34.45 is the IP address of the PC running the TFTP server, and xxxx is something to identify the switch.


The switch will now generate the required file, and transfer it to your PC via TFTP. You can pick up the file in the “Current Directory” folder and e-mail it to ProCurve support.

Obtaining the ‘show tech all’ via console cable

If there is no IP connectivity to the switch, it is still possible to obtain a ‘show tech all’ file if the switch has a console port. You can use Hyper Terminal which is typically installed with Windows, or you may choose to use a free application like Tera Term (http://en.sourceforge.jp/projects/ttssh2/releases/).


Connect the serial cable between your computer and the switch. Establish a connection, the parameters are 9600,8,N,1,N (9600 baud, 8 bits, no parity, 1 stop bit, no flow control).


***NOTE*** If the above settings don’t respond and you have a newer RJ45 looking Serial port on the switch use XON/XOFF instead of NONE at the last setting (Flow Control)***


When you have command line access via the console, issue the following command:


Switch# copy command ‘sh tech all’ xmodem


Now instruct the terminal emulator application to receive the file:


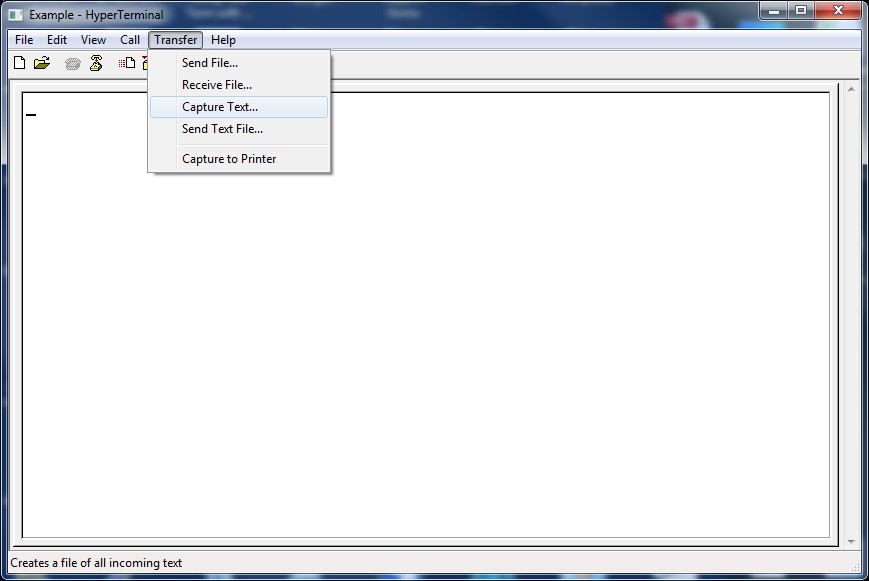
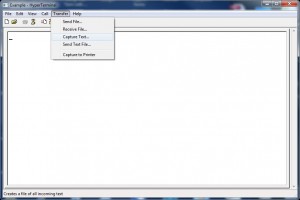
Hyper Terminal – In the menu select Transfer->Receive File, Set receiving protocol to XMODEM, and note the destination directory. Click Receive, name the file, and save.


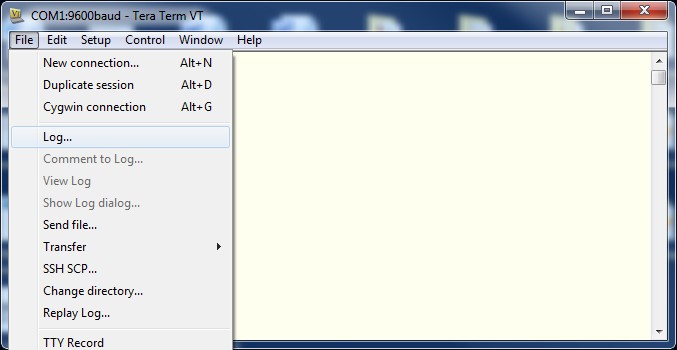
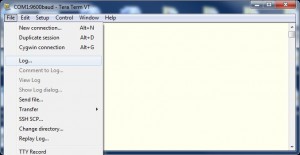
Tera Term – In the menu select File->Transfer->XMODEM->Receive, name the file, and save.


Once the file transfer has completed, you can e-mail it to HPN support.


Note that the switch may time out before you start receiving the file. Simply press Arrow Up in the terminal session, re-execute the command, and try again.


Logging the output of ‘show tech all’ via a terminal emulator:

Choose Transfer -> Capture Text or the follow the examples below.

This opens a window where you can scroll down to the folder where you wish to save the logs to. In this “Browse” window you can also define a name for the log file, for instance YYYY-MM-DD-HH-MM.txt

hyperterminalputty


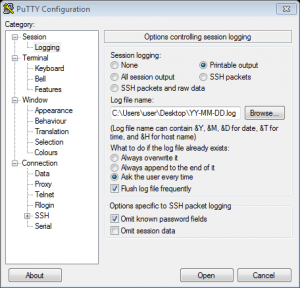
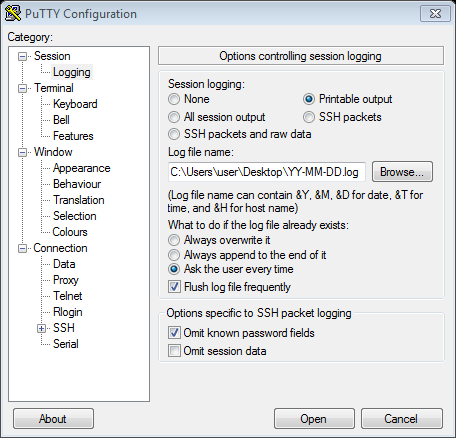
***If your preferred terminal emulator is Putty, ensure that you tick the option enabling “Printable output. ***


log


Choose the folder you wish to save the logs to. Your desktop is preferable.

Now your switch will send its logs to the file on your desktop, as long as it is connected via your terminal emulator.


download as word file: [wpdm_file id=83]

Using Tech Support Mode in ESXi 4.1

Enable the Tech Support Mode in ESXi 4.1

http://kb.vmware.com/kb/1017910

Enabling and Accessing Tech Support Mode

To enable local or remote TSM from the Direct Console User Interface (DCUI):
  1. At the DCUI of the ESXi host, press F2 and provide credentials when prompted.
  2. Scroll to Troubleshooting Options, and press Enter.
  3. If you want to enable local TSM, select Local Tech Support and press Enter once. This allows users to login on the virtual console of the ESXi host.

    If you want to enable remote TSM, select Remote Tech Support (SSH) and press Enter once. This allows users to login via SSH on the virtual console of the ESXi host.

  4. Optionally, if you want to configure the timeout for TSM:
    1. Select Modify Tech Support timeout and press Enter.
    2. Enter the desired timeout value in minutes and press Enter.
  5. Press Esc three times to return to the main DCUI screen.
To enable local or remote TSM from the vSphere Client:
  1. Select the host and click the Configuration tab.
  2. Click Security profile > Properties.
  3. Click Local Tech Support or Remote Tech Support (SSH) and click Options.
  4. Choose the desired startup policy and click Start, then click OK.
  5. Verify that the daemon selected in step 3 shows as running in the Services Properties window.
To configure the TSM timeout value using the vSphere Client:
  1. Select the host and click the Configuration tab.
  2. Click Advanced Settings.
  3. Change the UserVars.TSMTimeOut field to the desired value in minutes.
  4. Click OK.
To access the local TSM:
  1. At the main DCUI screen, press ALT+F1 simultaneously. This opens a virtual console window to the host.
  2. Provide credentials when prompted.

    Note: When typing the password, characters are not displayed on the console.

To access the remote TSM:
  1. Open an SSH client.
  2. Specify the IP address or domain name of the ESX host.

    Notes:

    • Directions may vary depending on what SSH client you are using. For more information, consult vendor documentation and support.
    • By default, SSH works on TCP port 22.
  3. Provide credentials when prompted.

Update Firmware DELL PowerEdge under ESX 3.5u2

For a customer we needed to upgrade ESX servers from 32 GB to 46 GB. This type of servers (Dell PowerEdge 2850) had a problem reading 8GB memory modules. To support 8 GB memory modules a minimum BIOS level is 2.3.1 and BMC level 2.10 is required.

Therefore we needed to upgrade the firmware of the BIOS and BMC.

I downloaded the newest Dell images from the Dell site (actually the complete DVD image of all updates) and attached the DVD in the DVD player. After that i mounted the DVD with a ssh session:

mount /dev/cdrom /mnt/cdrom

I browsed to the repository directory of the DVD (offcourse you can copy the files through the netwerk with tools like winscp. Make sure you have the proper rights to execute the files “chmod +x filename.BIN”) and updated the BMC first (no reboot required) with the command:

./BMC_FRMW_LX_R202152.BIN

This will enter the install dialog wich you need to follow. After the BMC update was finished i continued with the BIOS update:

./PE2950_BIOS_LX_2.6.1.BIN

After this the Server needs to reboot on which point (during reboot) i shut down the server and placed the 8 GB memory modules in slot 1, 2, 5 and 6 for optimal performance (this are the first 4 slots).

PuTTY access to the console, and WinSCP access to the ESXi file system:

Go to the ESXi console and press alt+F1

Type: unsupported  

Enter the root password

At the prompt type “vi /etc/inetd.conf”

Look for the line that starts with “#ssh” (you can search with pressing “/”)

Remove the “#” (press the “x” if the cursor is on the character)

Save “/etc/inetd.conf” by typing “:wq!”

Restart the host server.

Note: you can avoid restarting the server, but it’s no longer as easy as restarting services.sh. You need to:

Run ps | grep inetd

Look through the output for something like 1299 1299 busybox       inetd, process id 1299

Run kill -HUP <process_id>

ALT+F2 gets you back to the main management screen.