Go to http://ftp1.dell.com and select your model
Tag Archives: Dell
Installing Dell OpenManage Server Administrator on VMWare ESXi 5.5
Installing Dell OpenManage Server Administrator on VMWare ESXi 5.5
Installing Dell OMSA on a ESXi server allows you to see more detailed information regarding the Dell hardware. It also allows you to perform operations such as specifying hot spares and rebuilding RAID arrays. After you install OMSA on the ESXi server you can install the OMSA web-based GUI on another Windows PC or Server in order to access OMSA.
The steps below will get OMSA up and running on VMWare ESXi 5.5. Be sure to download the version of the OMSA Offline Installation Bundle that corresponds to your version of ESXi.
Download the OMSA Offline Bundle from the Dell Website.
Enable SSH on the ESXi Server
- Open and log-in to VMWare vShpere Client.
- Select the server node in the tree view on the left.
- Click the Configuration tab along the top.
- Click the Properties link to the right of Services.
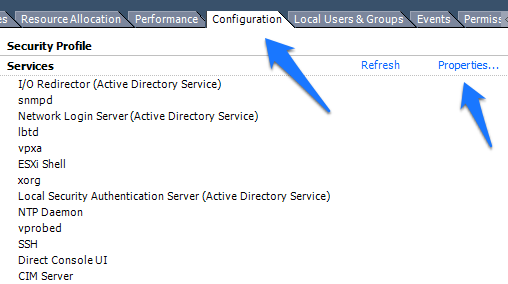
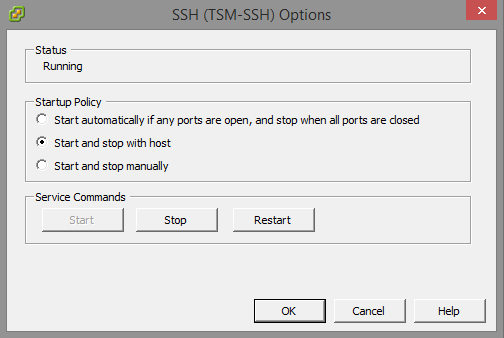
- Select SSH in the list and click Options.
- Select “Start and stop with host”
- Under Service Commands click Start.
- Click OK.
Transfer the OMSA Offline Bundle to the Server
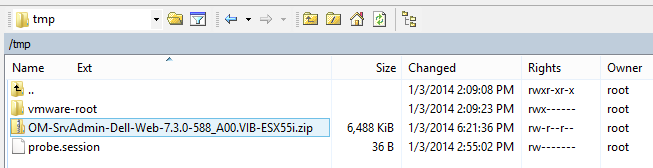
Since SSH is enabled the easiest way to transfer the file “OM-SrvAdmin-Dell-Web-7.3.0-588_A00.VIB-ESX55i.zip” to the server is with a SFTP client. I typically use WinSCP on Windows, Transmit on a Mac, or the command line SCP client on Linux systems. I’ll show you how to use WinSCP below:
- Open WinSCP.
- Click New to create a new connection.
- Enter the host name of the ESXi server, user name and password. (User name is root by default).
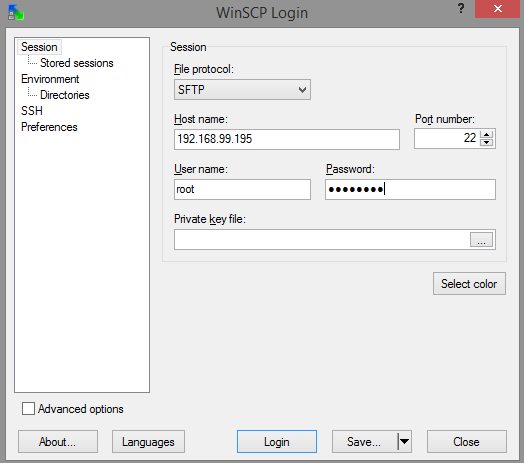
- Click Login.
- If this is your first time connecting to this host you’ll see a warning screen about the server’s host key. You can click Yes to continue.
- Once connected you’ll see an explorer type view with your local files on the left and the server’s file system on the right.
- You want to navigate to the /tmp/ folder.
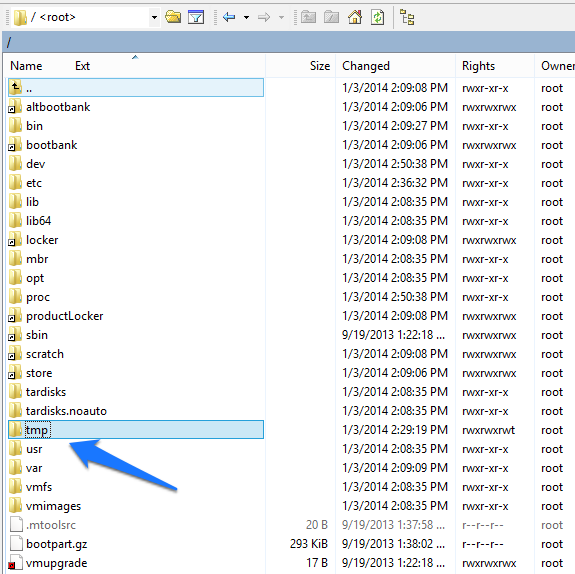
- Double click tmp to enter the directory.
- In the left pane browse to where you downloaded “OM-SrvAdmin-Dell-Web-7.3.0-588_A00.VIB-ESX55i.zip”
- Once located, drag the file to the right pane. When the Copy dialog comes up click Copy.
Install the Offline Bundle
Its now time to install the bundle. To do this you’ll need a SSH client. I use Putty on Windows and the command line SSH client on Mac and Linux. I’ll show you how to use Putty below.
- Open Putty.
- Enter the ESXi server host name and click Open.
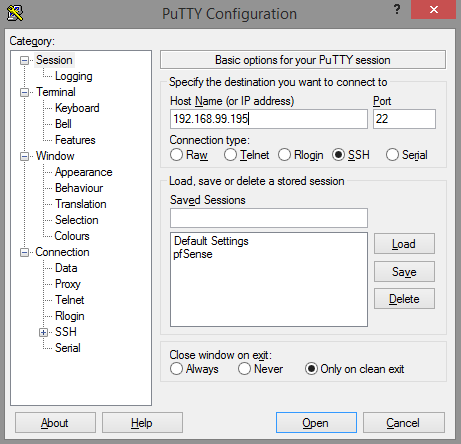
- Again if this is your first time connecting to this host you’ll see a Putty Security Alert dialog box. Click Yes to continue.
- Enter the user name (root).
- Enter the password.
- At the command line type “esxcli software vib install -d /tmp/OM-SrvAdmin-Dell-Web-7.3.0-588_A00.VIB-ESX55i.zip“
- Make sure to match the file name of the file you actually downloaded since version numbers will change frequently. You can use tab-auto-complete to type in the first few letters such as OM- and then press tab to complete the file name.
- Press enter.
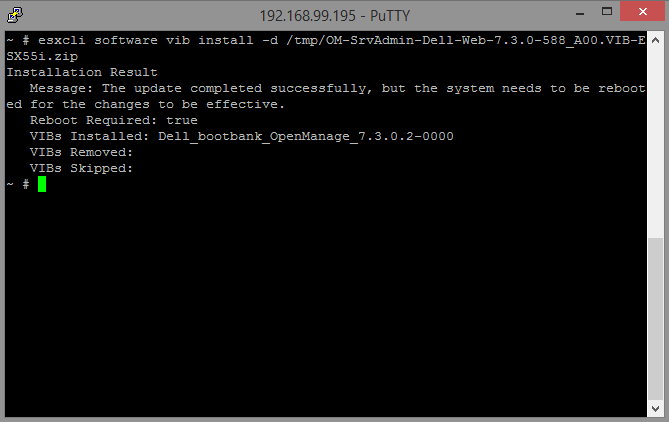
- Reboot the server to complete the installation. If you don’t have any running hosts you’ll be able to restart without being in maintenance mode. If you do have running hosts you’ll need to shut them down and then put the ESXi server into maintenance mode.
Installing OpenManage Server Administrator Managed Node
- Download the installer for Dell OpenManage Server Administrator Managed Node (Windows),v7.3 to a Windows PC.
- Run and install the application.
- The installer will complain about it not being installed on Dell software but you can proceed with the server installation only.
- Dell OMSA is web-based, relying on a Java back-end so when you double click the icon on your desktop it will open your default browser.
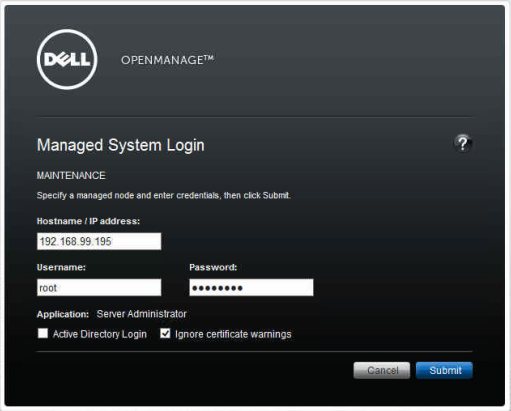
- Enter the ESXi host, user name and password. Check the box to Ingore certificate warnings.
- This should allow you to use OpenManage similarly to how you would on a bare-metal install of Windows Server on a Dell system.
How to install Dell Openmanage Server Administratior on ESXi using VMware Update Manager
http://oxfordsbsguy.com/2013/08/09/how-to-install-dell-openmanage-server-administrator-on-esxi-5-1-using-vmware-update-manager/
1. Download the OpenManage Server Administrator vSphere Installation Bundle (VIB) for ESXi 5.1, v7.3 from Dell’s website. It can be found on the Product Support page in the System Management section. Or you can download it from here.
 2. Login in to vCenter, click Home, Update Manager and then select the Patch Repository tab.
 3. Click Import Patches.
 4. Browse to the downloaded zip file and click Next. If you get a Security Warning dialogue box pop up, click Ignore.
 6. Click Finish to confirm the import.
 7. If you browse the Patch Repository you will now see the OpenManage 7.3 for ESXi 510 patch.

8. Click the Baseline and Groups tab. Then click on the left-hand Create option to create a new baseline.

9. Give the baseline a name, Dell Host Extension, and select the Host Extension radio button, and click Next.
 10. Browse to the OpenManage 7.3 for ESXi510 extension, select it and click the Down Arrow to add it, click Next.

11. Review the selection and click Finish.

12. Click on Home, Hosts and Clusters, select the host you want to Install OpenManage Server Administrator on and select the Update Manager tab, then click Attach.
 13. Select the Dell Host Extension baseline, then click Attach.
 14. Select Patches and Extensions check box and click Scan.
 15. To Apply the Extension, put the host into Maintenance Mode. Click the Stage button and then click the Remediate button.
To Access Server Administrator on ESXi 5.1 do the following or, just copy and paste the following address into a browser, changing the ESXiservername:
https://ESXiservername:1311/OMSALogin?manageDWS=false
1. From a Windows Server with Dell OpenManage Server Administrator installed, Open the local Server Administrator instance.
2. Click Logout in the top right hand corner of the web interface.
3. Click Log in.
 4. At the bottom of the login dialogue box, click Manage Remote Node.

4. Enter the Esxi hostname or IP address, username and password, and check the box to Ignore certificate warnings. Click Submit.
 You will now be presented with the Dell OpenManage Server Administrator interface for your ESXi server.

Configure iDRAC with RACADM
To setup a iDRAC with a static ip address, you can use the following commands from the Dell server:
racadm config -g cfgLanNetworking -o cfgNicIpAddress 10.0.0.1
racadm config -g cfgLanNetworking -o cfgNicGateway 10.0.0.254
racadm config -g cfgLanNetworking -o cfgNicNetmask 255.255.255.0
racadm config -g cfgLanNetworking -o cfgNicUseDHCP 0
racadm config -g cfgLanNetworking -o cfgDNSServersFromDHCP 0
racadm config -g cfgLanNetworking -o cfgDNSServer1 10.0.0.100
racadm config -g cfgLanNetworking -o cfgDNSServer2 10.0.0.101
racadm racreset
It is not necessary to do a reset of the idrac (last command).
To configure it for a remote server use:
racadm -r <ip address or hostname> -u <username> -p <password> <subcommand>
references:
Dell: How to install Server Administrator on Windows 2012 Server Core Edition
Do the following to install Server Administrator on a Server Core. Once installed, you can launch OMSA using a supported remote browser.
1. Enable WOW component. Run the following command from the Server Core command prompt:
dism /online /enable-feature /featurename:ServerCore-WOW64
2. Install x64 Server Administrator. Run the following command to install
Msiexec /i SysMgmtx64.msi
3. Disable WOW: Run the following command to disable WOW feature.
dism /online /disable-feature /featurename:ServerCore-WOW64
4. Reboot the system.
Note: Disabling or enabling the WOW component would require system reboot.
5. Server Administrator is installed. You can launch the Server Administrator from a remote device as Server Core does not have the user interface
disabling autonegotiate on the Dell iDRAC
Dell iDRAC devices tend to have problems negotiating with a switch port that’s at 1000mbit/auto – the device is limited to 100mbit. The quickest way to get it working is to disable auto and just go 100/Full.
/admin1-> racadm getconfig -g cfgNetTuning
cfgNetTuningNic100MB=2
cfgNetTuningNicFullDuplex=1
cfgNetTuningNicMtu=1500
cfgNetTuningNicAutoneg=1
/admin1-> racadm config -g cfgNetTuning -o cfgNetTuningNicAutoneg 0
Object value modified successfully
/admin1-> racadm racreset
RAC reset operation initiated successfully. It may take a few
 minutes for the RAC to come online again.
After a minute or so from it’s reboot it should pop right up on the network.
source: http://tacticalvim.wordpress.com/2013/03/07/disabling-autonegotiate-on-the-dell-idrac/
Monitoring Dell Servers in HP Systems Insight Manager
Monitoring Dell Servers in HP Systems Insight Manager
This post explains the details of managing Dell Servers with HP Systems Insight Manager(HPSIM) and enabling SNMP Traps support. The server MIB files “10892.mib” and “dcstorag.mib” can be used for monitoring the Dell Servers in an environment managed by HPSIM.
Managed Node Pre-Requisites
Installing the OpenManage Server Administrator
The Dell Server should be installed with the Server Administrator Software to enable the monitoring. The Server Administrator software comes with the installation DVD and the details for the installation and configuration of the OpenManage Server Administrator is available in support.dell.com manuals.
Configuring the SNMP Service
The SNMP Service needs to be configured in the Server to enable the SNMP communication between the Dell Server and HPSIM. To enable the traps to be forwarded to the HP SIM server the SNMP Trap destination needs to be configured properly with the HP SIM Server IP Address. The details for the SNMP configuration configuration is available in the Server Administrator documents in support.dell.com.
The current latest version can be downloaded from support.dell.com :
@ http://support.dell.com/support/edocs/software/svradmin/7.1/en/index.htm
Loading the Dell MIBs in HPSIM
The Dell Server MIB files are available with the Server Administrator DVD and also the MIBs can be downloaded from support.dell.com.
- Uploading he MIBs:
Uploading the MIBs is simply copying the MIBs from the downloaded folder to the \Program Files\HP\Systems Insight Manager\mibs folder
- Copy “10892.mib” to \Program Files\HP\Systems Insight Manager\mibs
- Copy “dcstorag.mib” to \Program Files\HP\Systems Insight Manager\mibs
Note – As HPSIM generates an error when a MIB has a filename that contains only numbers, rename “10892.mib” to “new10892.mib”, and for consistency also rename to “dcstorag.mib” to “newdcstorag.mib”.
- Compiling the MIBs:
The MIBs needs to be compiled to generate the intermediate .cfg file which can be used to register the MIBs in HP SIM.
- Open a command window (cmd.exe)
- Change the working directory to \Program Files\HP\Systems Insight Manager\mibs.
- Enter the command “mcompile new10892.mib”. The MIB should compile and return the message “Mib Compilation completed successfully”.
- Enter the command “newdcstorag.mib”. The MIB should compile and return the message “Mib Compilation completed successfully”.
- Registering the MIBs:
Register the Server MIB files as follows:
- Enter the command “mxmib -a new10892.cfg”. The MIB should register and return the message “COMMAND COMPLETED SUCCESSFULLY”.
- Enter the command “mxmib -a newdcstorag.cfg”. The MIB should register and return the message “COMMAND COMPLETED SUCCESSFULLY”.
HPSIM – System Type Manager
The System Type Manager is used to define the rules to identify the different systems in HP SIM. The steps used to configure the System Type Manager to recognize a Dell Server are as follows:
Dell Windows Server
- Login to HPSIM.
- Select Options ‐> Manage System Types.
- Click the New… button. The New Rule pane will open below.
- Beside System object identifier click the Retrieve from system… button. The Retrieve from system pane will appear below the current pane.
- Enter the hostname or IP address of the target Dell system in the Target hostname or IP address text box.
- Click Get Response. Note that the response value of “1.3.6.1.4.1.311.1.1.3.1.2” is displayed below.
-
- Figure 1

- Figure 1
-
- Click the OK button to accept this value and return to the New rule pane.
- Beside MIB variable object identifier enter the OID for the Server MIB Attribute “systemManagementSoftwareName” value as “.1.3.6.1.4.1.674.10892.1.100.1”.
-
- Figure 2

- Figure 2
-
- Beside Object Value click on “Retrieve from System”
- Click Get Response. Note that the response value of “Server Administrator” is displayed below. This is the OpenManage Server Administrator software name retrieved from the Dell Server.
-
- Figure 3

- Figure 3
-
- Click the OK button to accept this value and return to the New rule pane.
- Beside Compare rule select Match.
- Beside System Type select Server.
- Beside Subtype select “Dell”.
- Beside Product model enter “Dell Windows Server”.
- Leave the Custom management page field blank and click the OK button.


Dell Linux Server
- Login to HPSIM.
- Select Options ‐> Manage System Types.
- Click the New… button. The New Rule pane will open below.
- Beside System object identifier click the Retrieve from system… button. The Retrieve from system pane will appear below the current pane.
- Enter the hostname or IP address of the target Dell system in the Target hostname or IP address text box.
- Click Get Response. Note that the response value of “1.3.6.1.4.1.8072.3.2.10” is displayed below.
-
- Figure 4

- Figure 4
-
- Click the OK button to accept this value and return to the New rule pane.
- Beside MIB variable object identifier enter the OID for the Server MIB Attribute “systemManagementSoftwareName” value as “.1.3.6.1.4.1.674.10892.1.100.1”.
- Beside Object Value click on “Retrieve from System”
- Click Get Response. Note that the response value of “Server Administrator” is displayed below. This is the OpenManage Server Administrator software name retrieved from the Dell Server.
- Click the OK button to accept this value and return to the New rule pane.
- Beside Compare rule select Match.
- Beside System Type select Server.
- Beside Subtype select “Dell”.
- Beside Product model enter “Dell Linux Server”.
- Leave the Custom management page field blank and click the OK button.

Discovering Dell Servers
Once the Dell Server system type has been configured in the HP SIM, the Dell Servers can be properly discovered in HP SIM.
- Global Protocol Settings:
The SNMP settings can be changed as follows:
- Click Options ‐> Protocol Settings ‐> Global Protocol Settings. The Global Protocol Settings window will appear.
-
- Figure 5

- Figure 5
-
- Scroll down to the Default SNMP settings section and click on “Global Credentials” and Verify that the required community strings is configured and click on OK button to save the changes.

- Figure 6


- Discovering Dell Servers:
-
- Click Options ‐> Discovery. The Discovery summary page will be displayed.
- Figure 7

- Figure 7
- Click Options ‐> Discovery. The Discovery summary page will be displayed.

- Click on New button, the Discovery options page will be shown.
- Select the Discovery option “Discover a Single System” and enter the name for the discovery option and enter the IPAddress of the Dell Server. Note – Also the Group discovery can be used to discover multiple servers.
- Figure 8

- Figure 8

-
- Click on Save button to save and accept the changes.
i. Once the discovery rule is saved, Click on “Run Now” option to execute the discovery Rule. The Discovered Dell Server will be shown as
-
-
- Figure 9

- Figure 9
-

ii. The “Tools and Links” tab contains the link to launch the OpenManage Sever Administrator Console for Dell Servers.
-
-
- Figure 10

- Figure 10
-

iii. The Events tab will List the associated events with the corresponding Dell Server.
-
-
- Figure 11

- Figure 11
-

- Testing Dell Server SNMP Traps:
-
- Log on to Dell Server OpenManage Server Administrator console by clicking on the “openmanage” link from “Tools and Links” tab.
- Navigate to the Temperature page in Main System under Server Module in the left-side navigation tree
- Figure 12

- Figure 12

-
- Click on the “System Board Ambient Temperature” in the right-side navigation pane.
- The Properties page tab will be displayed and select “Set to Values” option and set a value higher than the current Temperature reading to simulate the Warning alert for Temperature.
- Figure 13

- Figure 13

-
- Click on Apply option to save the changes and verify that the Temperature status has been changed to Warning.
- Figure 14

- Figure 14
- Click on Apply option to save the changes and verify that the Temperature status has been changed to Warning.

-
- Navigate to the Events Tab in the HP SIM and the Temperature Alert should be shown in the Events page.
- figure 15

- figure 15
- Navigate to the Events Tab in the HP SIM and the Temperature Alert should be shown in the Events page.

The Server Administrator SNMP Traps details are documented in the Message Reference guide and can be downloaded from support.dell.com.
Appendix
MIB Files
|
# |
MIB |
MIB Filename |
Description |
| 1 | Server Administrator Instrumentation MIB | 10892.mib | The Server Administrator Instrumentation MIB provides
instrumentation data that allows you to monitor the health of a system with SNMP management applications. It provides: • Information about the status of temperatures, power supplies, voltages, currents, fans, and memory at key points in the system • Rapid access to detailed fault and performance information gathered by industry standard systems management agents • Version information for Basic Input/Output System (BIOS), firmware, and operating system • A detailed account of every cost of ownership (COO) detail about your system In addition, traps are sent to report a change in status of the health of critical components. |
| 2 | Server Administrator Storage Management MIB | dcstorag.mib | The Server Administrator Storage Management MIB provides storage management data that allows you to monitor the health of storage resources with SNMP management applications. |
If interested to know about Monitoring Dell Servers using HP Operations Manager for Windows, please refer to the Dell SPI white paper here
Dell Client System Update Application
This package provides the application for Dell Client System Update and is supported on Optiplex, Tablet, Precision and Latitude models that are running the following Windows Operating Systems: XP, VISTA (32/64-bit), Windows 7 (32/64-bit) and Windows 8 (32/64-bit).
1.Dell Client System Update 1×1 Tool is a stand-alone application that provides a Windows Update like experience for Dell Business Client platforms.
2.The application provides the ability to retrieve and update systems software released by Dell.
Note: The updates offered and provided by this tool may be a subset of the updates offered on Dell’s support website.
link: http://www.dell.com/support/drivers/us/en/19/driverdetails?driverid=MJH8R
Sample PowerShell Scripts with OMSA
sample Function to launch DRAC, based on computer name
Below are sample PowerShell scripts for querying data from OMSA – download the attached .txt file for all the examples.
| get-wmiobject -namespace root\cimv2\dell -computer Server1 -list | sort-object name | Displays all classes int he root\cimv2\dell namespace on Server1 |
| $a = get-wmiobject dell_chassis -namespace root\cimv2\dell -computer Server1 $a | select-object AmpStatus, EsmLogStatus, FanRedStatus, FanStatus, MemStatus, Model, ProcStatus, PsRedStatus, PsStatus, SecurityBreach, SerialNumber, Status, SystemClass, TempStatus, VoltStatus, VrmStatus |
Displayoverall hardware status based on info from Dell_Chassis |
| $a = get-wmiobject Dell_baseboard -namespace root\cimv2\dell -computer Server1 $a.PartNumber, $a.BaseBoardTypeDescString |
Display the part number of the motherboard |
| $a = get-wmiobject cim_PhysicalMemory -namespace root\cimv2\dell -computer Server1 $a | select-object capacity, datawidth, formfactor, memorytype, name, speedasstring, status, tag, totalwidth | format-table |
Displays Physical Memory information (speed, type, etc) |
| $a = get-wmiobject cim_temperaturesensor -namespace root\cimv2\dell -computer Server1 $a | select-object baseunits, CurrentReading, LowerThresholdCritical, LowerThresholdNonCritical, name, status, unitmodifier, upperthresholdcritical,upperthresholdnoncritical |
Show Current Temperature sensor information (CurrentReading in Celsius) |
| get-wmiobject cim_tachometer -namespace root\cimv2\dell -computer Server1 | select-object Name, CurrentReading | Displays Current Fan Speed |
| get-wmiobject cim_fru -namespace root\cimv2\dell -computer Server1 | select-object DeviceID, FRUManufacturerName, FRUPartNumberName, FRUSerialNumberName | Displays “Field Replaceable Units” (FRU) information for specific components |
| get-wmiobject cim_powersupply -namespace root\cimv2\dell -computer Server1 | select-object name, DeviceID, Status, TotalOutputPower | Displays the total output power of the supply – in milliwatts |
| get-wmiobject cim_processor -namespace root\cimv2\dell -computer Server1 | select-object CoreCount, CoreEnabledCount, CPUStatus, CurrentClockSpeed, DeviceID, MaxClockSpeed, Name | ft -autosize | Displays processor information |
| get-wmiobject dell_networkport -namespace root\cimv2\dell -computer Server1 | select-object OSAdapterDescription, IsTOEEnable | Displays if TCP Offload Engine (TOE) is enabled |
| $a = get-wmiobject DELL_PowerConsumptionData -namespace root\cimv2\dell -computer Server1 $a | select-object Name, CumulativePowerReading, maxPowerConsumption, minPowerConsumption, parStartTime, parTime, peakAmpReading, peakHeadRoom, peakWattReading, powerCap, powerCapCapabilities, pwrStartTime, pwrTime, Status |
Displays valuable power consumption information – shows “CumulativePowerReading based from pwrStartTime, as well as min/max power consumption, and peak amps, watts, etc. |
| get-wmiobject CIM_BIOSElement -namespace root\cimv2\dell -computer Server1 | select-object InstallDate, Name, Version | Displays BIOS Version, and installation date |
| get-wmiobject CIM_BIOSElement -namespace root\cimv2\dell -computer Server1 | % {$_.ConvertToDateTime($_.InstallDate), $_.Name, $_.Version} | Convert BIOS Install Date time to a friendly date/time |
| get-wmiobject DELL_Firmware -namespace root\cimv2\dell -computer Server1 | select-object Name, Version | Displays DRAC Version information |
| get-wmiobject Dell_SoftwareFeature -namespace root\cimv2\dell -computer Server1 | select-object Description, OmsaURL, Version | Displays the OMSAURL used to connect to DRAC |
| function LaunchDrac($strComputerName) { $a = get-wmiobject Dell_SoftwareFeature -namespace root\cimv2\dell -computer $strComputerName | select-object Description, OmsaURL, Version $ie = new-object -comobject InternetExplorer.Application $ie.visible = $true $ie.navigate(($a.omsaurl.split(‘,’))[0]) } |
sample Function to launch DRAC, based on computer name |
How to Set or Change a Dell PowerEdge Service Tag
Source: http://lonesysadmin.net/2011/03/08/how-to-set-a-dell-poweredge-service-tag/
Got a Dell PowerEdge that you replaced the motherboard on, and now it doesn’t have a service tag? Reset it with the asset.com tool, which I’ve conveniently packaged as both a floppy disk image and an ISO for those of us in need. They both use the Windows 7 boot disk DOS and asset_A209.com from ftp.dell.com (renamed to asset.com).
[wpdm_file id=50]
[wpdm_file id=51]
Once you boot from these you can set the service tag with:
asset /s <service tag>
You can also set the asset tag with:
asset <asset tag>
Or clear the asset tag with:
asset /d