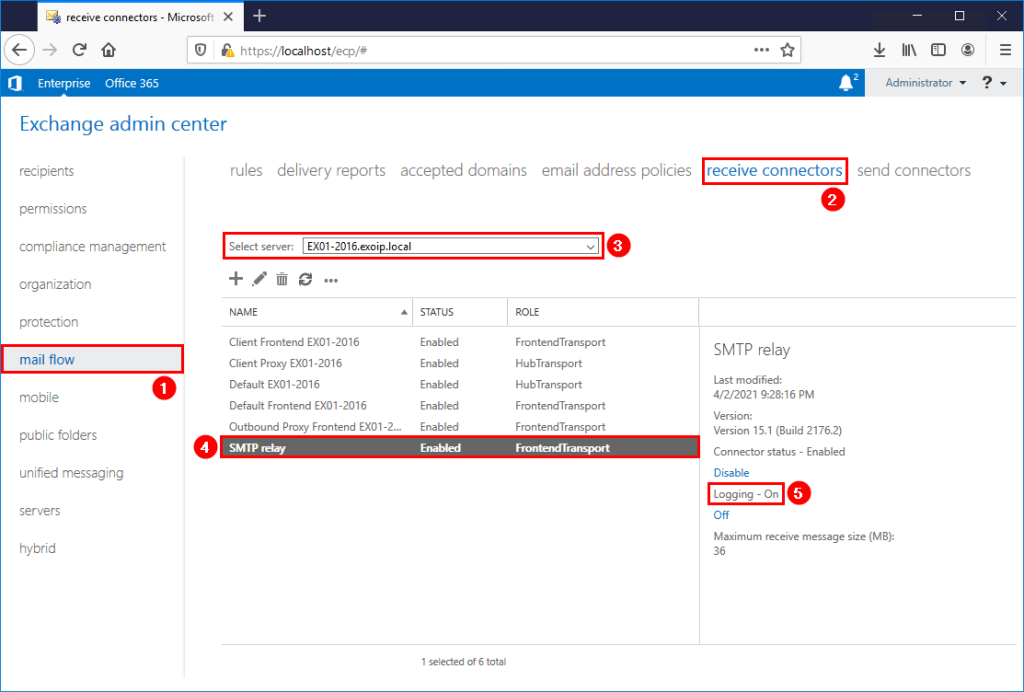
Find IP addresses using Exchange SMTP relay

see Find IP addresses using Exchange SMTP relay – ALI TAJRAN

To make this work, your SMTP relay logging should be enabled.

The script will look into your logfiles and export all IP address which have been using the relay service. If your loglocations is different then the default (C:\Program Files\Microsoft\Exchange Server\V15\TransportRoles\Logs\FrontEnd\ProtocolLog\SmtpReceive), make sure to alter it in the script.

Your logfile location can be found by executing the following powershell script:

Get-FrontendTransportService | fl Name,Identity,Receive*

Prepare SMTP-Review PowerShell script

Create two folders on the Exchange Server (C:) drive:

  • Temp
  • Scripts

Copy and paste the below code into Notepad. Give it the name SMTP-Review.ps1 and place it in the C:\scripts folder.

<#
    .SYNOPSIS
    SMTP-Review.ps1

    .DESCRIPTION
    Script is intended to help determine servers that are using an Exchange server to connect and send email.
    This is especially pertinent in a decommission scenario, where the logs are to be checked to ensure that
    all SMTP traffic has been moved to the correct endpoint.

    .LINK
    www.alitajran.com/find-ip-addresses-using-exchange-smtp-relay

    .NOTES
    Written by: ALI TAJRAN
    Website:    www.alitajran.com
    LinkedIn:   linkedin.com/in/alitajran

    .CHANGELOG
    V1.00, 04/05/2021 - Initial version
    V2.00, 03/28/2023 - Rewrite script to retrieve results faster
#>

# Clears the host console to make it easier to read output
Clear-Host

# Sets the path to the directory containing the log files to be processed
$logFilePath = "C:\Program Files\Microsoft\Exchange Server\V15\TransportRoles\Logs\FrontEnd\ProtocolLog\SmtpReceive\*.log"

# Sets the path to the output file that will contain the unique IP addresses
$Output = "C:\temp\IPAddresses.txt"

# Gets a list of the log files in the specified directory
$logFiles = Get-ChildItem $logFilePath

# Gets the number of log files to be processed
$count = $logFiles.Count

# Initializes an array to store the unique IP addresses
$ips = foreach ($log in $logFiles) {

    # Displays progress information
    $percentComplete = [int](($logFiles.IndexOf($log) + 1) / $count * 100)
    $status = "Processing $($log.FullName) - $percentComplete% complete ($($logFiles.IndexOf($log)+1) of $count)"
    Write-Progress -Activity "Collecting Log details" -Status $status -PercentComplete $percentComplete

    # Displays the name of the log file being processed
    Write-Host "Processing Log File $($log.FullName)" -ForegroundColor Magenta

    # Reads the content of the log file, skipping the first five lines
    $fileContent = Get-Content $log | Select-Object -Skip 5

    # Loops through each line in the log file
    foreach ($line in $fileContent) {

        # Extracts the IP address from the socket information in the log line
        $socket = $line.Split(',')[5]
        $ip = $socket.Split(':')[0]
        
        # Adds the IP address to the $ips array
        $ip
    }
}

# Removes duplicate IP addresses from the $ips array and sorts them alphabetically
$uniqueIps = $ips | Select-Object -Unique | Sort-Object

# Displays the list of unique IP addresses on the console
Write-Host "List of noted remove IPs:" 
$uniqueIps
Write-Host 

# Writes the list of unique IP addresses to the output file
$uniqueIps | Out-File $Output

In Line 27, change the path to the receive protocol log path you searched for in the previous step.

Run SMTP-Review PowerShell script

Run PowerShell as administrator and run the SMTP-Review.ps1 PowerShell script.

The script will go through all the files, and after it finishes, you will see which IP addresses use the SMTP relay in the console output. Also, it will generate an IPAddresses.txt file with the IP addresses in the C:\temp folder.

Make a note of the IP addresses and adjust the SMTP field in the printers, applications, and servers to the new SMTP relay record.

Configure Email notification for Windows Server Backup

When you need to rely on Windows Server Backup, you want some sort of reporting. A lot of scripts with mailing functions are available (e.g. WSB Backup to network with email notification and rotation) . If you want to rely on simple messaging from the server itself, you can use scheduled tasks for this.

Windows Server Backup writes events to its own event log (event logs > Applications and Services Logs > Microsoft > Windows > Backup > Operational). We can use these successful (4) and unsuccessful (5) events as a trigger.

Create two scheduled tasks (can run under system) with the following triggers:

Trigger for a successful event

Trigger for an unsuccessful event

In the action of the tasks, run a powershell command to send a mail.

Source: https://www.bluecompute.co.uk/blogposts/configure-email-notification-for-windows-server-backup/

To backup a domain controller with powershell. Use the script below to place it on the network. This scripts requires the Windows Server Backup Feature and can be scheduled

Import-Module ServerManager
[string]$date = get-date -f 'yyyy-MM-dd'
$path=”\\server\directory”
$TargetUNC=$path+'-'+$date
$TestTargetUNC= Test-Path -Path $TargetUNC
if (!($TestTargetUNC)){
New-Item -Path $TargetUNC -ItemType directory
}
$WBadmin_cmd = "wbadmin.exe START BACKUP -backupTarget:$TargetUNC -systemState -noverify -vssCopy -quiet"
Invoke-Expression $WBadmin_cmd

If an error occurs:

Detailed error: The filename, directory name, or volume label syntax is incorrect. The backup of the system state failed 
 

Make sure all drivers are set correct. In my case changing the path of vsock did the trick. How to find the driver path? Open an elevated prompt and execute the following commands:

DiskShadow /L writers.txt
list writers detailed

Check the directories, in my case the string which was found was the following:

File List: Path = c:\windows\\systemroot\system32\drivers, Filespec = vsock.sys

To correct the path, open the Registry Editor and go to reg key HKLM\SYSTEM\CurrentControlSet\Services\vsock

Change the ImagePath value from

\systemroot\system32\DRIVERS\vsock.sys
to
System32\DRIVERS\vsock.sys

Run the backup again, it should say:

The backup operation successfully completed.
The backup of volume (C:) completed successfully.
The backup of the system state successfully completed [01.06.2020 09:52].

source: http://woshub.com/backup-active-directory-domain-controller/

ACL script to determine folder permissions

To determine the ACL’s on a specific foldertree use the following script. It will display the Path, FileSystemRights, IsInherited, Name of the underlying folders.

$path = "\\server\path\"
$targetFile = "file.csv" # Not working yet

$foldersToQuery = Get-ChildItem $Path | Where {$_.PSIsContainer} | select -expandproperty FullName

   # Get access list, change any domain
foreach ($folder in $foldersToQuery) {
    $Access = (Get-Acl $Folder).Access |
      Select-Object @{n='Path';e={ $Folder }}, *,
        @{n='ADObject';e={ 
          If ($_.IdentityReference -NotMatch "^(NT AUTH|BUILTIN|$($Env:ComputerName))") {
            $Searcher = [ADSISearcher]"(sAMAccountName=$($_.IdentityReference -Replace '^.+\\'))"
            $Searcher.PropertiesToLoad.AddRange(@("name", "distinguishedName", "objectClass"))
            $Searcher.FindOne()
        } }} |
      Select-Object *, @{n='Name';e={ $_.ADObject.Properties['name'][0] }},
        @{n='DN';e={ $_.ADObject.Properties['distinguishedname'][0] }},
        @{n='Class';e={ ([String[]]$_.ADObject.Properties['objectclass'])[-1] }} -Exclude ADObject

      $Access | ForEach-Object {
        $Entry = $_
        If ($Entry.Class -eq 'group') {
  
          $Searcher = [ADSISearcher]"(memberOf:1.2.840.113556.1.4.1941:=$($Entry.DN))"
          $Searcher.PageSize = 1000
          $Searcher.PropertiesToLoad.AddRange(@("name", "distinguishedName", "objectClass"))
          $Searcher.FindAll() | ForEach-Object {
            $ADObject = $_
            $Entry | Select-Object *, @{n='Name';e={ $ADObject.Properties['name'][0] }},
              @{n='DN';e={ $ADObject.Properties['distinguishedname'][0] }},
              @{n='Class';e={ ([String[]]$ADObject.Properties['objectclass'])[-1] }} -Exclude Name, DN, Class
          }
        } Else {
          $Entry
        }
      } | ft Path, FileSystemRights, IsInherited, Name, class -AutoSize  

}

Reset 120 Day Grace Period for Windows RDS Server with PowerShell

Use the following Powershell script to reset the Grace Period of a Windows RDS Server

Because the original script has been removed from the script center ( https://gallery.technet.microsoft.com/scriptcenter/Reset-Terminal-Server-RDS-44922d91), a copy can be found below:

## This Script is intended to be used for Querying remaining time and resetting Terminal Server (RDS) Grace Licensing Period to Default 120 Days. 
## Developed by Prakash Kumar ([email protected]) May 28th 2016 
## www.adminthing.blogspot.com 
## Disclaimer: Please test this script in your test environment before executing on any production server. 
## Author will not be responsible for any misuse/damage caused by using it. 
 
Clear-Host 
$ErrorActionPreference = "SilentlyContinue" 
 
## Display current Status of remaining days from Grace period. 
$GracePeriod = (Invoke-WmiMethod -PATH (gwmi -namespace root\cimv2\terminalservices -class win32_terminalservicesetting).__PATH -name GetGracePeriodDays).daysleft 
Write-Host -fore Green ====================================================== 
Write-Host -fore Green 'Terminal Server (RDS) grace period Days remaining are' : $GracePeriod 
Write-Host -fore Green ======================================================   
Write-Host 
$Response = Read-Host "Do you want to reset Terminal Server (RDS) Grace period to Default 120 Days ? (Y/N)" 
 
if ($Response -eq "Y") { 
## Reset Terminal Services Grace period to 120 Days 
 
$definition = @" 
using System; 
using System.Runtime.InteropServices;  
namespace Win32Api 
{ 
    public class NtDll 
    { 
        [DllImport("ntdll.dll", EntryPoint="RtlAdjustPrivilege")] 
        public static extern int RtlAdjustPrivilege(ulong Privilege, bool Enable, bool CurrentThread, ref bool Enabled); 
    } 
} 
"@  
 
Add-Type -TypeDefinition $definition -PassThru 
 
$bEnabled = $false 
 
## Enable SeTakeOwnershipPrivilege 
$res = [Win32Api.NtDll]::RtlAdjustPrivilege(9, $true, $false, [ref]$bEnabled) 
 
## Take Ownership on the Key 
$key = [Microsoft.Win32.Registry]::LocalMachine.OpenSubKey("SYSTEM\CurrentControlSet\Control\Terminal Server\RCM\GracePeriod", [Microsoft.Win32.RegistryKeyPermissionCheck]::ReadWriteSubTree,[System.Security.AccessControl.RegistryRights]::takeownership) 
$acl = $key.GetAccessControl() 
$acl.SetOwner([System.Security.Principal.NTAccount]"Administrators") 
$key.SetAccessControl($acl) 
 
## Assign Full Controll permissions to Administrators on the key. 
$rule = New-Object System.Security.AccessControl.RegistryAccessRule ("Administrators","FullControl","Allow") 
$acl.SetAccessRule($rule) 
$key.SetAccessControl($acl) 
 
## Finally Delete the key which resets the Grace Period counter to 120 Days. 
Remove-Item 'HKLM:\SYSTEM\CurrentControlSet\Control\Terminal Server\RCM\GracePeriod' 
 
write-host 
Write-host -ForegroundColor Red 'Resetting, Please Wait....' 
Start-Sleep -Seconds 10  
 
  } 
 
Else  
    { 
Write-Host 
Write-Host -ForegroundColor Yellow '**You Chose not to reset Grace period of Terminal Server (RDS) Licensing' 
  } 
 
## Display Remaining Days again as final status 
tlsbln.exe 
$GracePost = (Invoke-WmiMethod -PATH (gwmi -namespace root\cimv2\terminalservices -class win32_terminalservicesetting).__PATH -name GetGracePeriodDays).daysleft 
Write-Host 
Write-Host -fore Yellow ===================================================== 
Write-Host -fore Yellow 'Terminal Server (RDS) grace period Days remaining are' : $GracePost 
Write-Host -fore Yellow ===================================================== 
 
## Cleanup of Variables 
Remove-Variable * -ErrorAction SilentlyContinue

Failed To Open or Edit GPO

source: https://mohdzmaili.wordpress.com/2017/02/15/failed-to-open-or-edit-gpo/comment-page-1/#comment-30


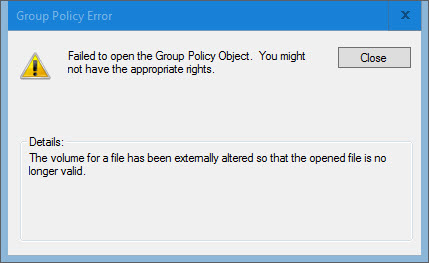
Group Policy Object cannot be opened or edited with the error: Failed to open Group Policy Object. You might not have the appropriate rights.

Details: The volume for a file has been externally altered so that the opened file is no longer valid.

gpo1

gpo2

Solution:

  • Get GPO GUID: from Group Policy Management Console (GPMC) –> choose GPO –> from right pane go to Details tab –> go to Unique ID field.
  • Open the path: C:\Windows\SYSVOL\sysvol\<Domain>\Policies\<GPO GUID>\User
  • Delete “registry.pol” file.

Note: if you have migrated SYSVOL replication type from FRS to DFSR, open the path:  C:\Windows\SYSVOL_DFSR\sysvol\<Domain>\Policies\<GPO GUID>\User

Copy WSUS approvals between Groups

source: http://www.craig-tolley.co.uk/2016/01/21/wsus-copy-updates-between-groups/

Run the script below, then call it using the following syntax:

Copy-WsusGroupApprovals -WsusServerFqdn wsus.domain.co.uk -SourceGroupName "OldServers" -TargetGroupName "NewServers"

You can optionally specify a port, the default being 8530. You can also specify to use a secure connection. The group names are both case sensitive though.

# ----------------------------------------------------------------------------------------------------------
# PURPOSE:    WSUS - Copy Approvals from one Group to another Group
#
# VERSION     DATE         USER                DETAILS
# 1           21/01/2016   Craig Tolley        First Version
#
# ----------------------------------------------------------------------------------------------------------

#.SYNOPSIS
# Copies all approvals from the specified source group to the specified destination group. 
# Group names are case sensitive. 
# Unless specified the default WSUS port of 8530 will be used to connect. 
function Copy-WsusGroupApprovals
{
    param
    (

    [Parameter(Mandatory=$true)]
    [ValidateNotNullOrEmpty()]
    [String]$WsusServerFqdn,

    [Int]$WsusServerPort = 8530,

    [Boolean]$WsusServerSecureConnect = $false,

    [Parameter(Mandatory=$true)]
    [ValidateNotNullOrEmpty()]
    [String]$SourceGroupName,

    [Parameter(Mandatory=$true)]
    [ValidateNotNullOrEmpty()]
    [String]$TargetGroupName

    )
    
    # Load the assembly required
    try
    {
        [void][reflection.assembly]::LoadWithPartialName("Microsoft.UpdateServices.Administration")
    }
    catch
    {
        Write-Error "Unable to load the Microsoft.UpdateServices.Administration assembly: $($_.Exception.Message)"
        break

    }

    # Attempt the connection to the WSUS Server
    try
    {
        $WsusServer = [Microsoft.UpdateServices.Administration.AdminProxy]::getUpdateServer($WsusServerFqdn, $WsusServerSecureConnect, $WsusServerPort)
    }
    catch
    {
        Write-Error "Unable to connect to the WSUS Server: $($_.Exception.Message)"
        break
    }

    # Get all of the Wsus Groups, and check that the specified source and destination groups exist
    $Groups = $WsusServer.GetComputerTargetGroups()
    If ($Groups.Name -notcontains $SourceGroupName -or $Groups.Name -notcontains $TargetGroupName)
    {
        Write-Error "Source or Destination group names cannot be found in the list of groups on the WSUS Server. Group names are case sensitive. Please check your names."
        break
    }
    $SourceGroupObj = $Groups | Where {$_.Name -eq $SourceGroupName}
    $TargetGroupObj = $Groups | Where {$_.Name -eq $TargetGroupName}

    # Get all of the updates on the server
    Write-Progress -Activity "Getting Details of all updates"
    $Updates = $WsusServer.GetUpdates()
    
    # Go through each of the updates. If the update has an approval for the source group, then create an approval for the destination group. 
    $i = 0
    $Approved = 0
    ForEach ($Update in $Updates)
    {
        $i ++
        Write-Progress -Activity "Copying update approvals" -PercentComplete (($i/$($Updates.Count))*100) -Status "$i of $($Updates.Count)"
        
        if ($Update.GetUpdateApprovals($SourceGroupObj).Count -ne 0 -and $Update.GetUpdateApprovals($TargetGroupObj).Count -eq 0)
        {
            Write-Host ("Approving {0} for {1}" -f $Update.Title, $TargetGroupObj.Name)
            $Update.Approve('Install',$TargetGroupObj) | Out-Null
            $Approved ++
        }
    }
    Write-Progress -Activity "Copying update approvals" -Completed

   Write-Output ("Approved {0} updates for target group {1}" -f $Approved, $TargetGroupName)
}

Using the BurFlags registry key to reinitialize File Replication Service replica sets

https://support.microsoft.com/en-us/kb/290762


Restoring FRS replicas

The global BurFlags registry key contains REG_DWORD values, and is located in the following location in the registry:

HKEY_LOCAL_MACHINE\SYSTEM\CurrentControlSet\Services\NtFrs\Parameters\Backup/Restore\Process at Startup

The most common values for the BurFlags registry key are:

  • D2, also known as a nonauthoritative mode restore
  • D4, also known as an authoritative mode restore

You can also perform BurFlags restores at the same time as you restore data from backup or from any other known good source, and then restart the service.

Nonauthoritative restore

Nonauthoritative restores are the most common way to reinitialize individual members of FRS replica sets that are having difficulty. These difficulties may include:

  • Assertions in the FRS service
  • Corruption of the local jet database
  • Journal wrap errors
  • FRS replication failures

Attempt nonauthoritative restores only after you discover FRS dependencies and you understand and resolve the root cause. For more information about how to discover FRS dependencies, see the “Considerations before configuring authoritative or nonauthoritative restores of FRS members” section later in this article.

Members who are nonauthoritatively restored must have inbound connections from operational upstream partners where you are performing Active Directory and FRS replication. In a large replica set that has at least one known good replica member, you can recover all the remaining replica members by using a nonauthoritative mode restore if you reinitialize the computers in direct replication partner order.

If you determine that you must complete a nonauthoritative restore to return a member back into service, save as much state from that member and from the direct replication partner in the direction that replication is not working. This permits you to review the problem later. You can obtain state information from the FRS and System logs in the Event Viewer.

Note You can configure the FRS logs to record detailed debugging entries. For more information about how to configure FRS logging, click the following article number to view the article in the Microsoft Knowledge Base:

221111 Description of FRS entries in the registry

To perform a nonauthoritative restore, stop the FRS service, configure the

BurFlags

registry key, and then restart the FRS service. To do so:

  1. Click Start, and then click Run.
  2. In the Open box, type cmd and then press ENTER.
  3. In the Command box, type net stop ntfrs.
  4. Click Start, and then click Run.
  5. In the Open box, type regedit and then press ENTER.
  6. Locate the following subkey in the registry:
    HKEY_LOCAL_MACHINE\System\CurrentControlSet\Services\NtFrs\Parameters\Backup/Restore\Process at Startup
  7. In the right pane, double-click BurFlags.
  8. In the Edit DWORD Value dialog box, type D2 and then click OK.
  9. Quit Registry Editor, and then switch to the Command box.
  10. In the Command box, type net start ntfrs.
  11. Quit the Command box.

When the FRS service restarts, the following actions occur:

  • The value for BurFlags registry key returns to 0.
  • Files in the reinitialized FRS folders are moved to a Pre-existing folder.
  • An event 13565 is logged to signal that a nonauthoritative restore is started.
  • The FRS database is rebuilt.
  • The member performs an initial join of the replica set from an upstream partner or from the computer that is specified in the Replica Set Parent registry key if a parent has been specified for SYSVOL replica sets.
  • The reinitialized computer runs a full replication of the affected replica sets when the relevant replication schedule begins.
  • When the process is complete, an event 13516 is logged to signal that FRS is operational. If the event is not logged, there is a problem with the FRS configuration.

Note: The placement of files in the Pre-existing folder on reinitialized members is a safeguard in FRS designed to prevent accidental data loss. Any files destined for the replica that exist only in the local Pre-existing folder and did not replicate in after the initial replication may then be copied to the appropriate folder. When outbound replication has occurred, delete files in the Pre-existing folder to free up additional drive space.

Authoritative FRS restore

Use authoritative restores only as a final option, such as in the case of directory collisions.

For example, you may require an authoritative restore if you must recover an FRS replica set where replication has completely stopped and requires a rebuild from scratch.

The following list of requirements must be met when before you perform an authoritative FRS restore:

  1. The FRS service must be disabled on all downstream partners (direct and transitive) for the reinitialized replica sets before you restart the FRS service when the authoritative restore has been configured to occur.
  2. Events 13553 and 13516 have been logged in the FRS event log. These events indicate that the membership to the replica set has been established on the computer that is configured for the authoritative restore.
  3. The computer that is configured for the authoritative restore is configured to be authoritative for all the data that you want to replicate to replica set members. This is not the case if you are performing a join on an empty directory. For more information, click the following article number to view the article in the Microsoft Knowledge Base:
    266679 Pre-staging the File Replication service replicated files on SYSVOL and Distributed file system shares for optimal synchronization
  4. All other partners in the replica set must be reinitialized with a nonauthoritative restore.

To complete an authoritative restore, stop the FRS service, configure the

BurFlags

registry key, and then restart the FRS service. To do so:

  1. Click Start, and then click Run.
  2. In the Open box, type cmd and then press ENTER.
  3. In the Command box, type net stop ntfrs.
  4. Click Start, and then click Run.
  5. In the Open box, type regedit and then press ENTER.
  6. Locate the following subkey in the registry:
    HKEY_LOCAL_MACHINE\System\CurrentControlSet\Services\NtFrs\Parameters\Backup/Restore\Process at Startup
  7. In the right pane, double click BurFlags.
  8. In the Edit DWORD Value dialog box, type D4 and then click OK.
  9. Quit Registry Editor, and then switch to the Command box.
  10. In the Command box, type net start ntfrs.
  11. Quit the Command box.

When the FRS service is restarted, the following actions occur:

  • The value for the BurFlags registry key is set back to 0.
  • An event 13566 is logged to signal that an authoritative restore is started.
  • Files in the reinitialized FRS replicated directories remain unchanged and become authoritative on direct replication. Additionally, the files become indirect replication partners through transitive replication.
  • The FRS database is rebuilt based on current file inventory.
  • When the process is complete, an event 13516 is logged to signal that FRS is operational. If the event is not logged, there is a problem with the FRS configuration.

Global vs. replica set specific reinitialization

There are both global- and replica set-specific BurFlags registry keys. Setting the global BurFlags registry key reinitializes all replica sets that the member holds. Do this only when the computer holds only one replica set, or when the replica sets that it holds are relatively small.

In contrast to configuring the global BurFlags key, the replica set BurFlags key permits you to reinitializes discrete, individual replica sets, allowing healthy replication sets to be left intact.

The global BurFlags registry key is found in the following location in the registry:

HKEY_LOCAL_MACHINE\System\CurrentControlSet\Services\NtFrs\Parameters\Backup / Restore\Process At Startup

This key can contain the same values as those that are discussed earlier in this article for authoritative and nonauthoritative restores.

You can locate the replica set specific BurFlags registry key by determining the GUID for the replica set that you want to configure. To determine which GUID corresponds to which replica set and configure a restore, follow these steps:

  1. Click Start, and then click Run.
  2. In the Open box, type cmd and then press ENTER.
  3. In the Command box, type net stop ntfrs.
  4. Click Start, and then click Run.
  5. In the Open box, type regedit and then press ENTER.
  6. To determine the GUID that represents the replica set that you want to configure, follow these steps:
    1. Locate the following key in the registry:
      KEY_LOCAL_MACHINE\System\CurrentControlSet\Services\NtFrs\Parameters\Replica Sets
    2. Below the Replica Sets subkey, there are one or more subkeys that are identified by a GUID. In the left pane, click the GUID, and then in the right pane note the Data that is listed for the Replica Set Root value. This file system path will indicate which replica set is represented by this GUID.
    3. Repeat step 4 for each GUID that is listed below the Replica Sets subkey until you locate the replica set that you want to configure. Note the GUID.
  7. Locate the following key in the registry:
    KEY_LOCAL_MACHINE\System\CurrentControlSet\Services\NtFrs\Parameters\Cumulative Replica Sets
  8. Below the Cumulative Replica Sets subkey, locate the GUID you noted in step 6c.
  9. In the right pane, double click BurFlags.
  10. In the Edit DWORD Value dialog box, type D2 to complete a nonauthoritative restore or type D4 to complete an authoritative restore, and then click OK.
  11. Quit Registry Editor, and then switch to the Command box.
  12. In the Command box, type net start ntfrs.
  13. Quit the Command box.

Considerations before you configure authoritative or nonauthoritative restores of FRS members

If you configure an FRS member to complete an authoritative or nonauthoritative restore by using the BurFlags registry subkey, you do not resolve the issues that initially caused the replication problem. If you cannot determine the cause of the replication difficulties, the members will typically revert back to the problematic situation as replication continues.

A detailed breakdown on FRS interdependencies is beyond the scope of this article, but your troubleshooting should include the following actions:

  • Verify that Active Directory replication is successful. Resolve Active Directory replication issues before you perform additional FRS troubleshooting. Use the Repadmin /showreps command to verify that Active Directory replication is occurring successfully. The Repadmin.exe tool is located in the Support\Tools folder on the Windows 2000 CD-ROM.
  • Verify that inbound and outbound Active Directory replication occurs between all domain controllers that host SYSVOL replica sets and between all domain controllers that host computer accounts for servers that participate in DFS replica sets.
  • Verify that FRS member objects, subscriber objects and connection objects exist in the Active Directory for all the computers that participate in FRS replication.
  • Verify that inbound and outbound connection objects exist for all domain controllers in the domain for SYSVOL replica sets.
  • Verify that all the members of DFS replica sets have at least inbound connection objects in a topology to avoid islands of replication.
  • Review the FRS and SYSTEM event logs on direct replication partners that are having difficulty.
  • Review the FRS debug logs in the %SYSTEMROOT%\DEBUG\NTFRS_*.LOG between the direct replication partners that are having replication problems.
Windows Server 2012: Deactivating UAC

source: http://social.technet.microsoft.com/wiki/contents/articles/13953.windows-server-2012-deactivating-uac.aspx

Deactivating UAC in Windows 2008 R2 was possible via running msconfig (for example winkey+r -> msconfig), going to the Tools tab and launching “Change UAC settings”. There, you select “Never notify” to disable UAC. The same approach is still available in Windows Server 2012, though UAC is still active after you selected “Never notify”. You have the option to turn off UAC via registry by changing the DWORD “EnableLUA” from 1 to 0 in “HKEY_LOCAL_MACHINE\SOFTWARE\Microsoft\Windows\CurrentVersion\policies\system”. You will get a notification that a reboot is required. After the reboot, UAC is disabled.