Installing Dell OpenManage Server Administrator on VMWare ESXi 5.5

Installing Dell OpenManage Server Administrator on VMWare ESXi 5.5

Installing Dell OMSA on a ESXi server allows you to see more detailed information regarding the Dell hardware. It also allows you to perform operations such as specifying hot spares and rebuilding RAID arrays. After you install OMSA on the ESXi server you can install the OMSA web-based GUI on another Windows PC or Server in order to access OMSA.

The steps below will get OMSA up and running on VMWare ESXi 5.5. Be sure to download the version of the OMSA Offline Installation Bundle that corresponds to your version of ESXi.


Download the OMSA Offline Bundle from the Dell Website.

Enable SSH on the ESXi Server

  • Open and log-in to VMWare vShpere Client.
  • Select the server node in the tree view on the left.
  • Click the Configuration tab along the top.
  • Click the Properties link to the right of Services.
vSphere Client Security Profile Page
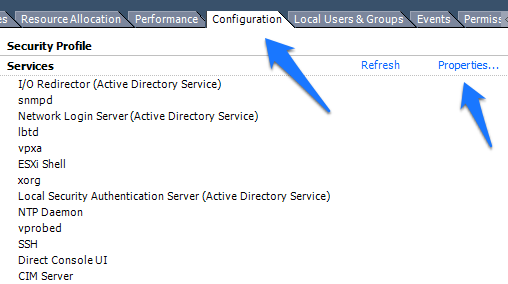
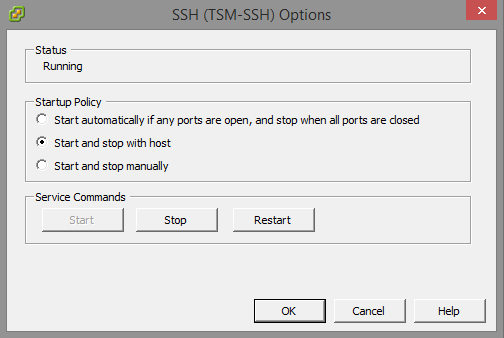
  • Select SSH in the list and click Options.
  • Select “Start and stop with host”
  • Under Service Commands click Start.
  • Click OK.
vSphere SSH Options
vSphere SSH Options

Transfer the OMSA Offline Bundle to the Server

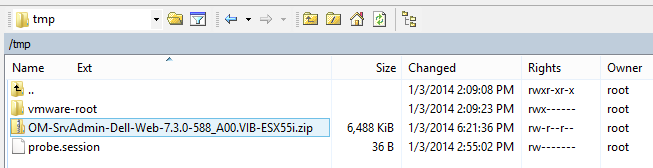
Since SSH is enabled the easiest way to transfer the file “OM-SrvAdmin-Dell-Web-7.3.0-588_A00.VIB-ESX55i.zip” to the server is with a SFTP client. I typically use WinSCP on Windows, Transmit on a Mac, or the command line SCP client on Linux systems. I’ll show you how to use WinSCP below:

  • Open WinSCP.
  • Click New to create a new connection.
  • Enter the host name of the ESXi server, user name and password. (User name is root by default).
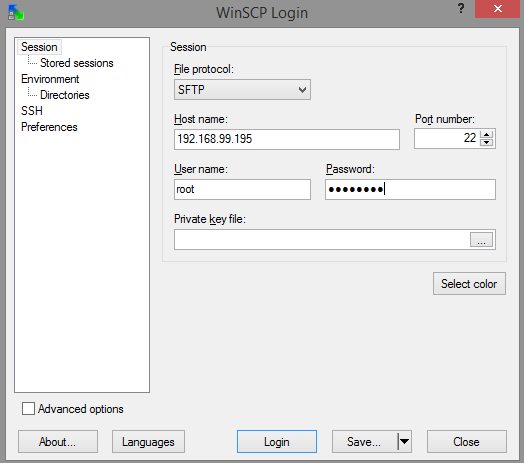
WinSCP Login Screen
WinSCP Login Screen
  • Click Login.
  • If this is your first time connecting to this host you’ll see a warning screen about the server’s host key. You can click Yes to continue.
  • Once connected you’ll see an explorer type view with your local files on the left and the server’s file system on the right.
  • You want to navigate to the /tmp/ folder.
ESXi /tmp/ Directory
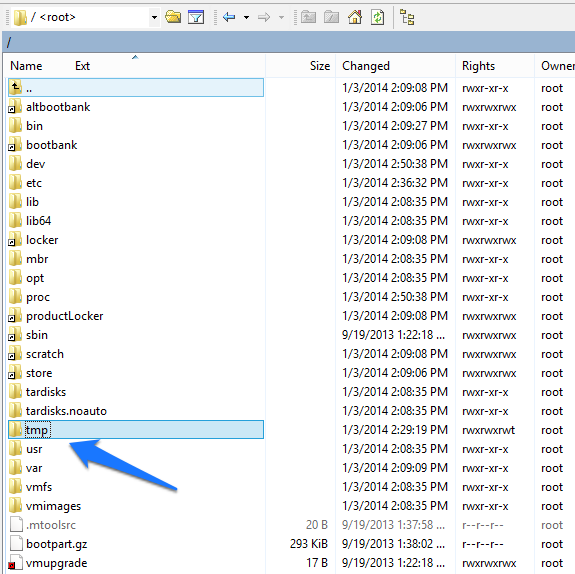
  • Double click tmp to enter the directory.
  • In the left pane browse to where you downloaded “OM-SrvAdmin-Dell-Web-7.3.0-588_A00.VIB-ESX55i.zip”
  • Once located, drag the file to the right pane. When the Copy dialog comes up click Copy.
OMSA In tmp Directory

Install the Offline Bundle

Its now time to install the bundle. To do this  you’ll need a SSH client. I use Putty on Windows and the command line SSH client on Mac and Linux. I’ll show you how to use Putty below.

  • Open Putty.
  • Enter the ESXi server host name and click Open.
Putty Configuration
Putty Configuration
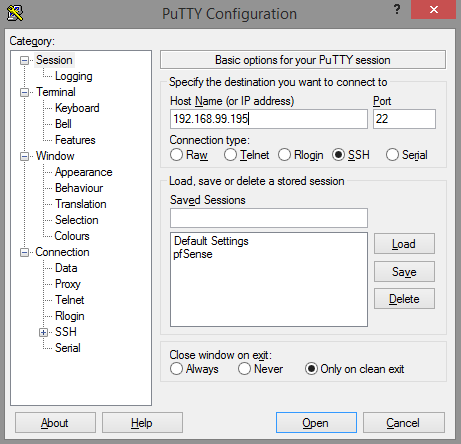
  • Again if this is your first time connecting to this host you’ll see a Putty Security Alert dialog box. Click Yes to continue.
  • Enter the user name (root).
  • Enter the password.
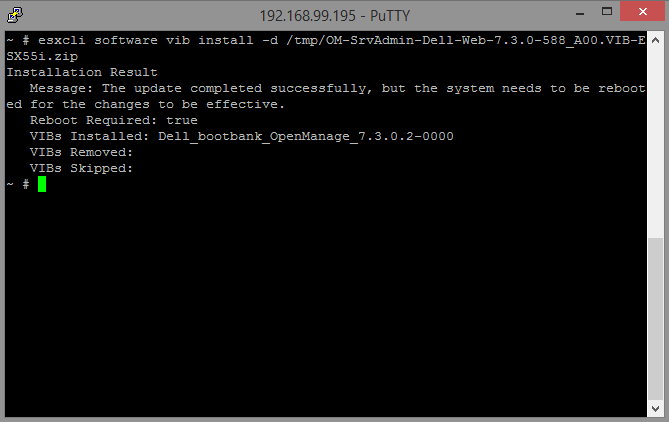
  • At the command line type “esxcli software vib install -d /tmp/OM-SrvAdmin-Dell-Web-7.3.0-588_A00.VIB-ESX55i.zip
  • Make sure to match the file name of the file you actually downloaded since version numbers will change frequently. You can use tab-auto-complete to type in the first few letters such as OM- and then press tab to complete the file name.
  • Press enter.
  • Reboot the server to complete the installation. If you don’t have any running hosts you’ll be able to restart without being in maintenance mode. If you do have running hosts you’ll need to shut them down and then put the ESXi server into maintenance mode.

Installing OpenManage Server Administrator Managed Node

  • Download the installer for Dell OpenManage Server Administrator Managed Node (Windows),v7.3 to a Windows PC.
  • Run and install the application.
  • The installer will complain about it not being installed on Dell software but you can proceed with the server installation only.
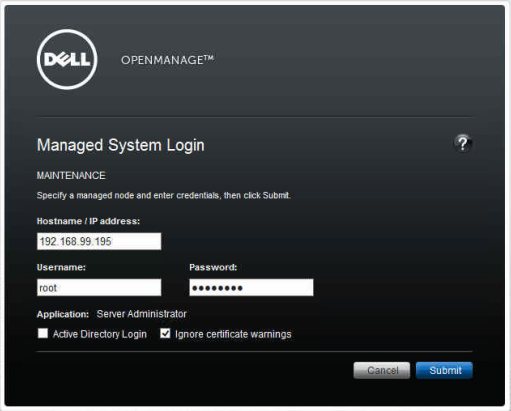
  • Dell OMSA is web-based, relying on a Java back-end so when you double click the icon on your desktop it will open your default browser.
  • Enter the ESXi host, user name and password. Check the box to Ingore certificate warnings.
OMSA Login
OMSA Login
  • This should allow you to use OpenManage similarly to how you would on a bare-metal install of Windows Server on a Dell system.

How to install Dell Openmanage Server Administratior on ESXi using VMware Update Manager

http://oxfordsbsguy.com/2013/08/09/how-to-install-dell-openmanage-server-administrator-on-esxi-5-1-using-vmware-update-manager/

1.  Download the OpenManage Server Administrator vSphere Installation Bundle (VIB) for ESXi 5.1, v7.3 from Dell’s website. It can be found on the Product Support page in the System Management section. Or you can download it from here.

OpenManage Server Administrator vSphere Installation Bundle (VIB) for ESXi 5.1, the current version is v7.32. Login in to vCenter, click Home, Update Manager and then select the Patch Repository tab.

VMware Update Manager - Patch Repository3. Click Import Patches.

VMware Update Manager - Import Patches4. Browse to the downloaded zip file and click Next. If you get a Security Warning dialogue box pop up, click Ignore.

Security Warning6. Click Finish to confirm the import.

VMware Update Manager - Import Patches7. If you browse the Patch Repository you will now see the OpenManage 7.3 for ESXi 510 patch.

VMware Patch Repository showing Dell OpenManage 7.3 for ESXi 510 patch

8. Click the Baseline and Groups tab. Then click on the left-hand Create option to create a new baseline.

VMware create Baseline

9. Give the baseline a name, Dell Host Extension, and select the Host Extension radio button, and click Next.

VMware New Baseline Name and Description10. Browse to the OpenManage 7.3 for ESXi510 extension, select it and click the Down Arrow to add it, click Next.

VMware New Baseline - Select Extensions

11. Review the selection and click Finish.

VMware New Baseline Complete

12. Click on Home, Hosts and Clusters, select the host you want to Install OpenManage Server Administrator on and select the Update Manager tab, then click Attach.

VMware Update Manager tab13. Select the Dell Host Extension baseline, then click Attach.

VMware - Attach Baseline or Group14. Select Patches and Extensions check box and click Scan.

VMware Confirm Scan15. To Apply the Extension, put the host into Maintenance Mode. Click the Stage button and then click the Remediate button.

To Access Server Administrator on ESXi 5.1 do the following or, just copy and paste the following address into a browser, changing the ESXiservername:

https://ESXiservername:1311/OMSALogin?manageDWS=false

1. From a Windows Server with Dell OpenManage Server Administrator installed, Open the local Server Administrator instance.

2. Click Logout in the top right hand corner of the web interface.

3. Click Log in.

Dell Server Administrator - Log in4. At the bottom of the login dialogue box, click Manage Remote Node.

Dell OpenManage Login

4. Enter the Esxi hostname or IP address, username and password, and check the box to Ignore certificate warnings. Click Submit.

Dell OpenManage - Managed System LoginYou will now be presented with the Dell OpenManage Server Administrator interface for your ESXi server.

Dell OpenManage Server Administrator ESXi interface

Creating a persistent scratch location for ESXi 4.x and 5.x (1033696)

source: http://kb.vmware.com/selfservice/microsites/search.do?cmd=displayKC&docType=kc&docTypeID=DT_KB_1_1&externalId=1033696


VMware recommends that ESXi has a persistent scratch location available for storing temporary data including logs, diagnostic information, and system swap. (This is not a requirement, however.) Persistent scratch space may be provisioned on a FAT 16, VMFS, or NFS partition accessible by the ESXi host.

Note: Scratch space is configured automatically during installation or first boot of an ESXi host, and does not usually need to be manually configured. ESXi Installable creates a 4 GB Fat16 partition on the target device during installation if there is sufficient space, and if the device is considered Local.

If persistent scratch space is not available, ESXi stores this temporary data on a ramdisk, which is constrained in space. This might be problematic in low-memory situations, but is not critical to the operation of ESXi. Information stored on a ramdisk does not persist across reboots, so troubleshooting information such as logs and core files could be lost. If a persistent scratch location on the host is not configured properly, you may experience intermittent issues due to lack of space for temporary files and the log files will not be updated.


Configuring a persistent scratch location using PowerCLI

To configure persistent scratch space for ESXi using the vSphere PowerCLI interface:

Notes:

  • Before proceeding, ensure that /tmp/scratch exists. If it does not exist, use the command mkdir /tmp/scratch to create it.
  • For more information on vSphere PowerCLI usage, see the vSphere PowerCLI documentation.
  1. Open a command prompt where the PowerCLI is installed.
  2. Connect to the ESXi host using the command:connect-viserver esx_hostname_or_IP
  3. Obtain a list of datastores reachable from this ESXi host using the command:Get-Datastore
  4. Mount a datastore read/write as a PSDrive using the command:New-PSDrive -Name "mounteddatastore" -Root \ -PSProvider VimDatastore -Datastore (Get-Datastore "DatastoreName")
  5. Access the new PSDrive using the command:Set-Location mounteddatastore:
  6. Create a uniquely-named directory for this ESXi host using the command:New-Item "DirectoryName" -ItemType directory

    For example:

    New-Item ".locker-ESXHostname" -ItemType directory

  7. Check the current value of the ScratchConfig.ConfiguredScratchLocation configuration option using the command:Get-VMHostAdvancedConfiguration -Name "ScratchConfig.ConfiguredScratchLocation"

    NoteVMHostAdvancedConfiguration has been deprecated in PowerCLI 5.1 and replaced with AdvancedSetting. For more information, see the vSphere PowerCLI documentation.

  8. Change the ScratchConfig.ConfiguredScratchLocation configuration option, specifying the full path to the directory created in step 6, using the command:Set-VMHostAdvancedConfiguration -Name "ScratchConfig.ConfiguredScratchLocation" -Value "/vmfs/volumes/DatastoreName/DirectoryName"

    For example:

    Set-VMHostAdvancedConfiguration -Name "ScratchConfig.ConfiguredScratchLocation" -Value "/vmfs/volumes/Datastore1/.locker-ESXHostname"

  9. Put the ESXi host into maintenance mode and reboot for the configuration change to take effect.

Clipboard Copy and Paste does not work in vSphere Client 4.1 and later

To be able to copy and paste between the guest operating system and the remote console, you must enable the Copy and Paste options using the vSphere Client. Alternatively, you can use RDP (Remote Desktop Protocol) to connect to the Windows virtual machines.

To enable this option for a specific virtual machine:

Note: VMware Tools must be installed for Copy and Paste to work.

  1. Log into a vCenter Server system using the vSphere Client and power off the virtual machine.
  2. Select the virtual machine and click the Summary tab.
  3. Click Edit Settings.
  4. Navigate to Options > Advanced > General and click Configuration Parameters.
  5. Click Add Row.
  6. Type these values in the Name and Value columns:


                            Name                                                Value

  • isolation.tools.copy.disable    false
  • isolation.tools.paste.disable   false

Note: These options override any settings made in the VMware Tools control panel of the guest operating system.

  1. Click OK to close the Configuration Parameters dialog, and click OK again to close the Virtual Machine Properties dialog.
  2. Power on the virtual machine.

Note: If you vMotion a virtual machine to a host where the isolation.tools.*="FALSE" is already set, the copy and paste options are automatically activated for that virtual machine.

To enable this option for all the virtual machines in the ESX/ESXi host:

  1. Log in to the ESX/ESXi host as a root user,
  2. Take a backup of the /etc/vmware/config file.
  3. Open the /etc/vmware/config file using a text editor.
  4. Add these entries to the file:

    isolation.tools.copy.disable="FALSE"
    isolation.tools.paste.disable="FALSE"

  5. Save and close the file.

    The Copy and Paste options are only enabled when the virtual machines restart or resume the next time or shutdown and power-on the VM for changes to take effect

Note: These options do not persist after an upgrade. If you upgrade to a newer version after enabling these options, the changes are lost and you may have to re-enable them.


http://kb.vmware.com/selfservice/microsites/search.do?language=en_US&cmd=displayKC&externalId=1026437

Using Tech Support Mode in ESXi 4.1

Enable the Tech Support Mode in ESXi 4.1

http://kb.vmware.com/kb/1017910

Enabling and Accessing Tech Support Mode

To enable local or remote TSM from the Direct Console User Interface (DCUI):
  1. At the DCUI of the ESXi host, press F2 and provide credentials when prompted.
  2. Scroll to Troubleshooting Options, and press Enter.
  3. If you want to enable local TSM, select Local Tech Support and press Enter once. This allows users to login on the virtual console of the ESXi host.

    If you want to enable remote TSM, select Remote Tech Support (SSH) and press Enter once. This allows users to login via SSH on the virtual console of the ESXi host.

  4. Optionally, if you want to configure the timeout for TSM:
    1. Select Modify Tech Support timeout and press Enter.
    2. Enter the desired timeout value in minutes and press Enter.
  5. Press Esc three times to return to the main DCUI screen.
To enable local or remote TSM from the vSphere Client:
  1. Select the host and click the Configuration tab.
  2. Click Security profile > Properties.
  3. Click Local Tech Support or Remote Tech Support (SSH) and click Options.
  4. Choose the desired startup policy and click Start, then click OK.
  5. Verify that the daemon selected in step 3 shows as running in the Services Properties window.
To configure the TSM timeout value using the vSphere Client:
  1. Select the host and click the Configuration tab.
  2. Click Advanced Settings.
  3. Change the UserVars.TSMTimeOut field to the desired value in minutes.
  4. Click OK.
To access the local TSM:
  1. At the main DCUI screen, press ALT+F1 simultaneously. This opens a virtual console window to the host.
  2. Provide credentials when prompted.

    Note: When typing the password, characters are not displayed on the console.

To access the remote TSM:
  1. Open an SSH client.
  2. Specify the IP address or domain name of the ESX host.

    Notes:

    • Directions may vary depending on what SSH client you are using. For more information, consult vendor documentation and support.
    • By default, SSH works on TCP port 22.
  3. Provide credentials when prompted.

ESX Host’s disconnected

ESX communicates with virtual center through what is loosely described as, “management agents”. When you hear TSE’s talk about “management agents”, we’re really talking about 3 things: vpxa, hostd, and vpxd 

 Vpxa lives on the ESX host (on the service console), it communicates with hostd. It’s mostly a listener service, and is very rarely an issue. Hostd lives on the ESX host (on the service console). This is the lion, the vast majority of “disconnects” indicate a problem with hostd, and vpxd lives on your virtual center server. These 3 services form a communications chain, and failure of one or more of these services, tends to produce “disconnects”.

Restarting the Management agents on an ESX or ESXi Server

To restart the management agents on ESX host:
  1. Log in to your ESX Server as root from either an SSH session or directly from the console of the server.
  2. Type “service mgmt-vmware restart”.
    Caution: Ensure Automatic Startup/Shutdown of virtual machines is disabled before running this command or you risk rebooting the virtual machines.
  3. Press Enter.
  4. Type “service vmware-vpxa restart”.
  5. Press Enter.
  6. Type “logout” and press Enter to disconnect from the ESX host.
To restart the management agents on ESXi:
  1. Connect to the console of your ESXi Server.
  2. Press F2 to customize the system.
  3. Login as “root”.
  4. Using the Up/Down arrows navigate to Restart Management Agents.
  5. Press Enter.
  6. Press F11 to restart the services.
  7. When the service has been restarted, press Enter.
  8. Press Esc to logout of the system.

Links:

VMware ESX and ESXi Comparison

source: http://kb.vmware.com/kb/1006543

VMware ESX and ESXi Comparison

Purpose

This article provides a detailed comparison of VMware ESX and VMware ESXi. The article is separated in to capabilities or features and compared at that level.

Resolution

Capability

VMware ESX

VMware ESXi

Service Console Service Console is a standard Linux environment through which a user has privileged access to the VMware ESX kernel. This Linux-based privileged access allows you to highly customize your environment by installing agents and drivers and executing scripts and other Linux-environment code. VMware ESXi is designed to make the server a computing appliance. Accordingly, VMware ESXi behaves more like firmware than traditional software. To provide hardware-like security and reliability, VMware ESXi does not support a privileged access environment like the Service Console of VMware ESX. To enable interaction with agents, VMware has provisioned CIM Providers through which monitoring and management tasks – traditionally done through Service Console agents – can be performed. VMware has provisioned RCLI to allow the execution of scripts.
Remote CLI VMware ESX Service Console has a host CLI command through which VMware ESX can be configured. ESX 3.5 Update 2 supports RCLI. VMware ESX Service Console CLI has been ported to a Remote CLI (RCLI) for VMware ESXi. RCLI is a virtual appliance that interacts with VMware ESXi hosts to enable host configuration through scripts or specific commands. Note

  • RCLI is limited to read-only access for the free version of VMware ESXi. To enable full functionality of RCLI on a VMware ESXi host, the host must be licensed with VI Foundation, VI Standard, or VI Enterprise.
  • The VMware Infrastructure toolkit for Windows and the Perl toolkit access ESXi through the same API as RCLI. Similarly, these toolkits are limited to read-only access for the free version of VMware ESXi. When the host is upgraded to VI Foundation, VI Standard, or VI Enterprise, these toolkits have write-access and provide a scriptable method for managing ESXi hosts.
  • The following Service Console CLI commands have not been implemented in RCLI:
  • ESXcfg-info
  • ESXcfg-resgrp
  • ESXcfg-swiscsi 
Scriptable Installation VMware ESX supports scriptable installations through utilities like KickStart. VMware ESXi Installable does not support scriptable installations in the manner ESX does, at this time. VMware ESXi does provide support for post installation configuration script using RCLI-based configuration scripts.
Boot from SAN VMware ESX supports boot from SAN. Booting from SAN requires one dedicated LUN per server. VMware ESXi may be deployed as an embedded hypervisor or installed on a hard disk.   In most enterprise settings, VMware ESXi is deployed as an embedded hypervisor directly on the server. This operational model does not require any local storage and no SAN booting is required because the hypervisor image is directly on the server.


The installable version of VMware ESXi does not support booting from SAN.

Serial Cable Connectivity VMware ESX supports interaction through direct-attached serial cable to the VMware ESX host. VMware ESXi does not support interaction through direct-attached serial cable to the VMware ESXi host at this time.
SNMP VMware ESX supports SNMP. VMware ESXi supports SNMP when licensed to a VI Foundation, VI Standard, or VI Enterprise edition. The free version of VMware ESXi does not support SNMP.
Active Directory Integration VMware ESX supports Active Directory integration through third-party agents installed on the Service Console. VMware ESXi with a Virtual Infrastructure license and in conjunction with VirtualCenter allows users to be authenticated via Active Directory. In this configuration, users can log in directly to an ESXi host and authenticate using a local username and password. The free version of VMware ESXi does not support Active Directory integration at this time.
HW Instrumentation Service Console agents provide a range of HW instrumentation on VMware ESX. VMware ESXi provides HW instrumentation through CIM Providers. Standards-based CIM Providers are distributed with all versions of VMware ESXi. VMware partners may inject their own proprietary CIM Providers in customized versions of VMware ESXi. To obtain a customized version of VMware ESXi, you typically have to purchase a server with embedded VMware ESXi through a server vendor. At this time, HP also offers its customized VMware ESXi Installable on www.vmware.com. Dell, IBM, and FSC will soon offer their customized version of VMware ESXi on www.vmware.com.


Remote console applications like Dell DRAC, HP iLO, IBM RSA, and FSC iRMC S2 are supported with ESXi.


Note: COS agents have a longer lineage than CIM Providers and are therefore more mature. VMware is actively working with its 250+ partners to close the CIM Provider–Service Console agent gap.

Software Patches and Updates VMware ESX software patches and upgrades behave like traditional Linux based patches and upgrades. The installation of a software patch or upgrade may require multiple system boots as the patch or upgrade may have dependencies on previous patches or upgrades. VMware ESXi patches and updates behave like firmware patches and updates. Any given patch or update is all-inclusive of previous patches and updates. That is, installing patch version “n” includes all updates included in patch versions n-1, n-2, and so forth.
VI Web Access VMware ESX supports managing your virtual machines through VI Web Access. You can use the VI Web Access to connect directly to the ESX host or to the VMware Infrastructure Client. VMware ESXi does not support web access at this time.
Licensing VMware ESX hosts can be licensed as part of a VMware Infrastructure 3 Foundation, Standard, or Enterprise suite.  VMware ESXi hosts can be individually licensed (for free) or licensed as part of a VMware Infrastructure 3 Foundation, Standard, or Enterprise suite. Individually licensed ESXi hosts offer a subset of management capabilities (see SNMP and Remote CLI).


ESXi – Free License

(ESX not available without VI)

VI Foundation

(with ESX or ESXi)

VI Standard

(with ESX or ESXi)

VI Enterprise

(with ESX or ESXi)

Core hypervisor functionality

Yes

Yes

Yes

Yes

Virtual SMP

Yes

Yes

Yes

Yes

VMFS

Yes

Yes

Yes

Yes

VirtualCenter Agent


Yes

Yes

Yes

Update Manager


Yes

Yes

Yes

Consolidated Backup


Yes

Yes

Yes

High Availability


Yes

Yes

VMotion


Yes

Storage VMotion


Yes

DRS


Yes

DPM


Yes

Systems Manageability of VMware ESXi on Dell PowerEdge Servers

 After people have learned about ESXi, and understand all the benefits (less patching, easy deployment and manageability, etc), one of the first concerns that they raise is around hardware management. Many IT shops use management tools from OEMs such as Dell OpenManage Server Administrator (OMSA) to do things like hardware health monitoring, asset inventory, and viewing alert and command logs. Traditionally, this functionality has been provided for ESX by an agent running in the Service Console. Without the Service Console, they ask, how could this be done for ESXi?

Ever since ESXi was released almost one and half years ago (as version ESXi 3.5), VMware and Dell have been working closely together to provide hardware management capabilities via an agentless model, using industry standard interfaces for management such as WS-MAN. With the release of ESXi 4, the management capabilities of Dell servers running ESXi is almost at parity with ESX 4. In particular, the following features are available to OMSA from an ESXi hostView server and storage asset data

  • View server and storage health information
  • View alert and command logs
  • Configure hardware (storage, BIOS, etc.)

All this is available via the familiar web-based interfaced used for servers running ESX.  Here is a screenshot of the Power Tracking Statistics Page:


Power stats

In addition, we have enhanced VMware vCenter (formerly VirtualCenter) Server to provide fairly extensive hardware-level monitoring as well. With vSphere 4, this capability is fully integrated with the rest of vCenter, e.g. you can set alarms on hardware faults. (Note that monitoring functionality is available even for the stand-alone, free version of ESXi 4; simply look in the vSphere Client).  Here is a screenshot of a Dell System being monitor in vCenter:

 Hwmon

To learn more about the management capabilities of ESXi 4 running on Dell PowerEdge servers, see this new joint white paper from VMware and Dell. There is also an online article in the June 2009 edition of Dell Power Solutions that talks about this.

PuTTY access to the console, and WinSCP access to the ESXi file system:

Go to the ESXi console and press alt+F1

Type: unsupported  

Enter the root password

At the prompt type “vi /etc/inetd.conf”

Look for the line that starts with “#ssh” (you can search with pressing “/”)

Remove the “#” (press the “x” if the cursor is on the character)

Save “/etc/inetd.conf” by typing “:wq!”

Restart the host server.

Note: you can avoid restarting the server, but it’s no longer as easy as restarting services.sh. You need to:

Run ps | grep inetd

Look through the output for something like 1299 1299 busybox       inetd, process id 1299

Run kill -HUP <process_id>

ALT+F2 gets you back to the main management screen.