Find IP addresses using Exchange SMTP relay

see Find IP addresses using Exchange SMTP relay – ALI TAJRAN

To make this work, your SMTP relay logging should be enabled.

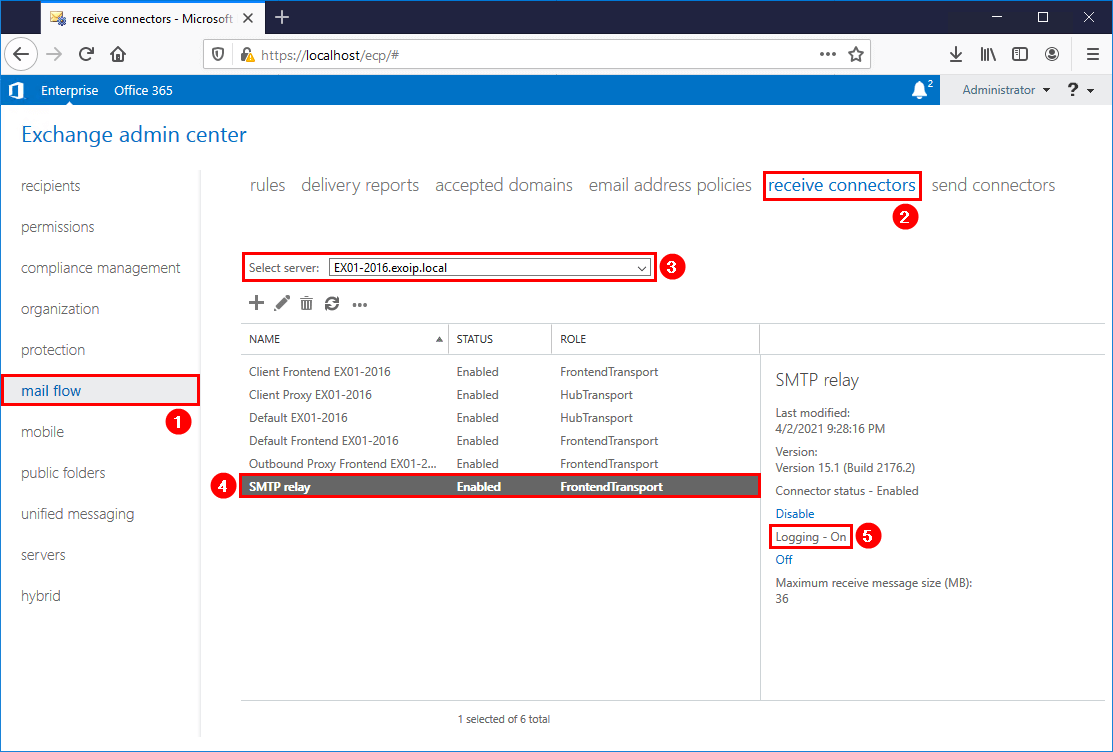
The script will look into your logfiles and export all IP address which have been using the relay service. If your loglocations is different then the default (C:\Program Files\Microsoft\Exchange Server\V15\TransportRoles\Logs\FrontEnd\ProtocolLog\SmtpReceive), make sure to alter it in the script.

Your logfile location can be found by executing the following powershell script:

Get-FrontendTransportService | fl Name,Identity,Receive*

Prepare SMTP-Review PowerShell script

Create two folders on the Exchange Server (C:) drive:

  • Temp
  • Scripts

Copy and paste the below code into Notepad. Give it the name SMTP-Review.ps1 and place it in the C:\scripts folder.

<#
    .SYNOPSIS
    SMTP-Review.ps1

    .DESCRIPTION
    Script is intended to help determine servers that are using an Exchange server to connect and send email.
    This is especially pertinent in a decommission scenario, where the logs are to be checked to ensure that
    all SMTP traffic has been moved to the correct endpoint.

    .LINK
    www.alitajran.com/find-ip-addresses-using-exchange-smtp-relay

    .NOTES
    Written by: ALI TAJRAN
    Website:    www.alitajran.com
    LinkedIn:   linkedin.com/in/alitajran

    .CHANGELOG
    V1.00, 04/05/2021 - Initial version
    V2.00, 03/28/2023 - Rewrite script to retrieve results faster
#>

# Clears the host console to make it easier to read output
Clear-Host

# Sets the path to the directory containing the log files to be processed
$logFilePath = "C:\Program Files\Microsoft\Exchange Server\V15\TransportRoles\Logs\FrontEnd\ProtocolLog\SmtpReceive\*.log"

# Sets the path to the output file that will contain the unique IP addresses
$Output = "C:\temp\IPAddresses.txt"

# Gets a list of the log files in the specified directory
$logFiles = Get-ChildItem $logFilePath

# Gets the number of log files to be processed
$count = $logFiles.Count

# Initializes an array to store the unique IP addresses
$ips = foreach ($log in $logFiles) {

    # Displays progress information
    $percentComplete = [int](($logFiles.IndexOf($log) + 1) / $count * 100)
    $status = "Processing $($log.FullName) - $percentComplete% complete ($($logFiles.IndexOf($log)+1) of $count)"
    Write-Progress -Activity "Collecting Log details" -Status $status -PercentComplete $percentComplete

    # Displays the name of the log file being processed
    Write-Host "Processing Log File $($log.FullName)" -ForegroundColor Magenta

    # Reads the content of the log file, skipping the first five lines
    $fileContent = Get-Content $log | Select-Object -Skip 5

    # Loops through each line in the log file
    foreach ($line in $fileContent) {

        # Extracts the IP address from the socket information in the log line
        $socket = $line.Split(',')[5]
        $ip = $socket.Split(':')[0]
        
        # Adds the IP address to the $ips array
        $ip
    }
}

# Removes duplicate IP addresses from the $ips array and sorts them alphabetically
$uniqueIps = $ips | Select-Object -Unique | Sort-Object

# Displays the list of unique IP addresses on the console
Write-Host "List of noted remove IPs:" 
$uniqueIps
Write-Host 

# Writes the list of unique IP addresses to the output file
$uniqueIps | Out-File $Output

In Line 27, change the path to the receive protocol log path you searched for in the previous step.

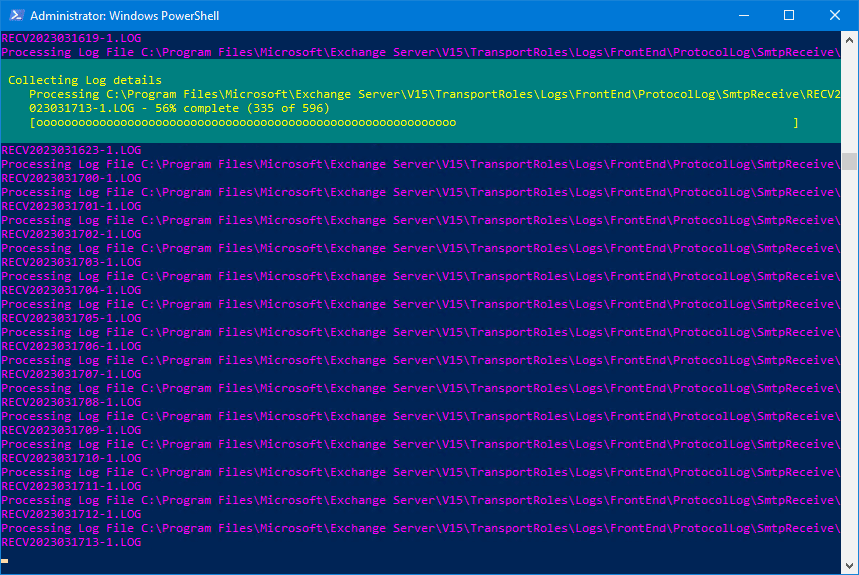
Run SMTP-Review PowerShell script

Run PowerShell as administrator and run the SMTP-Review.ps1 PowerShell script.

The script will go through all the files, and after it finishes, you will see which IP addresses use the SMTP relay in the console output. Also, it will generate an IPAddresses.txt file with the IP addresses in the C:\temp folder.

Make a note of the IP addresses and adjust the SMTP field in the printers, applications, and servers to the new SMTP relay record.

Microsoft 365 – Self-service purchase

Self-service purchase gives users a chance to try out new technologies and develop solutions that ultimately benefit their larger organizations. Central procurement and IT teams have visibility to all users who buy and deploy self-service purchase solutions through the Microsoft 365 admin center. Admins can turn off self-service purchasing on a per product basis via PowerShell..

To read more about the Self-service purchase option, go to: Self-service purchase FAQ | Microsoft Docs

To disable the AllowSelfServicePurchase do the following:

#Install module
Install-Module -Name MSCommerce

#Import module
Import-Module -Name MSCommerce

#Connect
Connect-MSCommerce

#Get details
Get-MSCommerceProductPolicies -PolicyId AllowSelfServicePurchase

#Disable ProductID (or $True to enable)
Update-MSCommerceProductPolicy -PolicyId AllowSelfServicePurchase -ProductId CFQ7TTC0KP0N -Enabled $False

The following table shows the ProductID needed to enable or disable

ProductProductId
Power Apps per userCFQ7TTC0KP0P
Power Automate per userCFQ7TTC0KP0N
Power Automate RPACFQ7TTC0KXG6
Power BI Premium (standalone)CFQ7TTC0KXG7
Power BI ProCFQ7TTC0L3PB
Project Plan 1CFQ7TTC0KXND
Project Plan 3CFQ7TTC0KXNC
Visio Plan 1CFQ7TTC0KXN9
Visio Plan 2CFQ7TTC0KXN8

source: Use AllowSelfServicePurchase for the MSCommerce PowerShell module | Microsoft Docs

Cannot Tenant to Teams Only upgrade mode in Teams Admin Center

When changing the coexistence mode to Teams only you get the following error: Please see the unsaved sections higlighted in red below:

We cannot see what the problem is when switching to teams only. With powershell it has better error messages. Use the following powershell to connect to teams and change the tennant

#Connect with the SkypeOnlineConnector
Import-Module SkypeOnlineConnector
$sfbSession = New-CsOnlineSession
Import-PSSession $sfbSession

#Change the tennant to TeamsOnly
Grant-CsTeamsUpgradePolicy -PolicyName UpgradeToTeams -Global

The following message appears:

This organization cannot be upgraded to TeamsOnly at the tenant level because there is an on-premise deployment of Skyp
e for Business detected in 1 or more of it sip domains

To change this use the following command:

Disable-CsOnlineSipDomain -Domain domainname

After all domains have been altered, you can change the tenant to TeamsOnly with Powershell or the GUI:

sources:

Error upgrading organization to TeamsOnly – TechNut

Chris Webb’s 365 Blog: Cannot set users or Tenant to Teams Only upgrade mode in Teams Admin Center (webbtech.org)

Office 365 Hide mailboxes from the GAL

Export all mailboxes who are shown in the GAL

Get-Mailbox -ResultSize Unlimited | Where {$_.HiddenFromAddressListsEnabled -eq $false}| select UserPrincipalname, HiddenFromAddressListsEnabled | Export-Csv "c:\temp\gal.csv" -NoTypeInformation -Encoding UTF8

Show all private groups which are shown in the GAL (Teams groups are default hidden)

Get-UnifiedGroup | Where-Object {$_.AccessType -eq 'Private'} | select Displayname, PrimarySMTPAddress

To hide a single mailbox use the following command:

Set-Mailbox -Identity [email protected] -HiddenFromAddressListsEnabled $true

To hide multiple mailboxes from the GAL, create a CSV file and use that as input to hide the mailboxes:

Import-Csv 'C:\Hide_Mailboxes.csv' | ForEach-Object {
$upn = $_."UserPrincipalName"
Set-Mailbox -Identity $upn -HiddenFromAddressListsEnabled $true
}

To hide a single group use the following command:

Set-UnifiedGroup <group> -HiddenFromAddressListsEnabled $true

Or hide all private groups at once:

Get-UnifiedGroup | Where-Object {$_.AccessType -eq 'Private'} | Set-UnifiedGroup -HiddenFromAddressListsEnabled $true

Sources:

Find mailboxes hidden from the GAL using Powershell – MorganTechSpace

Hide Office 365 Group from GAL using Powershell – MorganTechSpace

Failed To Disable The Mailbox Due To a Conflict In Directory Settings

If you have a conflict in directory settings between Microsoft 365 and your on premise location use the next procedure to solve this

Check if the affected mailbox in Exchange Online is an usermailbox

get-recipient user | fl recipient*

If not already, disable the user account in the on-premise environment.

disable-mailbox user

Wait (or force) until the changes replicate to Microsoft 365. Once it is synced, enable the on-premise object as an remote user mailbox

Enable-RemoteMailbox user -RemoteRoutingAddress [email protected]

Wait (or force) until the sync to Microsoft 365 has been completed and then check the user. The error message should be gone and a license can be added

Windows Backup Mail Report Script

Earlier i wrote a script to check for windows server backup results. At the next site a better script is written to report the results of windows server backup:

https://jocha.se/blog/tech/wbadmin-backup-mail-report

The following script is from this site:

<# .SYNOPSIS Windows Backup Mail Report Written by Joakim, http://jocha.se .DESCRIPTION Version 4.1 - Updated 2016-05-31 This script will mail a report from the latest Windows Backup job, can also fetch and generate reports from remote servers. The script requires at least PowerShell v3. .EXAMPLE To automate this script, setup a scheduled task. Name: Backup Email Task Description: Notifies backup admin of scheduled backup status Run whether user is logged on or not Trigger > On event > Log=Microsoft-Windows-Backup/Operational > Source=Backup > Event ID(s)= 4,5,8,9,17,22,49,50,52,100,517,518,521,527,528,544,545,546,561,564,612 Action: Start a Program Program: Powershell Arguments: -Command "C:\Scripts\WBJobReport.ps1" -ExecutionPolicy Bypass #> Add-PSSnapin Windows.ServerBackup -ErrorAction SilentlyContinue ####################################### #-------- Variables to change --------# # Uncomment the two rows below and row 207 to enable "Remote Report" generation. #$Servers = New-PSSession -Computername Server01, Server02, Server03 #Invoke-Command -Session $Servers { # Set your Company name $Company = "MyCompany" # Set the recipient/sender email-address $MailTo = "[email protected]" $MailFrom = "$Company Backup <[email protected]>" # SMTP user account password $MailUser = "MyUser" $MailPassword = "MyPassword" # SMTP Server $MailServer = "smtpserver.company.com" # SMTP Port $MailPort = 587 # If your server uses SSL, otherwise set to $false $UseSSL = $true #---- Don't change anything below ----# ####################################### Try { $CurrentTime = (Get-Date).ToString("yyyy-MM-dd HH:mm") $Computer = Get-Content env:computername $WBJob = Get-WBJob -Previous 1 $WBSummary = Get-WBSummary $WBLastSuccess = ($WBSummary.LastSuccessfulBackupTime).ToString("yyyy-MM-dd HH:mm") $WBResult = $WBSummary.LastBackupResultHR $WBErrorMsg = $WBJob.ErrorDescription + "`n" + $WBSummary.DetailedMessage $WBStartTime = $WBJob.StartTime $WBEndTime = $WBJob.EndTime $WBDuration = (New-TimeSpan -Start $WBStartTime -End $WBEndTime) $Password = ConvertTo-SecureString $MailPassword -AsPlainText -Force $Credentials = New-Object System.Management.Automation.PSCredential ($MailUser, $Password) Function FormatBytes { Param ( [System.Int64]$Bytes ) [string]$BigBytes = "" #Convert to TB If ($Bytes -ge 1TB) {$BigBytes = [math]::round($Bytes / 1TB, 2); $BigBytes += " TB"} #Convert to GB ElseIf ($Bytes -ge 1GB) {$BigBytes = [math]::round($Bytes / 1GB, 2); $BigBytes += " GB"} #Convert to MB ElseIf ($Bytes -ge 1MB) {$BigBytes = [math]::round($Bytes / 1MB, 2); $BigBytes += " MB"} #Convert to KB ElseIf ($Bytes -ge 1KB) {$BigBytes = [math]::round($Bytes / 1KB, 2); $BigBytes += " KB"} #If smaller than 1KB, leave at bytes. Else {$BigBytes = $Bytes; $BigBytes += " Bytes"} Return $BigBytes } Function Log-BackupItems { Param ( [System.String]$Name, [System.String]$Status, [System.Int64]$Bytes ) $Item = New-Object System.Object; $Item | Add-Member -Type NoteProperty -Name "Name" -Value $Name; $Item | Add-Member -Type NoteProperty -Name "Status" -Value $Status; $Item | Add-Member -Type NoteProperty -Name "Size" -Value (FormatBytes -Bytes $Bytes); Return $Item; } $results=@() $WBJob | % { $_.JobItems | % { $BackupItem = $null If ($_.Name -eq 'VolumeList') { $_ | % {$_.SubItemList | % { $BackupItem = Log-BackupItems -Name $_.Name -Status $_.State -Bytes $_.TotalBytes $results += $BackupItem }} } Else { $_ | % { $BackupItem = Log-BackupItems -Name $_.Name -Status $_.State -Bytes $_.TotalBytes $results += $BackupItem } } } } # Change Result of 0 to Success in green text and any other result as Failure in red text If ($WBResult -eq 0) { $WBResult = "Successful"} Else {$WBResult = "Failed"} # Assemble the HTML Report $HTMLMessage = @" <!DOCTYPE html> <html> <head> <title>$Company Backup Report for $Computer</title> <style> body { font-family: Verdana, Geneva, Arial, Helvetica, sans-serif; font-size: 12px } h3{ clear: both; font-size: 150%; margin-left: 20px;margin-top: 30px; } table { padding: 15px 0 20px; width: 500px; text-align: left; } td, th { padding: 0 20px 0 0; margin 0; text-align: left; } th { margin-top: 15px } a, a:visited { color: #2ea3f2; text-decoration: none; } #Report { width: 600px; } #Successful { color: green } #Failed { color: red } </style> </head> <body> <div id="Report"> <p><h3><a href="http://jocha.se">$Company Backup Report for $Computer</a></p></h3> <table id="summary"><tbody> <tr><td>Todays date:</td> <td>$CurrentTime</td></tr> <tr><td>Last Successful Backup:</td> <td>$WBLastSuccess</td></tr> <tr><td>Start time last backup:</td> <td>$WBStartTime</td></tr> <tr><td>End time last backup:</td> <td>$WBEndTime</td></tr> <tr><td>Duration last backup:</td> <td>$WBDuration</td></tr> <tr><td>Backup Result:</td> <td><b id="$WBResult">$WBResult</b></td></tr> <tr><td>Error Message (if applicable):</td> <td>$WBErrorMsg</td></tr></tbody></table> $( $html = $results | ConvertTo-HTML -Fragment $xml=[xml]$html $attr=$xml.CreateAttribute('id') $attr.Value='items' $xml.table.Attributes.Append($attr) | out-null $html=$xml.OuterXml | out-string $html ) </div> </body> </html> "@ $email = @{ SMTPServer = $MailServer UseSSL = $UseSSL BodyAsHtml = $true Port = $MailPort Credential = $Credentials Encoding = ([System.Text.Encoding]::UTF8) To = $MailTo From = $MailFrom Subject = "$WBResult Backup on $Computer" Body = $HTMLMessage } Send-MailMessage @email } Catch { $email = @{ SMTPServer = $MailServer BodyAsHtml = $true UseSSL = $UseSSL # Port is a PowerShell v3 variable Port = $MailPort Credential = $Credentials Encoding = ([System.Text.Encoding]::UTF8) To = $MailTo From = $MailFrom Subject = "Failed Backup on $Computer" Body = "The backup script failed to run!" } Send-MailMessage @email } # Uncomment below to enable "Remote Report". #}

Configure Email notification for Windows Server Backup

When you need to rely on Windows Server Backup, you want some sort of reporting. A lot of scripts with mailing functions are available (e.g. WSB Backup to network with email notification and rotation) . If you want to rely on simple messaging from the server itself, you can use scheduled tasks for this.

Windows Server Backup writes events to its own event log (event logs > Applications and Services Logs > Microsoft > Windows > Backup > Operational). We can use these successful (4) and unsuccessful (5) events as a trigger.

Create two scheduled tasks (can run under system) with the following triggers:

Trigger for a successful event

Trigger for an unsuccessful event

In the action of the tasks, run a powershell command to send a mail.

Source: https://www.bluecompute.co.uk/blogposts/configure-email-notification-for-windows-server-backup/

To backup a domain controller with powershell. Use the script below to place it on the network. This scripts requires the Windows Server Backup Feature and can be scheduled

Import-Module ServerManager
[string]$date = get-date -f 'yyyy-MM-dd'
$path=”\\server\directory”
$TargetUNC=$path+'-'+$date
$TestTargetUNC= Test-Path -Path $TargetUNC
if (!($TestTargetUNC)){
New-Item -Path $TargetUNC -ItemType directory
}
$WBadmin_cmd = "wbadmin.exe START BACKUP -backupTarget:$TargetUNC -systemState -noverify -vssCopy -quiet"
Invoke-Expression $WBadmin_cmd

If an error occurs:

Detailed error: The filename, directory name, or volume label syntax is incorrect. The backup of the system state failed 
 

Make sure all drivers are set correct. In my case changing the path of vsock did the trick. How to find the driver path? Open an elevated prompt and execute the following commands:

DiskShadow /L writers.txt
list writers detailed

Check the directories, in my case the string which was found was the following:

File List: Path = c:\windows\\systemroot\system32\drivers, Filespec = vsock.sys

To correct the path, open the Registry Editor and go to reg key HKLM\SYSTEM\CurrentControlSet\Services\vsock

Change the ImagePath value from

\systemroot\system32\DRIVERS\vsock.sys
to
System32\DRIVERS\vsock.sys

Run the backup again, it should say:

The backup operation successfully completed.
The backup of volume (C:) completed successfully.
The backup of the system state successfully completed [01.06.2020 09:52].

source: http://woshub.com/backup-active-directory-domain-controller/