Find IP addresses using Exchange SMTP relay

see Find IP addresses using Exchange SMTP relay – ALI TAJRAN

To make this work, your SMTP relay logging should be enabled.
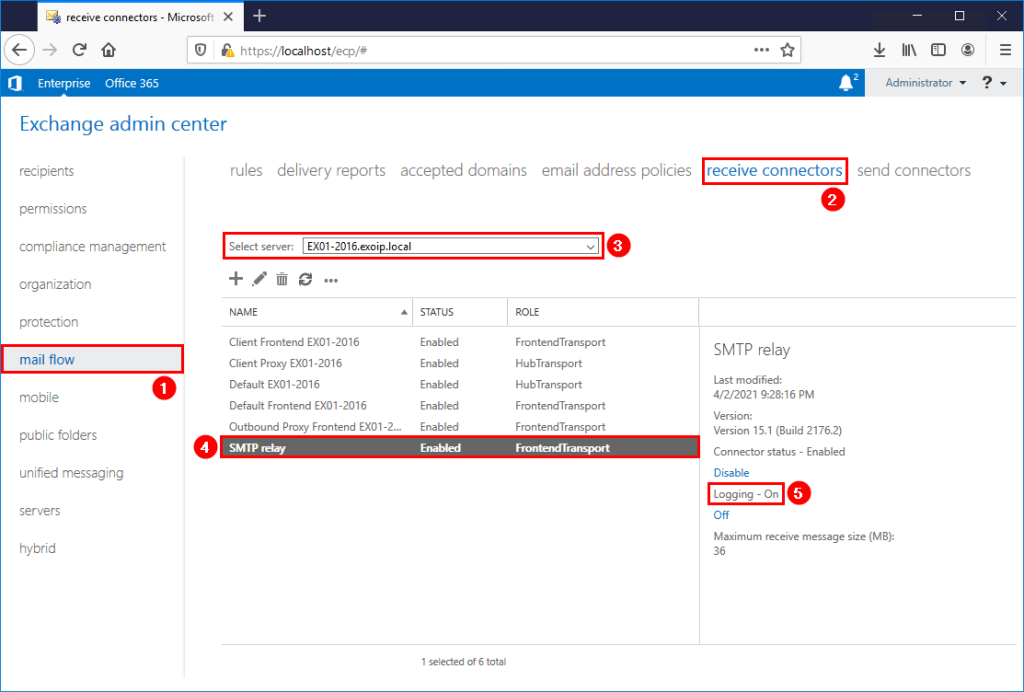
The script will look into your logfiles and export all IP address which have been using the relay service. If your loglocations is different then the default (C:\Program Files\Microsoft\Exchange Server\V15\TransportRoles\Logs\FrontEnd\ProtocolLog\SmtpReceive), make sure to alter it in the script.

Your logfile location can be found by executing the following powershell script:

Get-FrontendTransportService | fl Name,Identity,Receive*

Prepare SMTP-Review PowerShell script

Create two folders on the Exchange Server (C:) drive:

  • Temp
  • Scripts

Copy and paste the below code into Notepad. Give it the name SMTP-Review.ps1 and place it in the C:\scripts folder.

<#
    .SYNOPSIS
    SMTP-Review.ps1

    .DESCRIPTION
    Script is intended to help determine servers that are using an Exchange server to connect and send email.
    This is especially pertinent in a decommission scenario, where the logs are to be checked to ensure that
    all SMTP traffic has been moved to the correct endpoint.

    .LINK
    www.alitajran.com/find-ip-addresses-using-exchange-smtp-relay

    .NOTES
    Written by: ALI TAJRAN
    Website:    www.alitajran.com
    LinkedIn:   linkedin.com/in/alitajran

    .CHANGELOG
    V1.00, 04/05/2021 - Initial version
    V2.00, 03/28/2023 - Rewrite script to retrieve results faster
#>

# Clears the host console to make it easier to read output
Clear-Host

# Sets the path to the directory containing the log files to be processed
$logFilePath = "C:\Program Files\Microsoft\Exchange Server\V15\TransportRoles\Logs\FrontEnd\ProtocolLog\SmtpReceive\*.log"

# Sets the path to the output file that will contain the unique IP addresses
$Output = "C:\temp\IPAddresses.txt"

# Gets a list of the log files in the specified directory
$logFiles = Get-ChildItem $logFilePath

# Gets the number of log files to be processed
$count = $logFiles.Count

# Initializes an array to store the unique IP addresses
$ips = foreach ($log in $logFiles) {

    # Displays progress information
    $percentComplete = [int](($logFiles.IndexOf($log) + 1) / $count * 100)
    $status = "Processing $($log.FullName) - $percentComplete% complete ($($logFiles.IndexOf($log)+1) of $count)"
    Write-Progress -Activity "Collecting Log details" -Status $status -PercentComplete $percentComplete

    # Displays the name of the log file being processed
    Write-Host "Processing Log File $($log.FullName)" -ForegroundColor Magenta

    # Reads the content of the log file, skipping the first five lines
    $fileContent = Get-Content $log | Select-Object -Skip 5

    # Loops through each line in the log file
    foreach ($line in $fileContent) {

        # Extracts the IP address from the socket information in the log line
        $socket = $line.Split(',')[5]
        $ip = $socket.Split(':')[0]
        
        # Adds the IP address to the $ips array
        $ip
    }
}

# Removes duplicate IP addresses from the $ips array and sorts them alphabetically
$uniqueIps = $ips | Select-Object -Unique | Sort-Object

# Displays the list of unique IP addresses on the console
Write-Host "List of noted remove IPs:" 
$uniqueIps
Write-Host 

# Writes the list of unique IP addresses to the output file
$uniqueIps | Out-File $Output

In Line 27, change the path to the receive protocol log path you searched for in the previous step.

Run SMTP-Review PowerShell script

Run PowerShell as administrator and run the SMTP-Review.ps1 PowerShell script.

The script will go through all the files, and after it finishes, you will see which IP addresses use the SMTP relay in the console output. Also, it will generate an IPAddresses.txt file with the IP addresses in the C:\temp folder.

Make a note of the IP addresses and adjust the SMTP field in the printers, applications, and servers to the new SMTP relay record.

Get AD Nested Group Members with Powershell

Use the following script to get nested AD group members using powershell.

Import-Module ActiveDirectory

function Get-ADNestedGroupMembers {
  [cmdletbinding()]
  param ( [String] $Group )            
  Import-Module ActiveDirectory
  $Members = Get-ADGroupMember -Identity $Group -Recursive | select samaccountname | %{Get-ADUser $_.samaccountname -Properties mail}
  $members
}

Get-ADNestedGroupMembers "GROUP" | Select Name,SamAccountName,mail,enabled

Microsoft 365 – Self-service purchase

Self-service purchase gives users a chance to try out new technologies and develop solutions that ultimately benefit their larger organizations. Central procurement and IT teams have visibility to all users who buy and deploy self-service purchase solutions through the Microsoft 365 admin center. Admins can turn off self-service purchasing on a per product basis via PowerShell..

To read more about the Self-service purchase option, go to: Self-service purchase FAQ | Microsoft Docs

To disable the AllowSelfServicePurchase do the following:

#Install module
Install-Module -Name MSCommerce

#Import module
Import-Module -Name MSCommerce

#Connect
Connect-MSCommerce

#Get details
Get-MSCommerceProductPolicies -PolicyId AllowSelfServicePurchase

#Disable ProductID (or $True to enable)
Update-MSCommerceProductPolicy -PolicyId AllowSelfServicePurchase -ProductId CFQ7TTC0KP0N -Enabled $False

The following table shows the ProductID needed to enable or disable

ProductProductId
Power Apps per userCFQ7TTC0KP0P
Power Automate per userCFQ7TTC0KP0N
Power Automate RPACFQ7TTC0KXG6
Power BI Premium (standalone)CFQ7TTC0KXG7
Power BI ProCFQ7TTC0L3PB
Project Plan 1CFQ7TTC0KXND
Project Plan 3CFQ7TTC0KXNC
Visio Plan 1CFQ7TTC0KXN9
Visio Plan 2CFQ7TTC0KXN8

source: Use AllowSelfServicePurchase for the MSCommerce PowerShell module | Microsoft Docs

VMware Appliance Management Interface (VAMI) – Unable to login

When trying to login to your VAMI interface (https://FQDN:5480), an error “Unable to login” is shown:

If the applmgmt service has been stopped, this can be the root cause.

Connect to the console of the virtual center appliance and enable SSH. Login with the root credentials and check which services has been stopped:

service-control --status

If the “applmngt” service is stopped, start it with:

service-control --start applmgmt

If you want to start all services use –all instead of applmgmt

Check your running services and if they are up, connect to the VAMI and it should be working!

Cannot Tenant to Teams Only upgrade mode in Teams Admin Center

When changing the coexistence mode to Teams only you get the following error: Please see the unsaved sections higlighted in red below:

We cannot see what the problem is when switching to teams only. With powershell it has better error messages. Use the following powershell to connect to teams and change the tennant

#Connect with the SkypeOnlineConnector
Import-Module SkypeOnlineConnector
$sfbSession = New-CsOnlineSession
Import-PSSession $sfbSession

#Change the tennant to TeamsOnly
Grant-CsTeamsUpgradePolicy -PolicyName UpgradeToTeams -Global

The following message appears:

This organization cannot be upgraded to TeamsOnly at the tenant level because there is an on-premise deployment of Skyp
e for Business detected in 1 or more of it sip domains

To change this use the following command:

Disable-CsOnlineSipDomain -Domain domainname

After all domains have been altered, you can change the tenant to TeamsOnly with Powershell or the GUI:

sources:

Error upgrading organization to TeamsOnly – TechNut

Chris Webb’s 365 Blog: Cannot set users or Tenant to Teams Only upgrade mode in Teams Admin Center (webbtech.org)

Office 365 Hide mailboxes from the GAL

Export all mailboxes who are shown in the GAL

Get-Mailbox -ResultSize Unlimited | Where {$_.HiddenFromAddressListsEnabled -eq $false}| select UserPrincipalname, HiddenFromAddressListsEnabled | Export-Csv "c:\temp\gal.csv" -NoTypeInformation -Encoding UTF8

Show all private groups which are shown in the GAL (Teams groups are default hidden)

Get-UnifiedGroup | Where-Object {$_.AccessType -eq 'Private'} | select Displayname, PrimarySMTPAddress

To hide a single mailbox use the following command:

Set-Mailbox -Identity [email protected] -HiddenFromAddressListsEnabled $true

To hide multiple mailboxes from the GAL, create a CSV file and use that as input to hide the mailboxes:

Import-Csv 'C:\Hide_Mailboxes.csv' | ForEach-Object {
$upn = $_."UserPrincipalName"
Set-Mailbox -Identity $upn -HiddenFromAddressListsEnabled $true
}

To hide a single group use the following command:

Set-UnifiedGroup <group> -HiddenFromAddressListsEnabled $true

Or hide all private groups at once:

Get-UnifiedGroup | Where-Object {$_.AccessType -eq 'Private'} | Set-UnifiedGroup -HiddenFromAddressListsEnabled $true

Sources:

Find mailboxes hidden from the GAL using Powershell – MorganTechSpace

Hide Office 365 Group from GAL using Powershell – MorganTechSpace

Veeam: Your License consumption has been exceeding the license cap

When using Veeam backup for Microsoft Office 365 it is possible you get a license error during backup. This is because when you move a Microsoft 365 license to a new user, this needs a backup to and counts as a second Veeam license.

Normally this should not be a problem, you can use more Veeam licenses than you have (10% of extra licenses or 10 user accounts -whichever is greater-) to overcome this issue. And if a user does not have a restore point in the past 31 days the license will be available again. To see the more information about licenses check this page out: Licensing and License Types – Veeam Backup for Microsoft Office 365 Guide

If Veeam is not backing up anymore because you do not have enough license, you should purchase new ones or free some.

To revoke licenses without waiting you can use powershell. To revoke licenses you need to remove all of the user’s data from all the repositories prior to revoking the license.

Use the following procedure to remove user licenses: Remove User License in Veeam Backup for Microsoft Office 365

Use the following powershell command to check which data a user has on a repository:

$repository = Get-VBORepository -Name "REPOSITORY" 
$user = Get-VBOEntityData -Type User -Repository $repository -Name "[email protected]" 
$user

Email

If the user has email existing on the repository, you will use the following section:

#This remove script is used for repositories containing users Email
#Fill in "REPOSITORY" with the name of the repository as it is showing in Veeam Backup for Office 365 and the email address of the user you wish to remove the data for "[email protected]"

$repository = Get-VBORepository -Name "REPOSITORY" 
$user = Get-VBOEntityData -Type User -Repository $repository -Name "[email protected]" 
Remove-VBOEntityData -Repository $repository -User $user -Mailbox -ArchiveMailbox -OneDrive -Sites
#Y will accept the deleting of data

Remove License

Once you have removed the user’s data from all configured repositories, then you can remove the license for this user. The below script will pull the organization you have added into the console and desired user to then release the license. If you missed a repository, the error will tell you on what repository you still have remaining data:

#If there is no more data for this user on any repository you can use the following to remove the license
#Fill in the domain name as it is shown in Veeam Office 365 "DOMAIN.onmicrosoft.com" and the users email address "[email protected]"

$org = Get-VBOOrganization -Name "DOMAIN.onmicrosoft.com"
$licensedUser = Get-VBOLicensedUser -Organization $org -Name "[email protected]"
Remove-VBOLicensedUser -User $licensedUser

No Email

If a user has no email data look at the following article to delete sharepoint or onedrive data: Remove User License in Veeam Backup for Microsoft Office 365

Failed To Disable The Mailbox Due To a Conflict In Directory Settings

If you have a conflict in directory settings between Microsoft 365 and your on premise location use the next procedure to solve this

Check if the affected mailbox in Exchange Online is an usermailbox

get-recipient user | fl recipient*

If not already, disable the user account in the on-premise environment.

disable-mailbox user

Wait (or force) until the changes replicate to Microsoft 365. Once it is synced, enable the on-premise object as an remote user mailbox

Enable-RemoteMailbox user -RemoteRoutingAddress [email protected]

Wait (or force) until the sync to Microsoft 365 has been completed and then check the user. The error message should be gone and a license can be added