Windows Backup Mail Report Script

Earlier i wrote a script to check for windows server backup results. At the next site a better script is written to report the results of windows server backup:

https://jocha.se/blog/tech/wbadmin-backup-mail-report

The following script is from this site:

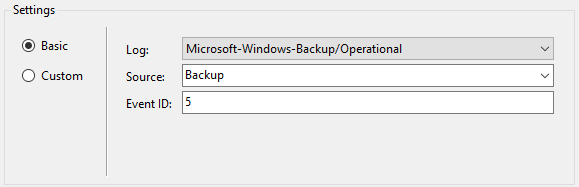
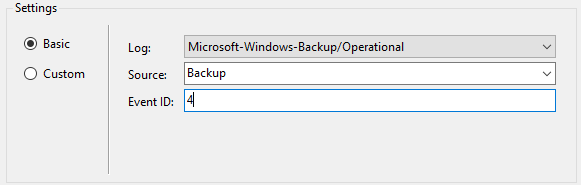
<# .SYNOPSIS Windows Backup Mail Report Written by Joakim, http://jocha.se .DESCRIPTION Version 4.1 - Updated 2016-05-31 This script will mail a report from the latest Windows Backup job, can also fetch and generate reports from remote servers. The script requires at least PowerShell v3. .EXAMPLE To automate this script, setup a scheduled task. Name: Backup Email Task Description: Notifies backup admin of scheduled backup status Run whether user is logged on or not Trigger > On event > Log=Microsoft-Windows-Backup/Operational > Source=Backup > Event ID(s)= 4,5,8,9,17,22,49,50,52,100,517,518,521,527,528,544,545,546,561,564,612 Action: Start a Program Program: Powershell Arguments: -Command "C:\Scripts\WBJobReport.ps1" -ExecutionPolicy Bypass #> Add-PSSnapin Windows.ServerBackup -ErrorAction SilentlyContinue ####################################### #-------- Variables to change --------# # Uncomment the two rows below and row 207 to enable "Remote Report" generation. #$Servers = New-PSSession -Computername Server01, Server02, Server03 #Invoke-Command -Session $Servers { # Set your Company name $Company = "MyCompany" # Set the recipient/sender email-address $MailTo = "[email protected]" $MailFrom = "$Company Backup <[email protected]>" # SMTP user account password $MailUser = "MyUser" $MailPassword = "MyPassword" # SMTP Server $MailServer = "smtpserver.company.com" # SMTP Port $MailPort = 587 # If your server uses SSL, otherwise set to $false $UseSSL = $true #---- Don't change anything below ----# ####################################### Try { $CurrentTime = (Get-Date).ToString("yyyy-MM-dd HH:mm") $Computer = Get-Content env:computername $WBJob = Get-WBJob -Previous 1 $WBSummary = Get-WBSummary $WBLastSuccess = ($WBSummary.LastSuccessfulBackupTime).ToString("yyyy-MM-dd HH:mm") $WBResult = $WBSummary.LastBackupResultHR $WBErrorMsg = $WBJob.ErrorDescription + "`n" + $WBSummary.DetailedMessage $WBStartTime = $WBJob.StartTime $WBEndTime = $WBJob.EndTime $WBDuration = (New-TimeSpan -Start $WBStartTime -End $WBEndTime) $Password = ConvertTo-SecureString $MailPassword -AsPlainText -Force $Credentials = New-Object System.Management.Automation.PSCredential ($MailUser, $Password) Function FormatBytes { Param ( [System.Int64]$Bytes ) [string]$BigBytes = "" #Convert to TB If ($Bytes -ge 1TB) {$BigBytes = [math]::round($Bytes / 1TB, 2); $BigBytes += " TB"} #Convert to GB ElseIf ($Bytes -ge 1GB) {$BigBytes = [math]::round($Bytes / 1GB, 2); $BigBytes += " GB"} #Convert to MB ElseIf ($Bytes -ge 1MB) {$BigBytes = [math]::round($Bytes / 1MB, 2); $BigBytes += " MB"} #Convert to KB ElseIf ($Bytes -ge 1KB) {$BigBytes = [math]::round($Bytes / 1KB, 2); $BigBytes += " KB"} #If smaller than 1KB, leave at bytes. Else {$BigBytes = $Bytes; $BigBytes += " Bytes"} Return $BigBytes } Function Log-BackupItems { Param ( [System.String]$Name, [System.String]$Status, [System.Int64]$Bytes ) $Item = New-Object System.Object; $Item | Add-Member -Type NoteProperty -Name "Name" -Value $Name; $Item | Add-Member -Type NoteProperty -Name "Status" -Value $Status; $Item | Add-Member -Type NoteProperty -Name "Size" -Value (FormatBytes -Bytes $Bytes); Return $Item; } $results=@() $WBJob | % { $_.JobItems | % { $BackupItem = $null If ($_.Name -eq 'VolumeList') { $_ | % {$_.SubItemList | % { $BackupItem = Log-BackupItems -Name $_.Name -Status $_.State -Bytes $_.TotalBytes $results += $BackupItem }} } Else { $_ | % { $BackupItem = Log-BackupItems -Name $_.Name -Status $_.State -Bytes $_.TotalBytes $results += $BackupItem } } } } # Change Result of 0 to Success in green text and any other result as Failure in red text If ($WBResult -eq 0) { $WBResult = "Successful"} Else {$WBResult = "Failed"} # Assemble the HTML Report $HTMLMessage = @" <!DOCTYPE html> <html> <head> <title>$Company Backup Report for $Computer</title> <style> body { font-family: Verdana, Geneva, Arial, Helvetica, sans-serif; font-size: 12px } h3{ clear: both; font-size: 150%; margin-left: 20px;margin-top: 30px; } table { padding: 15px 0 20px; width: 500px; text-align: left; } td, th { padding: 0 20px 0 0; margin 0; text-align: left; } th { margin-top: 15px } a, a:visited { color: #2ea3f2; text-decoration: none; } #Report { width: 600px; } #Successful { color: green } #Failed { color: red } </style> </head> <body> <div id="Report"> <p><h3><a href="http://jocha.se">$Company Backup Report for $Computer</a></p></h3> <table id="summary"><tbody> <tr><td>Todays date:</td> <td>$CurrentTime</td></tr> <tr><td>Last Successful Backup:</td> <td>$WBLastSuccess</td></tr> <tr><td>Start time last backup:</td> <td>$WBStartTime</td></tr> <tr><td>End time last backup:</td> <td>$WBEndTime</td></tr> <tr><td>Duration last backup:</td> <td>$WBDuration</td></tr> <tr><td>Backup Result:</td> <td><b id="$WBResult">$WBResult</b></td></tr> <tr><td>Error Message (if applicable):</td> <td>$WBErrorMsg</td></tr></tbody></table> $( $html = $results | ConvertTo-HTML -Fragment $xml=[xml]$html $attr=$xml.CreateAttribute('id') $attr.Value='items' $xml.table.Attributes.Append($attr) | out-null $html=$xml.OuterXml | out-string $html ) </div> </body> </html> "@ $email = @{ SMTPServer = $MailServer UseSSL = $UseSSL BodyAsHtml = $true Port = $MailPort Credential = $Credentials Encoding = ([System.Text.Encoding]::UTF8) To = $MailTo From = $MailFrom Subject = "$WBResult Backup on $Computer" Body = $HTMLMessage } Send-MailMessage @email } Catch { $email = @{ SMTPServer = $MailServer BodyAsHtml = $true UseSSL = $UseSSL # Port is a PowerShell v3 variable Port = $MailPort Credential = $Credentials Encoding = ([System.Text.Encoding]::UTF8) To = $MailTo From = $MailFrom Subject = "Failed Backup on $Computer" Body = "The backup script failed to run!" } Send-MailMessage @email } # Uncomment below to enable "Remote Report". #}

Configure Email notification for Windows Server Backup

When you need to rely on Windows Server Backup, you want some sort of reporting. A lot of scripts with mailing functions are available (e.g. WSB Backup to network with email notification and rotation) . If you want to rely on simple messaging from the server itself, you can use scheduled tasks for this.

Windows Server Backup writes events to its own event log (event logs > Applications and Services Logs > Microsoft > Windows > Backup > Operational). We can use these successful (4) and unsuccessful (5) events as a trigger.

Create two scheduled tasks (can run under system) with the following triggers:

Trigger for a successful event

Trigger for an unsuccessful event

In the action of the tasks, run a powershell command to send a mail.

Source: https://www.bluecompute.co.uk/blogposts/configure-email-notification-for-windows-server-backup/

To backup a domain controller with powershell. Use the script below to place it on the network. This scripts requires the Windows Server Backup Feature and can be scheduled

Import-Module ServerManager
[string]$date = get-date -f 'yyyy-MM-dd'
$path=”\\server\directory”
$TargetUNC=$path+'-'+$date
$TestTargetUNC= Test-Path -Path $TargetUNC
if (!($TestTargetUNC)){
New-Item -Path $TargetUNC -ItemType directory
}
$WBadmin_cmd = "wbadmin.exe START BACKUP -backupTarget:$TargetUNC -systemState -noverify -vssCopy -quiet"
Invoke-Expression $WBadmin_cmd

If an error occurs:

Detailed error: The filename, directory name, or volume label syntax is incorrect. The backup of the system state failed 
 

Make sure all drivers are set correct. In my case changing the path of vsock did the trick. How to find the driver path? Open an elevated prompt and execute the following commands:

DiskShadow /L writers.txt
list writers detailed

Check the directories, in my case the string which was found was the following:

File List: Path = c:\windows\\systemroot\system32\drivers, Filespec = vsock.sys

To correct the path, open the Registry Editor and go to reg key HKLM\SYSTEM\CurrentControlSet\Services\vsock

Change the ImagePath value from

\systemroot\system32\DRIVERS\vsock.sys
to
System32\DRIVERS\vsock.sys

Run the backup again, it should say:

The backup operation successfully completed.
The backup of volume (C:) completed successfully.
The backup of the system state successfully completed [01.06.2020 09:52].

source: http://woshub.com/backup-active-directory-domain-controller/

NetApp monitoring in CheckMK

To use the special agent of the checkmk which collects data from a NetApp filer instead of SNMP do the following:

  1. Download the Netapp Manageability SDK from NetApp (a login is required). This can be downloaded here.
  2. Login to OMD with su – sitename
  3. Copy the two python files ‘NaElement.py’ and ‘NaServer.py’ to the OMD directory /omd/sites/sitename/local/lib/python
  4. Add a new ruleset ‘Check NetApp via WebAPI’ for your filers. Make sure the user has appropiate permissions1
  5. Monitor your filer with a configured special agent instead of snmp or no agent

1 The user which you use, needs appropriate permissions. The appropriate permissions can be found in the header of the agent (see also https://forum.checkmk.com/t/netapp-monitoring-via-checkmk/20694/6)

sources: https://checkmk.com/check_mk-werks.php?werk_id=1665

ACL script to determine folder permissions

To determine the ACL’s on a specific foldertree use the following script. It will display the Path, FileSystemRights, IsInherited, Name of the underlying folders.

$path = "\\server\path\"
$targetFile = "file.csv" # Not working yet

$foldersToQuery = Get-ChildItem $Path | Where {$_.PSIsContainer} | select -expandproperty FullName

   # Get access list, change any domain
foreach ($folder in $foldersToQuery) {
    $Access = (Get-Acl $Folder).Access |
      Select-Object @{n='Path';e={ $Folder }}, *,
        @{n='ADObject';e={ 
          If ($_.IdentityReference -NotMatch "^(NT AUTH|BUILTIN|$($Env:ComputerName))") {
            $Searcher = [ADSISearcher]"(sAMAccountName=$($_.IdentityReference -Replace '^.+\\'))"
            $Searcher.PropertiesToLoad.AddRange(@("name", "distinguishedName", "objectClass"))
            $Searcher.FindOne()
        } }} |
      Select-Object *, @{n='Name';e={ $_.ADObject.Properties['name'][0] }},
        @{n='DN';e={ $_.ADObject.Properties['distinguishedname'][0] }},
        @{n='Class';e={ ([String[]]$_.ADObject.Properties['objectclass'])[-1] }} -Exclude ADObject

      $Access | ForEach-Object {
        $Entry = $_
        If ($Entry.Class -eq 'group') {
  
          $Searcher = [ADSISearcher]"(memberOf:1.2.840.113556.1.4.1941:=$($Entry.DN))"
          $Searcher.PageSize = 1000
          $Searcher.PropertiesToLoad.AddRange(@("name", "distinguishedName", "objectClass"))
          $Searcher.FindAll() | ForEach-Object {
            $ADObject = $_
            $Entry | Select-Object *, @{n='Name';e={ $ADObject.Properties['name'][0] }},
              @{n='DN';e={ $ADObject.Properties['distinguishedname'][0] }},
              @{n='Class';e={ ([String[]]$ADObject.Properties['objectclass'])[-1] }} -Exclude Name, DN, Class
          }
        } Else {
          $Entry
        }
      } | ft Path, FileSystemRights, IsInherited, Name, class -AutoSize  

}

Microsoft Teams – Welcome Message

Microsoft teams can send welcome messages when a user is added to the teams. This behavior can be altered with powershell

The current setting for the team can be checked with powershell. To run this, you need to be connected to Microsoft 365. For Microsoft 365 management you can install the “Microsoft Exchange Online Powershell Module” from Microsoft 365.

Get-UnifiedGroup -Identity 'Group Name' | fl WelcomeMessageEnabled

The outcome should be True or False. When it is set to True, welcome messages will be send. To change this setting, so welcome messages are not send, change the value to false

set-UnifiedGroup -Identity 'Group Name' -UnifiedGroupWelcomeMessageEnabled:$False

Delete folders with ‘Long Filenames’

When deleting files the following error occurs:

Source Path Too Long
The source file name(s) are larger than is supported by the file system. Try moving to a location which has a shorter path name, or try renaming to shorter name(s) before attempting this operation.

To delete these files use the following robocopy method:

MD C:\DELETE-ME
robocopy C:\DELETE-ME C:\{path}\{The Top Level Folder To Delete} /s /mir

After the directory has been removed, remove the remaining folders with:

rd C:\DELETE-ME
rd C:\{path}\{The Top Level Folder To Delete}

Backup all SQL databases

The following script can be used to backup all databases from a SQL server. The system databases are excluded. If any other database should be excluded, add them to the “NOT IN” section.

For different date formats in the export, check: https://robbamforth.wordpress.com/2010/06/11/sql-date-formats-getdate-examples/

The script is exporting the databases now with the following format: databasename_YYMMDD.bak

DECLARE @name VARCHAR(50) -- database name  
DECLARE @path VARCHAR(256) -- path for backup files  
DECLARE @fileName VARCHAR(256) -- filename for backup  
DECLARE @fileDate VARCHAR(20) -- used for file name
 
-- specify database backup directory
SET @path = 'C:\Backup\'  
 
-- specify filename format
SELECT @fileDate = CONVERT(VARCHAR(8),GETDATE(),112) 
 
DECLARE db_cursor CURSOR READ_ONLY FOR  
SELECT name 
FROM master.sys.databases 
WHERE name NOT IN ('master','model','msdb','tempdb')  -- exclude these databases
AND state = 0 -- database is online
AND is_in_standby = 0 -- database is not read only for log shipping
 
OPEN db_cursor   
FETCH NEXT FROM db_cursor INTO @name   
 
WHILE @@FETCH_STATUS = 0   
BEGIN   
   SET @fileName = @path + @name + '_' + @fileDate + '.BAK'  
   BACKUP DATABASE @name TO DISK = @fileName  
 
   FETCH NEXT FROM db_cursor INTO @name   
END   
 
CLOSE db_cursor   
DEALLOCATE db_cursor

Administer WID instance with SQL Server Management Studio

Windows Server Update Services (WSUS) can use a Windows Internal Database (WID). This database is manged through WSUS, but occasionally you want to administer this with SQL Server Management Studio.

Install SQL Server Management Studion (Express) on the server where WSUS has been installed. Then connect to the WID database by using the following server name:

2008R2:
\\.\pipe\MSSQL$MICROSOFT##SSEE\sql\query
2012R2: 
\\.\pipe\MICROSOFT##WID\tsql\query 

Now you can administer the instance.

If you prefer to administer the database from CLI, you can install the SQL Server Command Line Query Utility – SQLCMD.

To connec to to the database instance, run the sqlcmd utility by passing the instance name. If the database is set in single user mode you can change this by running the following commands:

Windows Server 2012R2:
Open Command Prompt with Administrator Rights
sqlcmd -S np:\\.\pipe\MICROSOFT##WID\tsql\query
alter database susdb
set multi_user
go 

or

Windows Server 2008R2:
sqlcmd -S np:\\.\pipe\MSSQL$MICROSOFT##SSEE\sql\query
alter database susdb
set multi_user
go 

Please Note. It is possible to administer WID instances this way, but it is not recommended. Changes to the WID instance can break the product or changes can be overwritten by updates of the products.