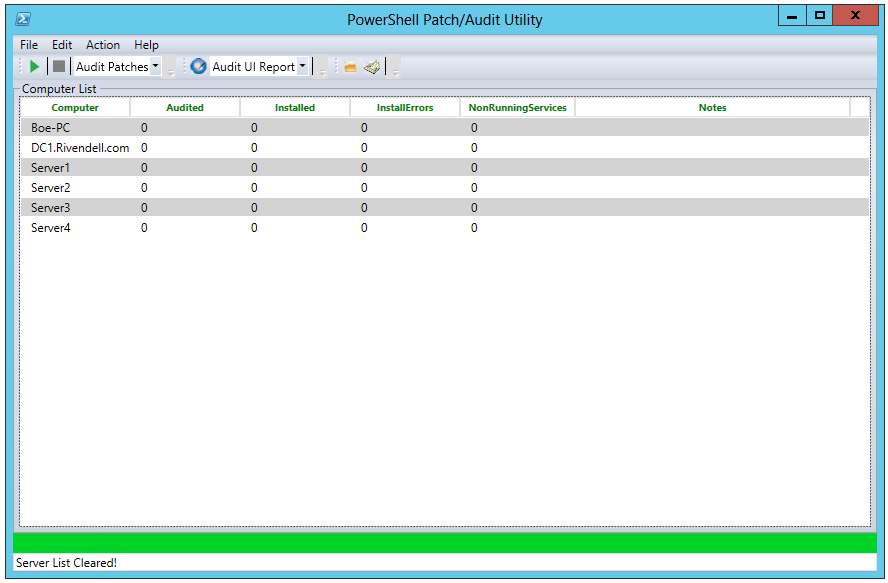
DiskPart has encountered an error: The media is write protected.

During the creation of a new disk, the error “The media is write protected” pops up.

Check if the disk (or volume) is in a read-only state:

DISKPART> attributes disk
Current Read-only State : Yes
Read-only : Yes
Boot Disk : No
Pagefile Disk : No
Hibernation File Disk : No
Crashdump Disk : No
Clustered Disk : No

If the disk or volume is in a read-only state, clear the attribute with the following command:


attributes disk clear readonly

attributes volume clear readonly

Go ahead with the creation of the new disk

Crack Sheet Protection Password in Excel

This routine provides a password to unprotect your worksheet. However, it may not give you the original password that was used.

Open the workbook that has the protected sheet in it. Hit Alt+F11 to view the Visual Basic Editor. Hit Insert-Module and paste this code into the right-hand code window:

Sub PasswordBreaker()
  'Author unknown but submitted by brettdj of www.experts-exchange.com

  Dim i As Integer, j As Integer, k As Integer
  Dim l As Integer, m As Integer, n As Integer
  Dim i1 As Integer, i2 As Integer, i3 As Integer
  Dim i4 As Integer, i5 As Integer, i6 As Integer
  On Error Resume Next
  For i = 65 To 66: For j = 65 To 66: For k = 65 To 66
  For l = 65 To 66: For m = 65 To 66: For i1 = 65 To 66
  For i2 = 65 To 66: For i3 = 65 To 66: For i4 = 65 To 66
  For i5 = 65 To 66: For i6 = 65 To 66: For n = 32 To 126

 ActiveSheet.Unprotect Chr(i) & Chr(j) & Chr(k) & _
      Chr(l) & Chr(m) & Chr(i1) & Chr(i2) & Chr(i3) & _
      Chr(i4) & Chr(i5) & Chr(i6) & Chr(n)
  If ActiveSheet.ProtectContents = False Then
      MsgBox "One usable password is " & Chr(i) & Chr(j) & _
          Chr(k) & Chr(l) & Chr(m) & Chr(i1) & Chr(i2) & _
          Chr(i3) & Chr(i4) & Chr(i5) & Chr(i6) & Chr(n)
   ActiveWorkbook.Sheets(1).Select
   Range("a1").FormulaR1C1 = Chr(i) & Chr(j) & _
          Chr(k) & Chr(l) & Chr(m) & Chr(i1) & Chr(i2) & _
          Chr(i3) & Chr(i4) & Chr(i5) & Chr(i6) & Chr(n)
       Exit Sub
  End If
  Next: Next: Next: Next: Next: Next
  Next: Next: Next: Next: Next: Next

End Sub


Close the VB Editor window. Navigate to the worksheet you want to unprotect. Hit Tools-Macro-Macros and double-click PasswordBreaker in the list.

source: http://www.theofficeexperts.com/VBASamples/Excel02.htm

Scan fast multiple subnets to CSV files

I need multipe subnets scanned and need an outpu to a CSV file.

For this i will use a program called Softperfect Network Scanner. You candownload it from their website or download it here: [wpdm_file id=80]

First i’ll create an config file which has the settings i need:

I only need the ip, hostname and response time. So i will hide the MAC address from the View menu (Visible Columns). Also i do not need to scan a mac address and shared folders which are enabled by default. I will open the Program Options under the Options memu (or CTRL+K) and deselect the resolve MAC addresses under the Additional tab. Under the Shares tab i deslect the Scan for shared resources.

Now my config is like I want it, I need to save it to a xml file. I save the running config file to xml. Choose File, Current Config, Save to file and place it with the netscan.exe in a folder.

In the online manual you can read all other parameters to scan, but i use the simple command:

netscan /range:172.16.0.1-172.16.0.255 /auto:result.csv

This command will scan all devices within the 172.16.0.0/24 range and save it to a file called result.csv

VirtualBox – PXE does not work

During a WDS implementation the image stopt. After installing the VirtualBox 4.2.4 Oracle VM VirtualBox Extension Pack PXE ran fine and WDS could deploy images.

Download the extension pack from: https://www.virtualbox.org/wiki/Downloads

Make sure the machine which you are deploying has at least 512 MB of internal memory, otherwise the pxe boot will fail.

Windows 2012 – CLI

Activating Windows 2012 with powershell:

(or use sconfig)

slmgr.vbs –ipk <productkey>
slmgr.vbs –ato


Rename the sever:
  • Determine the current name of the server with the hostname or ipconfig command.
  • In Windows PowerShell, run Rename-Computer.
  • Restart the computer.


Installing GUI with powershell:

(or use sconfig)

Install-WindowsFeature Server-Gui-Shell, Server-Gui-Mgmt-Infra

An other option is to use dism

Dism /online /enable-feature /featurename:ServerCore-FullServer /featurename:Server-Gui-Shell /featurename:Server-Gui-Mgmt

If this fail, you need to mount the files.

1. Create a folder to mount WIM (mkdir c:\mountdir)

2. Check the index number needed for a server with GUI image (where d is the DVD drive)

dism /get-wiminfo /Wimfile: d:\sources\install.wim

We want to install the SERVERSTANDARD so the index number will be 2

3. Mount the WIM for Server Standard:

dism /mount-wim /wimfile: d:\sources\install.wim /Index:2 /mountdir:c:\mountdir /readonly

4. Start powershell and execute:

Install-WindowsFeature Server-Gui-Mgmt-Infra, Server-Gui-Shell –restart –source c:\mountdir\windows\winsxs

5. Restart the server


Remove the GUI with powershell:
Uninstall-WindowsFeature Server-Gui-Shell, Server-Gui-Mgmt-Infra


SCONFIG

Use SCONFIG to configure a lot of options (domain/Computername/updates/nic/…)


For other options to remove/install the GUI look at http://www.howtogeek.com/111967/how-to-turn-the-gui-off-and-on-in-windows-server-2012/

Configure a Server Core Server: http://technet.microsoft.com/en-us/library/jj592692.aspx#BKMK_1_5

Script – Get HP Serial Numbers

To get a list of HP Serial numers run the following Powershell script. Place the servernames/ipaddresses you want to check in the serverlist parameter.


#
# Get HP Serial Numbers from server text file
#
# Written by Bastiaan van Leeuwen
#
# Change $serverlist parameter to the right text file

$serverlist = "d:\script\servers.txt"
$username = Get-Credential domain\user

foreach($server in get-content $serverlist)
{
gwmi win32_systemenclosure -computer "$server" -credential $username –ErrorAction SilentlyContinue | 
select __SERVER,serialnumber
}


SCRIPT – Computer Inventory

The Computer Inventory Script enumerates Hardware, OS, System, Processor, Memory, Disk, and Network information and neatly organizes it in an Excel file. I’ve provided Version 2 of the script that allows you to choose a number of computer resources; all computers in the domain, all servers in the domain, computers from a list maintained in a text file, and the ability manually pick a computer. Version 2 of the PowerShell script also allows you to send credential information should you wish to logon the remote computer with an alternative user account. This is helpful for DMZ servers as well as stand alone servers that are not members of your domain.

source: http://www.powershellpro.com/why-i-no-longer-hate-writing-documentation/614/


[wpdm_file id=78]

Active Directory Users and Computers Saved Queries

source: http://myitforum.com/cs2/blogs/rcrumbaker/archive/2008/08/07/active-directory-users-and-computers-saved-queries.aspx

Right Click on Saved Queries and Choose New and then Query.

Name the Query accordingly and then click on Define Query…


Then Find the Custom Search and click on the Advanced tab.

Paste each of these in the <add criteria from above to this list> area and then click OK.


Locked Out Users

(&(&(&(&(objectCategory=person)(objectClass=user)(lockoutTime:1.2.840.113556.1.4.804:=4294967295)))))


Dial In Access

(&(&(&(&(objectCategory=person)(objectClass=user)(msNPAllowDialin=TRUE)))))


Disabled User Accounts

(&(objectCategory=person)(objectClass=user)(userAccountControl:1.2.840.113556.1.4.803:=2))


No Expiring Accounts

(&(objectCategory=person)(objectClass=user)(userAccountControl:1.2.840.113556.1.4.803:=65536))


Active Accounts

(&(&(objectCategory=person)(objectClass=user)(!userAccountControl:1.2.840.113556.1.4.803:=2)))


Hidden Mailboxes

(&(objectCategory=person)(objectClass=user)(msExchHideFromAddressLists=TRUE))


Windows 2000 SP4

(&(&(&(objectCategory=Computer)(operatingSystem=Windows 2000 Professional)(operatingSystemServicePack=Service Pack 4))))


Windows XP SP3

(&(&(&(&(&(&(&(objectCategory=Computer)(operatingSystem=Windows XP Professional)(operatingSystemServicePack=Service Pack 3))))))))


Vista SP1 Machines

(&(&(&(&(sAMAccountType=805306369)(objectCategory=computer)(operatingSystem=Windows Vista*)(operatingSystemServicePack=Service Pack 1)))))


All Workstations

(sAMAccountType=805306369)


2003 Servers Non-DCs

(&(&(&(samAccountType=805306369)(!(primaryGroupId=516)))(objectCategory=computer)(operatingSystem=Windows Server 2003*)))


2003 Servers – DCs

(&(&(&(samAccountType=805306369)(primaryGroupID=516)(objectCategory=computer)(operatingSystem=Windows Server 2003*))))


Server 2008

(&(&(&(&(samAccountType=805306369)(!(primaryGroupId=516)))(objectCategory=computer)(operatingSystem=Windows Server 2008*))))

View BSOD (blue screen) crash information stored in dump files

Description

BlueScreenView scans all your minidump files created during ‘blue screen of death’ crashes, and displays the information about all crashes in one table. For each crash, BlueScreenView displays the minidump filename, the date/time of the crash, the basic crash information displayed in the blue screen (Bug Check Code and 4 parameters), and the details of the driver or module that possibly caused the crash (filename, product name, file description, and file version).
For each crash displayed in the upper pane, you can view the details of the device drivers loaded during the crash in the lower pane. BlueScreenView also mark the drivers that their addresses found in the crash stack, so you can easily locate the suspected drivers that possibly caused the crash.

http://www.nirsoft.net/utils/blue_screen_view.html

[wpdm_file id=76]

How to Set or Change a Dell PowerEdge Service Tag

Source: http://lonesysadmin.net/2011/03/08/how-to-set-a-dell-poweredge-service-tag/


Got a Dell PowerEdge that you replaced the motherboard on, and now it doesn’t have a service tag? Reset it with the asset.com tool, which I’ve conveniently packaged as both a floppy disk image and an ISO for those of us in need. They both use the Windows 7 boot disk DOS and asset_A209.com from ftp.dell.com (renamed to asset.com).

[wpdm_file id=50]

[wpdm_file id=51]

Once you boot from these you can set the service tag with:

asset /s <service tag>

You can also set the asset tag with:

asset <asset tag>

Or clear the asset tag with:

asset /d