A nice article to install multiple ESX installations through PXE boot
Category Archives: Microsoft
How to Temporarily Disable Terminal Server Client Logons
To temporarily disable TS client logons use the command: “Change Logon /Disable”
VMware image customization in progress
To correct the issue I removed the sysprepDecryptor.exe registry entry from the session manger key.
Here is the location to delete the sysprepDecryptor.exe registry entry.
HKEY_LOCAL_MACHINE\SYSTEM\CurrentControlSet\Control\Session Manager\
Value name = BootExecute
Default Value = autocheck autochk *
How to restore your “Show Desktop” button.
Someone deleted the Show desktop button in the quick launch toolbar, here is the way to restore it:
- Create a new text file
- Put in the following content:
[Shell]
Command=2
IconFile=explorer.exe,3
[Taskbar]
Command=ToggleDesktop - Safe the file as: Show Desktop.scf
- Copy or move the file to your quick launch toolbar
Cannot open Microsoft Sites
Open the register editor and navigate to: HKEY_LOCAL_MACHINE\SYSTEM\CurrentControlSet\Services\Tcpip\Parameters\Interfaces\<AdapterID>
Add the following DWORD: MTU and set the Decimal setting to 1492.
After a restart the machine can reach Microsoft websites
Configure Automatic Updates in a Non–Active Directory Environment
To setup a WSUS server on a workgroup server, you need to alter the register.
You can find the register keys here: HKEY_LOCAL_MACHINE\Software\Policies\Microsoft\Windows\WindowsUpdate
AU register settings are in the key: HKEY_LOCAL_MACHINE\Software\Policies\Microsoft\Windows\WindowsUpdate\AU
For more information on keys you can follow the next link: http://technet.microsoft.com/en-us/library/cc708449(WS.10).aspx
With the command “wuauclt.exe /detectnow” you can let the WSUS server detect your machine faster.
Send the queued information directly to the wsus server with: “wuauclt /r /reportnow”
Use a USB key to install Windows 7
How to create a bootable USB key from which you can install Windows 7 on your system.
- Start diskpart on your machine (Start, run, diskpart)
- Then check which disk is your usb key with list disk
- Select your USB key with select disk 3 where “3” is your USB key
- Run Clean (this will wipe your usb key)
- Run Create partition primary to create a new primary partition
- Set the created partition to active with the command Active
- Format the partition as a Fat32 file system: Format fs=fat32 quick
- Assign a drive letter to your USB key for easy access from a explorer
- Copy the complete contents of the Windows 7 installation disk to you USB key (drag & drop)
Now you have a USB key with an installable windows 7 on it. It will install faster then a DVD and it’s easier to carry it with you. Another advantage is that you can install netbooks without dvd players from the USB key.
MsSQL 2005 Express connection problem
After installing an application, it could not access the local MsSQL 2005 Express Database. There was a message: Error : 40 – could not open a connection to SQL server.
After investigating that the tcp/ip protocol was enabled (http://support.microsoft.com/default.aspx?scid=kb;EN-US;914277) it appeared that the port 1433 needed to set up.
You can check the port by doing the following:
- Open SQL server 2005 Configuration Manager
- Select the Protocols for SQLexpress (beneath SQL Server 2005 Network Configuration)
- Select the properties of the tcp/ip protocol
- Tab IP Addresses
- Enter TCP port 1433
Restore a SQL Server database to a new server
Moving a database with Microsoft SQL Server Management Studio
We will begin by opening SQL Server Management Studio from the Start Menu by choosing Start and typing SQL Server in the Instant Search field (Figure A) The SQL Server Management Studio appears (Figure B) and it will be the main area you use to restore your backups.
Figure A
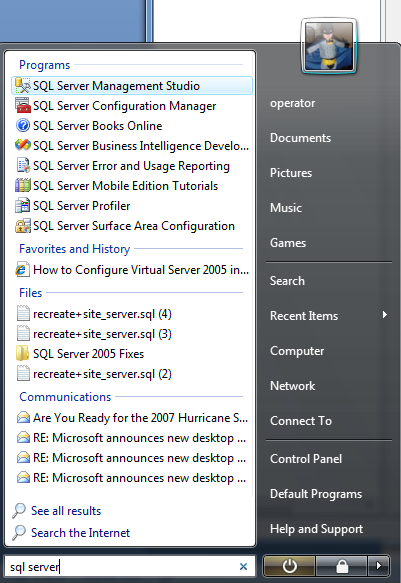
Search field
Figure B
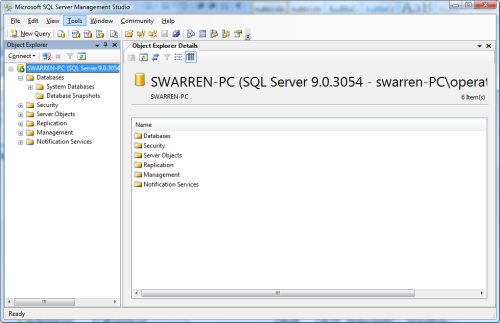
SQL Server Management Studio
Note: I am going to assume that you already know how to backup a SQL Server database and that you have placed the backups on a file server or copied the backups to the new server. We will continue the tutorial from this point.
Now that you have the Management Studio opened, right-click on Databases and choose Restore Database (Figure C).
Figure C
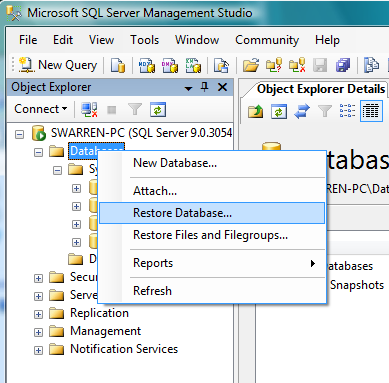
Restore Database
The Restore Database window appears and we will begin by typing the name of the Database we want to restore in the To Database field (Figure D) and choosing the From Device radio button to choose where your backup file is, shown in Figure E.
Figure D
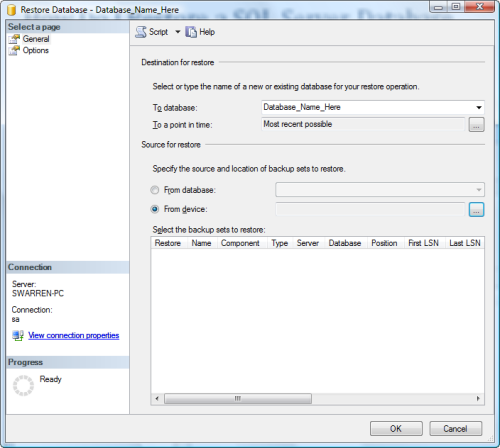
To Database
Figure E
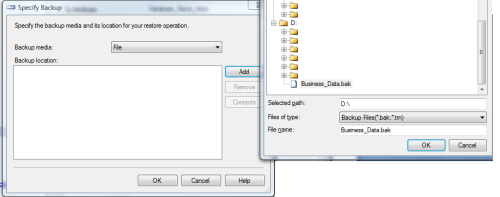
From Device
Your file now appears in the Select backups to restore text box. Place a check in the checkbox to continue as shown in Figure F.
Figure F
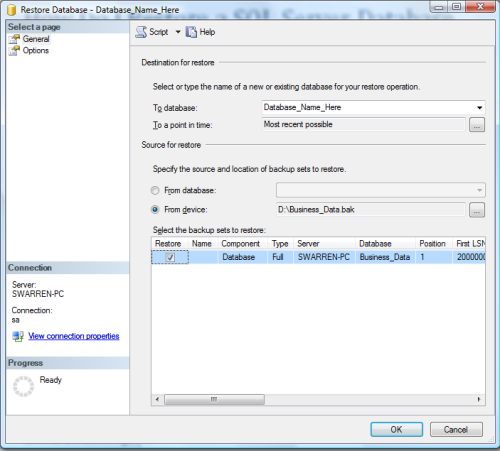
Select backups
You are now at the critical point of the restore where you choose Options from Select a Page. This is where you specify a new path for your database files. It is the same as the move option that will be discussed later in this tutorial. Simply type a new path to the database and log file (Figure G). For example, the current structure is the following:
C:\Program Files\Microsoft SQL Server\MSSQL.1\MSSQL\DATA\Database_Name_Here.mdfC:\Program Files\Microsoft SQL Server\MSSQL.1\MSSQL\DATA\Database_Name_Here_1.ldf
Figure G
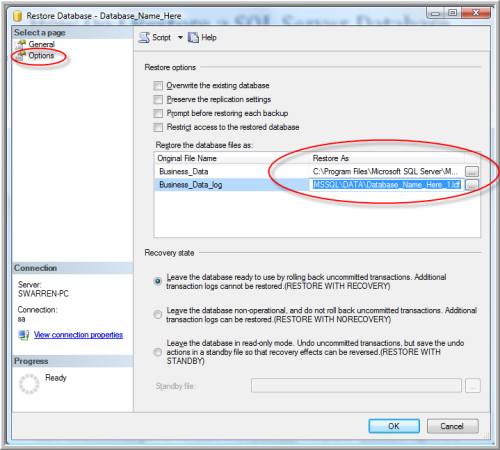
New path
We want to move these database files to a new path. Simply type the new path (Figure H). For purposes of this tutorial, we will move it to the following:
D:\ SQL\DATA\Database_Name_Here.mdfD:\SQL\Logs\Database_Name_Here_1.ldf
Figure H
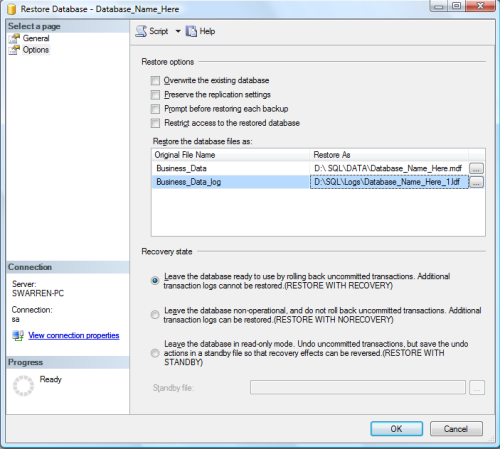
Move to path
You are now ready to click OK and let the database be restored (Figure I).
Figure I
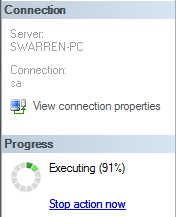
Progress
You have now successfully restored and moved the database files as shown in Figure J and Figure K.
Figure J
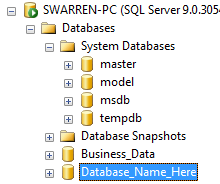
Restored
Figure K

Database moved
Show %computername% instead off “my computer” on the desktop
Locate the key [HKEY_CLASSES_ROOT\CLSID\{20D04FE0-3AEA-1069-A2D8-08002B30309D}
Rename the value named “LocalizedString” to “LocalizedString.old”. Create a new REG_EXPAND_SZ value named “LocalizedString”, and set the value to “%USERNAME% or %COMPUTERNAME%”.
Exit the registry editor, click on your desktop and press F5 (for refresh). The “My Computer” icon should now be rename to “Username on Computername”.
On Windows 2008 you do not have enough permissions to change the key. Take ownership of the key and you can change it.