At our client site we use IBM Tivoli Storage Manager, and it gives a few problems. To make sure the problems are not in a old client of the software, you can download the client software here
Monthly Archives: July 2009
Wrong preferred DNS server (BIND) with VPN client
When you are connected with VPN to your work network, some dns names are resolving to the wrong number. This is because you are using the wrong preferred dns.
When typing nslookup, you see that the used DNS server is the dns server from your networkcard and not the VPN dns server.
Look with ipconfig /all” for the name of your vpn network interface, then go to the following key in the register:
HKLM\SYSTEM\CURRENTCONTROLSET\SERVICES\TCPIP\LINKAGE\BIND
Make sure the name of your network interface is on top of the bind sequence. This should set your preferred DNS to your VPN DNS server.
Change all ESX root passwords
Another great script from Arnim van Lieshout.
With this script you can change all ESX root passwords at once:
#
# This script changes the root password on all ESX hosts in the esxservers.txt textfile
#

# Add VI-toolkit #
Add-PSsnapin VMware.VimAutomation.Core
Initialize-VIToolkitEnvironment.ps1# Get old root credential
$oldrootPassword = Read-Host “Enter old root password” -AsSecureString
$oldrootCredential = new-object -typename System.Management.Automation.PSCredential -argumentlist “root”,$oldrootPassword

# Get new root credential
$newrootPassword = Read-Host “Enter new root password” -AsSecureString
$newrootCredential = new-object -typename System.Management.Automation.PSCredential -argumentlist “root”,$newrootPassword
$newrootPassword2 = Read-Host “Retype new root password” -AsSecureString
$newrootCredential2 = new-object -typename System.Management.Automation.PSCredential -argumentlist “root”,$newrootPassword2

# Compare passwords
If ($newrootCredential.GetNetworkCredential().Password -ceq $newrootCredential2.GetNetworkCredential().Password) {

 # Create new root account object
 $rootaccount = New-Object VMware.Vim.HostPosixAccountSpec
 $rootaccount.id = “root”
 $rootaccount.password = $newrootCredential.GetNetworkCredential().Password
 $rootaccount.shellAccess = “/bin/bash”

 # Get list of Host servers from textfile to change root password on
 Get-Content esxservers.txt | %{
  Connect-VIServer $_ -User root -Password $oldrootCredential.GetNetworkCredential().Password -ErrorAction SilentlyContinue -ErrorVariable ConnectError | Out-Null
  If ($ConnectError -ne $Null) {
   Write-Host “ERROR: Failed to connect to ESX server:” $_
  }
  Else {
   $si = Get-View ServiceInstance
   $acctMgr = Get-View -Id $si.content.accountManager
   $acctMgr.UpdateUser($rootaccount)
   Write-Host “Root password successfully changed on” $_
      Disconnect-VIServer -Confirm:$False | Out-Null
  }
 }
}
Else {
Write-Host “ERROR: New root passwords do not match. Exiting…”
}
Example esxservers.txt:
esx001.yourdomain.local
esx002.yourdomain.local
esx003.yourdomain.local
esx004.yourdomain.local
Download: [wpdm_file id=9]
List all vm’s and total assigned diskspace
Looking for new scripts i’ve stumbled opon the following script to list all vm’s to an excel sheet and display the total assigned diskspace:
# Define Variables
$outputFile = 'C:\VMDiskCapacity.csv'
$VCServer = "vcenter.mydomain.com"
$username = "vcenter_admin"
$pass = "password"

##################
# Add VI-toolkit #
##################
Add-PSsnapin VMware.VimAutomation.Core
Initialize-VIToolkitEnvironment.ps1

# Connect server
$VC = Connect-VIServer -Server "$VCServer" -User "$username" -Password "$pass"

$myCol = @()    # Prepare output collection
$VMs = Get-VM | sort Name    # Get all VMs (sorted)
$counter = 0    # Initialize counter for progress bar
ForEach ($VM in $VMs)    # Loop through VMs
   {
   $counter++    # Increase counter for progress bar
   Write-Progress -Activity "Gathering disk information" -Status "Processing VM $VM" -PercentComplete (100*($counter/$VMs.count))    # Display progress bar

   $myObj = "" |
   select VM, TotalDiskSizeGB # Create output object
   $myObj.VM = $VM.Name    # Virtual Machine Name

   $TotalDiskSizeKB = 0
   ForEach ($DISK in $VM.HardDisks)    # Loop through VM's harddisks
      {
      $TotalDiskSizeKB += $DISK.CapacityKB
      }

   $myObj.TotalDiskSizeGB = [math]::Round(($TotalDiskSizeKB * 1KB / 1GB),0) #Disk Size in GB
   $myCol += $myObj    # Add output to collection
   }
$myCol | Export-Csv $outputFile -NoTypeInformation  # Export output to csv
VMotion error CPUID mismatch on same hardware
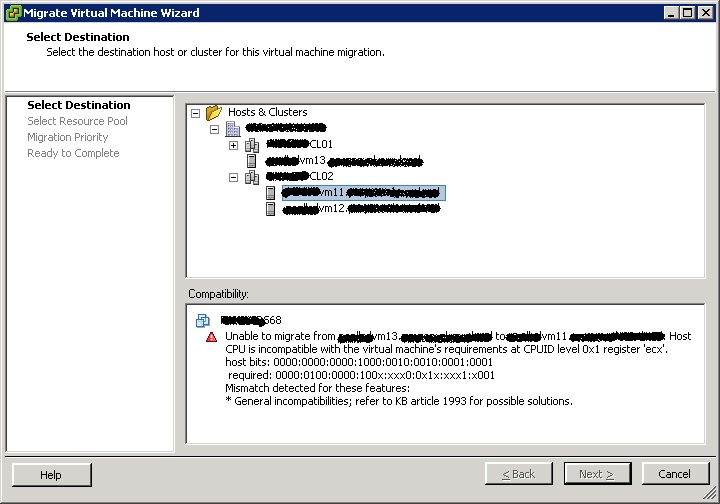
We recently acquired a new Dell PowerEdge for our VMware Cluster. Although the hardware was the same, we did get a vmotion error like this one:

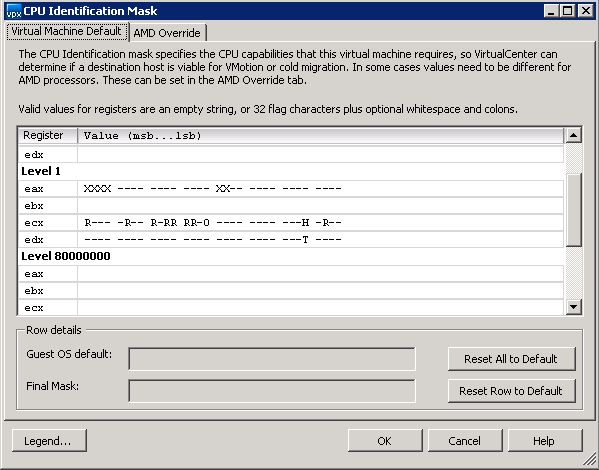
After investigating the problem, it looked like the virtual center server added maskid’s on it own to the virtual machines. After deleting this masks vmotion could occur without any problem. You can see themas settings in the following picture:

To remove the mask id, do the following:
- Shut down the virtual machine
- Edit the settings of the virtual machine
- Go to the options tab
- Click the CPUID Maks setting
- Click the Advanced Button
- Press Reset all to default
- Power on the virtual machine
After doing this, you should have no settings in this advanced page.
This happened on ESX 3.5 u2, an alternative for this solution is to upgrade to ESX 3.5 u4 and use EVC.
Login directly to the VI Client with credentials
If you want VIC to start and login directly to your virtual center environment, alter the shortcut and set the passthroughAuth option.
For example:
“C:\Program Files\VMware\Infrastructure\Virtual Infrastructure Client\Launcher\VpxClient.exe” -passthroughAuth -s <VC server>
VMPerfMon: Measure real usage within a VM
This tool shows you the actual perfomance the VM is using (while running itself within the VM) and also displays stats like how much Mhz the VM can access, etc.
[wpdm_file id=”8″]
For more information visit the following website: http://www.run-virtual.com/?p=130
ESXi 4 on a bootable USB key
- Download ESXi 4.o VMware-VMvisor-Installer-4.0.0-164009.x86_64.iso
- Open image.tgz
- Open image.tgz\usr\lib\vmware\installer\VMware-VMvisor-big-164009-x86_64.dd.bz2
- Extract VMware-VMvisor-big-164009-x86_64.dd to your local hardrive
- Attach the USB flash drive and make sure you no longer need the data on it
- Use WinImage to transfer VMware-VMvisor-big-164009-x86_64.dd to the USB flash drive
- Disk->Restore Virtual Hard Disk image on physical drive…
- Select the USB flash drive (Warning: If you select the wrong disk you will lose data!)
- Select the image file VMware-VMvisor-big-164009-x86_64.dd
- Confirm the warning message
- Wait for the transfer to complete
- Unplug the USB flash drive (Warning: If you forget to unplug the flash drive from the PC you might lose the data on your hard drives the next time you boot!)
- Attach the USB flash drive to the machine you want to boot (Warning: If ESX Server 4i recognizes local drives, you might lose the data on it, so make sure you don´t need it anymore or unplug all hard drives!)
- Turn the machine on and make sure the USB flash drive is selected as boot device
- Watch ESX Server 4i boot
- Configure
- Enjoy!
WinSCP
WinSCP is an open source free SFTP client and FTP client for Windows. Legacy SCP protocol is also supported. Its main function is safe copying of files between a local and a remote computer.
For more information or download, visit the following url: http://winscp.net/eng/docs/introduction
Disable Debug Mode in Workstation 7.0 Experimental
When installing workstation 7 experimental (e.x.p build-169612), all virtuals will run in debug mode. When starting virtal machine’s, the following message appears:
When looking at the debug options, you can not disable it. Offcourse this is necessary for VMware to troubleshoot their experimental build, but your virtuals will slow down a little bit.
To turn off the debugging mode you can do the following (stop vmware workstation):
- Go to your installation path (normally C:\Program Files\VMware\VMware Workstation)
- Rename vmware-vmx-debug.exe to vmware-vmx-debug.old
- Copy vmware-vmx.exe to vmware-vmx-debug.exe
If you start a virtual machine now, the message is gone and debugging is off.