List all vm’s and total assigned diskspace

Looking for new scripts i’ve stumbled opon the following script to list all vm’s to an excel sheet and display the total assigned diskspace:

# Define Variables 
$outputFile = 'C:\VMDiskCapacity.csv' 
$VCServer = "vcenter.mydomain.com" 
$username = "vcenter_admin" 
$pass = "password" 

################## 
# Add VI-toolkit # 
################## 
Add-PSsnapin VMware.VimAutomation.Core 
Initialize-VIToolkitEnvironment.ps1 

# Connect server 
$VC = Connect-VIServer -Server "$VCServer" -User "$username" -Password "$pass" 

$myCol = @()    # Prepare output collection 
$VMs = Get-VM | sort Name    # Get all VMs (sorted) 
$counter = 0    # Initialize counter for progress bar 
ForEach ($VM in $VMs)    # Loop through VMs 
   { 
   $counter++    # Increase counter for progress bar 
   Write-Progress -Activity "Gathering disk information" -Status "Processing VM $VM" -PercentComplete (100*($counter/$VMs.count))    # Display progress bar 
    
   $myObj = "" | 
   select VM, TotalDiskSizeGB # Create output object 
   $myObj.VM = $VM.Name    # Virtual Machine Name 
    
   $TotalDiskSizeKB = 0 
   ForEach ($DISK in $VM.HardDisks)    # Loop through VM's harddisks 
      { 
      $TotalDiskSizeKB += $DISK.CapacityKB    
      } 
    
   $myObj.TotalDiskSizeGB = [math]::Round(($TotalDiskSizeKB * 1KB / 1GB),0) #Disk Size in GB 
   $myCol += $myObj    # Add output to collection 
   } 
$myCol | Export-Csv $outputFile -NoTypeInformation  # Export output to csv 
VMotion error CPUID mismatch on same hardware

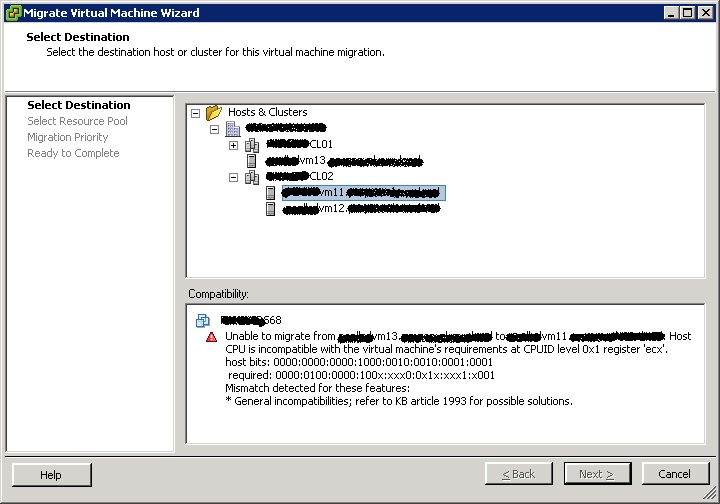
We recently acquired a new Dell PowerEdge for our VMware Cluster. Although the hardware was the same, we did get a vmotion error like this one:

vmotion error

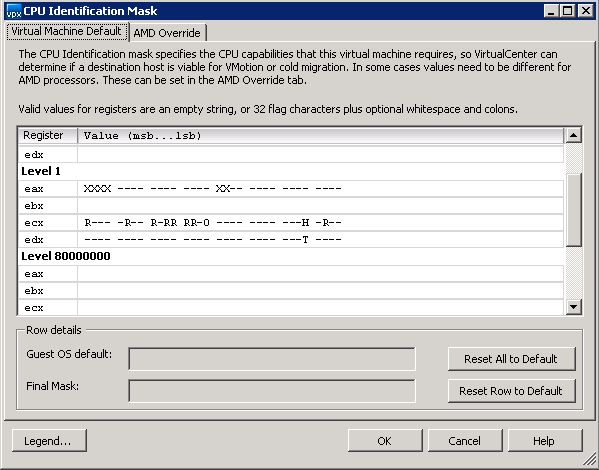
After investigating the problem, it looked like the virtual center server added maskid’s on it own to the virtual machines. After deleting this masks vmotion could occur without any problem. You can see themas settings in the following picture:

CPUID

To remove the mask id, do the following:

  • Shut down the virtual machine
  • Edit the settings of the virtual machine
  • Go to the options tab
  • Click the CPUID Maks setting
  • Click the Advanced Button
  • Press Reset all to default
  • Power on the virtual machine

After doing this, you should have no settings in this advanced page.

This happened on ESX 3.5 u2, an alternative for this solution is to upgrade to ESX 3.5 u4 and use EVC.

ESXi 4 on a bootable USB key

  1. Download ESXi 4.o VMware-VMvisor-Installer-4.0.0-164009.x86_64.iso
  2. Open image.tgz
  3. Open image.tgz\usr\lib\vmware\installer\VMware-VMvisor-big-164009-x86_64.dd.bz2
  4. Extract VMware-VMvisor-big-164009-x86_64.dd to your local hardrive
  5. Attach the USB flash drive and make sure you no longer need the data on it
  6. Use WinImage to transfer VMware-VMvisor-big-164009-x86_64.dd to the USB flash drive
    1. Disk->Restore Virtual Hard Disk image on physical drive…
    2. Select the USB flash drive (Warning: If you select the wrong disk you will lose data!)
    3. Select the image file VMware-VMvisor-big-164009-x86_64.dd
    4. Confirm the warning message
    5. Wait for the transfer to complete
  7. Unplug the USB flash drive (Warning: If you forget to unplug the flash drive from the PC you might lose the data on your hard drives the next time you boot!)
  8. Attach the USB flash drive to the machine you want to boot (Warning: If ESX Server 4i recognizes local drives, you might lose the data on it, so make sure you don´t need it anymore or unplug all hard drives!)
  9. Turn the machine on and make sure the USB flash drive is selected as boot device
  10. Watch ESX Server 4i boot
  11. Configure
  12. Enjoy!

Running PowerShel Scripts to generate ESX Reports

In my previous post i have written about a script that gave an output of the datastore usage of your esx hosts. For this you need to run a powershell script against your virtual center server.

Before you can run this script you have a few requirement, this requirements are:

After installing the Microsoft PowerShell and VI Toolkit for Windows you have to place your scripts in the script directory (c:\program files\vmware\infrastructure\vitoolkitforwindows\scripts)

Check your rights, it should be unrestricted: “powershell get-executionpolicy”.
If your result is: “Restricted”, type in the following command: “powershell set-executionpolicy unrestricted”

Now you can run your scripts by starting the “VMware VI Toolkit (for windows)”, this option can be found under start > programs > vmware > vmware vi toolkit

Changing the IP address, default gateway, and hostname of the Service Console in ESX 3.0.x

This article provides steps to change the Service Console IP address, gateway address, and hostname on an ESX 3.x host.

Changing settings from the physical or remote console connection
 
Changing the IP for the Service Console must be done from the physical console or through a remote console session. If you make changes through a network connection such as SSH, network connectivity to the Service Console disconnects because the Service Console’s network interface changes.  
  1. Run the following command to set the IP address:

    [root@server root]# esxcfg-vswif -i <a.b.c.d> -n <w.x.y.z> vswif0, where <a.b.c.d> is the IP address and <w.x.y.z> is the subnet mask

    Note: In this example, vswif0 is the Service Console adapter that is the interface to which you are applying the IP address change.

  2. Open the /etc/hosts file with a text editor and modify it so that it reflects the correct IP address and hostname. 
  3. To change the default gateway address and the hostname, edit the /etc/sysconfig/network file and change the GATEWAY and HOSTNAME parameters to the proper values. 
  4. For the changes to take place, reboot the host or restart the network service with the command: 

    [root@server root]# service network restart 

    Note: This command breaks any current network connections to the Service Console. 

Changing the hostname without rebooting

To dynamically change the hostname, run the command: 
 
[root@server root]# hostname newname

Note: This command creates a temporary hostname change. This change is lost when the system is rebooted.

 
Changing the DNS server settings
 
To change the DNS server settings, update the nameserver IPs and search domain the /etc/resolv.conf file.
 
Changing settings in VMware Infrastructure Client
 
To change the hostname, domain, DNS servers, and default gateway in VMware Infrastructure (VI) Client: 
  1. Highlight the ESX host and click the Configuration tab.
  2. Click DNS and Routing.
  3. Click Properties.
  4. To change the hostname, domain, and DNS servers, click the DNS Configuration tab and enter the appropriate values.

    Note: Disable VMware High Availability if you do not want virtual machines to failover during the hostname IP change.

  5. To change the default gateway, click the Routing tab and enter the appropriate value.
  6. Update the etc/opt/vmware/vpxa/vpxa.cfg file to reflect the new settings.
  7. Reboot the ESX host for the changes to take place. 

VMware KB Article: 4309499